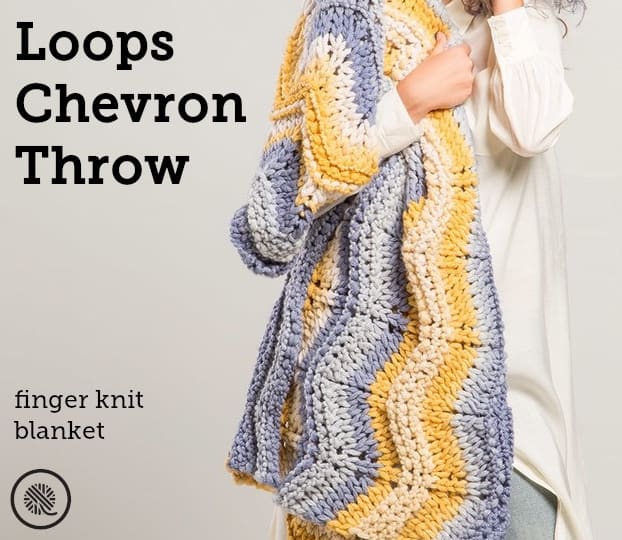
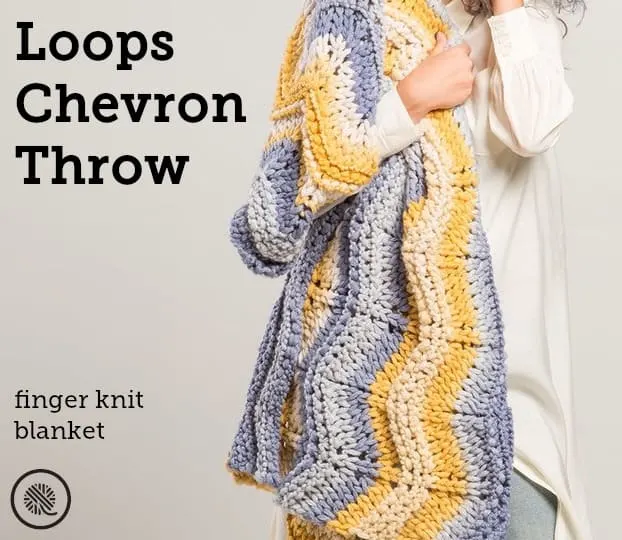
Finger knitting is a handy way to make a simple project on the go with no needles or tools. With the introduction of loop yarn earlier this year finger knit projects changed from simple to spectacular. Thanks to Michaels and their Loops yarn you can even make a finger knit chevron blanket! Scroll down to the bottom of the post for the full tutorial video.
The free Zig Zag Throw pattern (used with permission from Michaels) uses increases and decreases to create the telltale design. Yes! You can work more than just knit and purl stitches with loop yarn. Seriously, this is a game changer. A simple color change to add contrast and BAM in no time you have a beautiful blanket.
Adding some special stitches like an increase, loop decrease right and loop decrease left you can add some shaping to your knits. You don’t even need to know how to work these stitches on needles to be able to knit this throw.
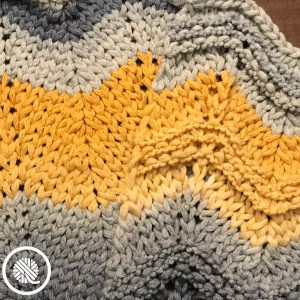
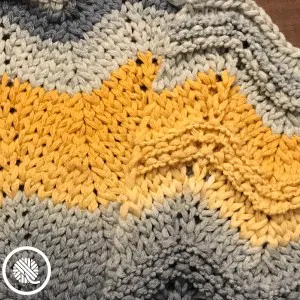
The video below show two different versions of this pattern. First, I’ll show you the Zig Zag Throw pattern exactly as written. Then I’ll show you a simpler version that just uses knit stitches (that’s the smooth one in the picture above) and also has a beautiful chained edge.
PIN THE Loops Zig Zag Throw!
The Zig Zag Throw pattern looks like it has knit and purl stitches, but they made it even easier by adding a twist. As a rule you don’t turn your work when knitting with loop yarn. That means you are always working on the front of your project. But by knitting some rows on the front and turning your work and knitting other rows on the back your blanket will have the texture of knits and purls.
Finger Knit Chevron Blanket Patterns
Get the free Zig Zag Throw pattern here from Michaels!
I also created my own version below, I guess you could say it’s without the twist since you work the entire project on the front side. You never need to turn your work. The other feature I added is a chained edge that matches the bind off. Come on, don’t we all want the cast on and bind off edge to look the same? Of course we do!
MATERIALS
Loops & Threads Loops yarn (3.5 oz.)
5 balls Color A – Mustard
5 balls Color B – Hopi Corn
Measuring tape
Stitch marker
Scissors
GAUGE
5½ sts x 6 rows = 4″ [10 cm] measured flat (Each 13-loop chevron = 7″ [18 cm] wide)
SKILL LEVEL Easy
MEASUREMENTS 42” x 58” [107 cm x 147 cm]
ABBREVIATIONS
LK = Loop Knit With working yarn in back, pull the working loop through next project loop from back to front.
LP = Loop Purl. With working yarn in front (on top of project), push working loop through next project loop from front to back.
LDR (Loop Decrease Right) = Stack the next 2 loops on your project together with the 2nd loop in front of the 1st loop. Reach through both these loops, front to back, then grab the next loop on your yarn and pull it through.
LDL (Loop Decrease Left) = Stack the next 2 loops on your project together with the 1st loop in front of the 2nd loop, reach through both these loops, front to back, then grab the next loop on your yarn and pull it through.
Increase = Increase by skipping the next loop on your yarn and working the next LK or LP with the following loop. On the next row work this skipped loop as directed.
Rep = Repeat
WL = Working Loop; The next loop on your working yarn coming from the ball.
INSTRUCTIONS
With Color A, cut the first 2 loops to allow for a tail to weave in. Count 78 loops for your chained edge* and place marker. Count out 78 more loops for first row..
Chevron Repeat:
Row 1: Work across the 78 loops, as follows, from right to left, *LDR over the next 2 loops, LK in each of the next 4 loops, increase 1 loop, LK in next loop, increase 1 loop, LK in each of the next 4 loops, LDL over the next 2 loops; rep from * across row, do not turn.
Row 2: Working from left to right, LK in each loop across, being careful to include the increase loops. Do not turn.
Rep Rows 1 and 2 three more times, then rep Row 1 once more.
Cut A, leaving 1 loop to use when changing colors. Join B.
With B, repeat Rows 2. Rep Rows 1-2 four times.
Cut B, leaving 1 loop to use when changing colors. Join A.
Work the complete Chevron Repeat 3 more times.
Finishing:
Bind Off: Starting at the opposite end of the row as the working yarn, reach through the first loop and grab the second loop, pull it through the first loop, *reach through the loop you just pulled through, grab the next loop, pull this loop through the last loop; repeat from * across until only one loop remains. Cut yarn next to last loop. Use a sewing needle and thread to secure last loop.
*Chained Cast On Edge: Go back to the long tail on your cast on edge and from the back push the loop right at the corner through the end stitch. Take the next loop on the tail and from the back push it in between the next stitch. Repeat this with the remaining loops. Then beginning back at the other end of the row repeat the bind off steps and weave in your tail.
Pin the Finger Knit Chevron Blanket!
![]()
![]()
See the full tutorial for the Zig Zag Throw below:
For more loop yarn projects check out these patterns:
Angela
Saturday 19th of October 2019
Hi! Love this pattern and your explanation is really easy to follow. I did purchase 5 skeins of the two colors I am using. I also started this project by counting off 78 loops. However, I have already run out of my first color by row 4. What do I do?
Tammy Johns
Saturday 23rd of March 2019
I am always looking for new patterns for loop yarn. Thank you for your patterns. Tammy
Tammy Johns
Saturday 23rd of March 2019
I am always looking for new patterns for loop yarn. Thank you for your patterns. Tammy