
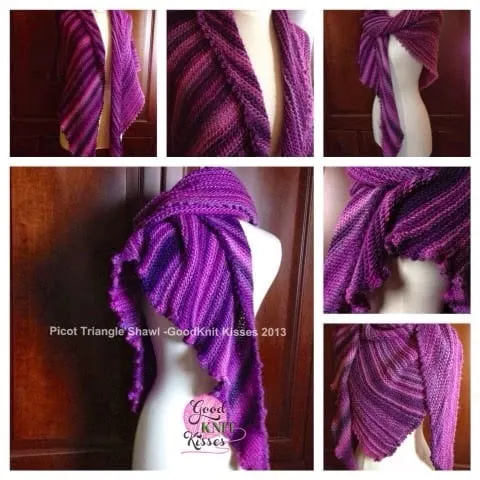
The Picot Triangle Shawl is a shawl knit on the bias in garter stitch. Cast on with or without picots, add along the side as you go and bind off with or without for a versatile pattern.
Picot Triangle Shawl
by Kristen Mangus
GoodKnit Kisses
June 27, 2013
EDITED September 2018; SEE NOTES AT BOTTOM First!
Stitch gauge:
Loom:
Yarn:
Abbreviations:
Cast on:
Picot CO 165 pegs. (starting on left working to right if right handed, Place removable Stich Marker on peg 1) http://youtu.be/MdtQZm9wUE0
Begin Picot Bind Off*.
Cable CO Notes.
Non-Picot shawl option:
Kristen Copyright 2013, 2014 GoodKnit Kisses, Kristen Mangus. Picot Triangle Shawl Pattern is for personal use only. Do not reproduce pattern in part or whole as written. Items may be made for personal use. Contact Kristen Mangus if you are a crafter selling individually and Kristen will give permission. kristen@goodknitkisses.com
The Picot shawl is created on the bias so it is not a regular triangle. You need to know a few basic things before I map this out below with timestamps jumping back and forth to clear up confusion from the main video instructions (and see linked pattern in description too please). The picots are along the cast on edge, then created every other row for the side edge which actually builds in twice as many on this edge, then the 3rd edge is forms during the bind off stage.
1. The main pattern works a purl row from right to left and a knit row of e-wrap knit from left to right (as shown in pattern. If you want to make with opposite hand feel free but instructions here reflect as in video).
2. The pattern uses a “short row method” that keeps repeating over and over and you purl and e-wrap less pegs each row later. One peg will get a holding stitch on it and a garter ridge gets made (a row of knits followed by a row of purls). So when you get back to this holding peg (HS or half stitch) you don’t do anything to it at all and make a new holding peg by wrapping with the HS and starting the garter ridge process again. The following steps will walk you through the main pattern after casting on to the 165th peg.
3. All of the main cast on slowly progresses right to left in casting on a picot onto every other peg. Cast on first picot only 00:04:25 , Bind off 2 00:05:15 , Completed 1st picot and Cable cast on 4 for standard picot style 00:06:10 to 00:07:58. Bind off 2 00:07:58 to 00:08:42. Repeat steps from min 00:06:10 to 00:09:44 until final picot at 165.
4. Once the 165th peg has a picot you are ready to begin “Row 1”
5. Row 1: Slip (do not work) this beginning peg (peg 165). Purl all remaining pegs; including peg 1. Timestamp 00:17:59 to 00:18:20 STOP VIDEO and go to step 6.
6. Row 2: Make a HS (Half Stitch) onto peg 1. This moves the working yarn around the back left of peg 1 and around to the front of peg 1 to the right. Now move yarn to the back and you are in position to begin e-wrap knitting the remaining pegs to peg 165. (See timestamp 00:18:20 until 00:18:31 to see how it is done. STOP VIDEO and go to step 7; the video is showing the demo much father down after several repeats of rows 1 & 2 have been made with the short row method you are about to start working.)
7. Continuing Row 2: E-wrap knit all remaining pegs after the HS (Half Stitch). Timestamp 00:18:31 to 00:18:50 STOP VIDEO. In the video I show leaving the e-wrap in place without working the stitch (lifting up and over) so then I work that stitch right before I purl an individual stitch on the next row as a shortcut tie saver (I’ve shown the shortcut in another video before). E-wrap all stitches until peg 1 and knit over peg 1. STOP. do NOT purl yet. Go to step 8.
8. MAKE an edge PICOT at the end of Row 2 (side is the side edge of your triangle: Now jump to Timestamp 00:09:49 to 00:14:20 to see this: Cable CO (Cast on) 3, BO (Bind off) 3 to form picot. STOP when picot is made and go to step 9.
[I like to have 3 st markers on pegs 166-168 to show where picots need to be added on even numbered rows. For less picots on edging only, add picots every 4th row. As the pattern reads, this edge will be fuller than the cast on picots to give it a ruffled look when draped.]
9. Repeat Row 1: Slip peg 1 and purl all remaining stitches until the peg before the last HS. SO you lift up and over to knit off the previous E-wrap Knit (EWK) and Purl that same peg. Then do the next one until you get to the HS and STOP.
10. Repeat Row 2: Use steps 6-8 to form row 2. The rows will get faster and faster forming your “short rows” until your last HS is at peg 164. “Repeat Rows 1 & 2 until last HS is at peg 164 & ending on row Row 2. This row will be HS 1, EW 1.”
11. See Timestamp 00:18:50 for the rest of the way on the pattern.
Sharvari
Tuesday 5th of April 2022
Can this be done on kb 1/2 inch loom The flexee one?
Lillian
Wednesday 11th of April 2018
I love everything u do
Lillian
Wednesday 11th of April 2018
I love everything u do