Inside: Learn to make this crochet boho inspired crossbody bag. Free pattern includes written instructions, seaming diagrams and tutorial videos.
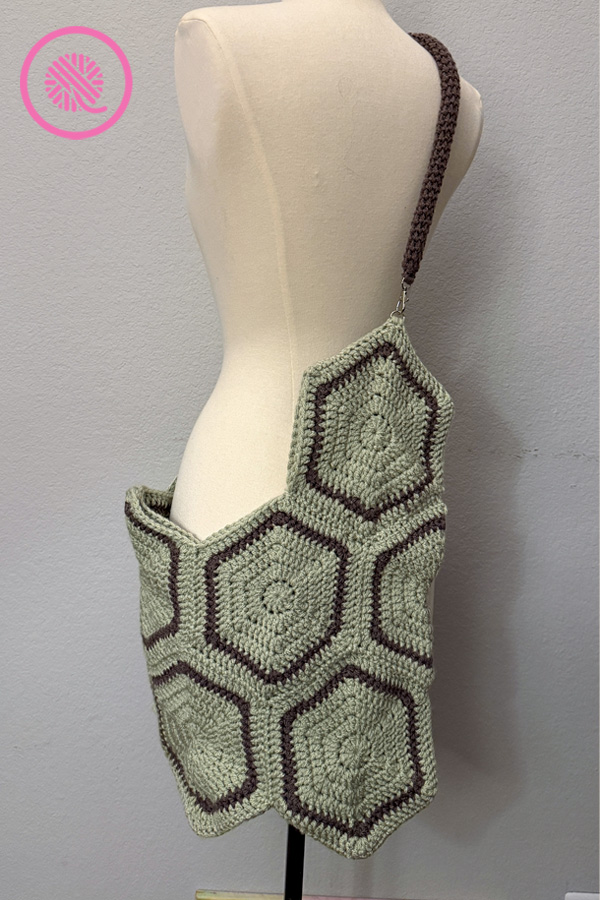
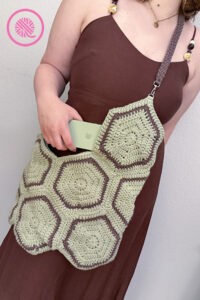
My crochet Hexagon Crossbody Bag is an oversized, asymmetrical purse with boho vibes. It’s sturdy, soft design makes it ideal for long days out shopping or at the beach. I also included an optional cell phone pocket at the top. This pattern uses 15 crocheted hexagons using bulky weight yarn in 2 colors. The spiral strap with swivel hooks and D rings makes a strong, secure way to carry your bag.
Pattern includes written instructions, detailed diagrams for assembly and seaming, and links to fully captioned tutorial videos demonstrating the pattern.
Crochet Hexagon Crossbody Bag
By Kristen Mangus
An ad-free downloadable PDF of this pattern is available for purchase in my GoodKnit Kisses online store, Etsy or Ravelry at the links below:


MATERIALS
(Materials list may contain affiliate links to products I used to make this project. Using these links costs you nothing, but helps support GKK.)
Yarn
Bulky (#5) weight yarn in 2 colors
Yarn Bee Soft & Sleek Chunky (142 g/ 5 oz, 193 m/211 yds) used in sample.
Contrast A – Color Sage
Contrast B – Color Dark Grey
Hook
US Size J (6 mm) hook
Furls Odyssey II hook in Black & Nickel used in sample.
Notions
Tapestry needle for weaving in ends and seaming
30 locking stitch markers for assembly
2 – ½” Swivel Snap Hooks with D rings
ABBREVIATIONS
Beg = Beginning
Ch = Chain
Dc = Double crochet
Edc = Extended double crochet
Hdc = Half double crochet
INC = Increase
Rnd = round
Sl = slipped stitch
St(s) = Stitch(es)
Tr = Treble crochet
YO = Yarnover
If you need a refresher, be sure to check out my How to Crochet series!
GAUGE 7 sts x 3 rows in 2” (10 cm) in double crochet stitch
MEASUREMENT
SKILL LEVEL Easy
NOTES
Resizing: You can make this pattern using any size hexagon.
This bag is unlined and doesn’t have closures, but you can easily add those if you prefer them. It can accommodate a zipper, magnetic closures, snaps or buttons. I do not recommend using velcro with yarn.
Crochet Boho Inspired Crossbody Bag
Part 1: Crochet the Hexagons
NOTES
This design uses the magic circle to begin. The video tutorial shows how to make a magic circle. The entire pattern is worked in the round on the Right Side without turning your work.
The hexagon can be made larger by adding rounds until it reaches the desired size. Changing hook sizes up or down a .5 mm will change finished size about 1/2 inch.
The accent stripe is slightly smaller than other rounds, however it can be worked in double crochet as other rounds if desired.
Corners are made in treble crochet to prevent gaps. On the last round, the treble is substituted for an extended double crochet to prevent curling as a treble can be too tall on that round. If you prefer, you may substitute Edc for Tr throughout the pattern.
Extended double crochet – Yarnover, insert hook in dc of prev rnd and draw up a loop, YO and draw through ONE LOOP ONLY on hook; finish remaining as regular dc – YO and draw through 2 loops on hook, YO and draw 2 loops remaining on hook.
INSTRUCTIONS
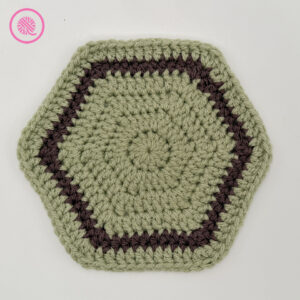
Make 15 hexagons.
With contrast A, make a magic circle.
Rnd. 1: Ch 2. Dc 12 in magic circle. Sl to join into beg dc. (12 dc).
Gently tug beginning yarn tail to close magic circle.
NOTE: Chain does NOT count as a stitch in any round.
Rnd. 2: Ch 2. *Dc 1, tr 1, dc 1 into first st (makes corner), Dc INC (Dc twice in same st). Repeat from * 5 times. Sl to join into beg dc. (30 sts – 6 corners made).
Rnd. 3: Ch 2. Dc into first dc. *Dc 1, tr 1, dc 1 into next tr, Dc 4. Repeat from * 4 times. Next Dc 1, tr 1, dc 1 into next tr (makes 6th corner), Dc 3. Sl to join into beg dc. (42 sts).
Rnd. 4: Ch 2. Dc 2 into next 2 dc. *Dc 1, tr 1, dc 1 into next tr, Dc 6. Repeat from * 4 times. Next Dc 1, tr 1, dc 1 into next tr (last corner), Dc 4. Sl to join into beg dc. (54 sts).
Rnd 5: With contrast B, ch 1. Hdc 3 into next 3dc. *Hdc 1, dc 1, hdc 1 into next tr, hdc 8. Repeat from * 4 times. Next Dc 1, tr 1, dc 1 into next tr (last corner), Hdc 5. Sl to join into beg dc. (66 sts).
Rnd 6: With contrast A, ch 2. Dc 4 into next 4 hdc. *Dc 1, edc 1, dc 1 into next dc, Dc 10. Repeat from * 4 times. Next Dc 1, edc 1, dc 1 into next tr (makes 6th corner), Dc 6. Sl to join into beg dc. (78 sts).
Fasten off. Weave in ending tail. At magic circle, pull tail to tighten, and weave tail into center.
Part 1: Crochet the Hexagons Tutorial Videos
Select videos are available to GoodKnit Kisses YouTube members only. To get exclusive access to GKK VIP-only content, free PDF patterns, weekly Zoom meetup and more, sign in to YouTube and join as a VIP Member today! Find out more about GKK Membership HERE!
Right handed
Left handed
Crochet Boho Inspired Crossbody Bag
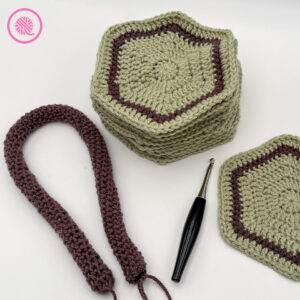
Part 2: Spiral Strap
This strap is sturdy and strong. I’m very tall so I made a long strap. If you are average or petite you will want to make your i-cords about 6” shorter.
NOTES
The spiral handle is worked in the round without slipping to join at the end of each round.
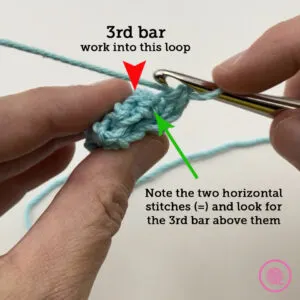
You work into the third bar of the stitch (see picture) which causes the top edge of your work to roll inward. Be sure to watch the tutorial video below to get a clear picture of which stitch to crochet into.

Note: You must keep your tension loose when working the handle. If your tension is too tight it will be difficult to work in the third bar.
Measuring – Hold tape measure at beginning of your handle and stretch handle as far as you can. This mimics the weight on the bag as you wear it on your shoulder. Check measurement to see if you’ve reached your desired length. If it’s too long, pull out a few rounds and remeasure. NOTE: For my project, the handle length was perfect at 22”. This stretched to 31” once I attached it to my bag.
INSTRUCTIONS
Make 1
With contrast B, start with a magic circle leaving a long tail for sewing.
Rnd. 1: Sc 8 times in magic circle. (8 sc)
Gently tug beginning yarn tail to close magic circle. NOTE: Do NOT join.
Rnd 2: *Sc in back loop only. Rep from * to end of rnd.
Rnd 3: Look at the two horizontal/parallel lines, and note the loop coming out the top. This is the third bar of the stitch. Sc in this bar. *Sc in next bar. Rep from * to end of rnd.
Rep Rnd 3 until the handle measures 22” (56 cm) before stretching it out or to desired length; I stretched to 31” (78.7 cm)and stopped. Rope will be a continuous spiral and stretchy.
Cut leaving a long tail for sewing. Using tapestry needle, weave tail through next 8 sts and pull through to tighten. Make a knot to fasten off. At magic circle, pull tail to tighten and make a knot to fasten off.
Finishing:
Sew swivel snap hooks to each end of the spiral strap.
Part 3 – Spiral Strap Tutorial Videos
NOTE: This video demonstrates the strap using worsted weight yarn and a smaller hook size. Use the hook size recommended in this pattern with bulky weight yarn.
Right handed
Left handed
Crochet Boho Inspired Crossbody Bag
Part 3: Assembly & Seaming
INSTRUCTIONS
Layout:
- Arrange the 15 hexagons according to the diagram below. You have 2 hexagons in the center of the first row, 7 hexagons in the second row and 6 in the third row.
- Use locking stitch markers to attach all corners where the hexagons meet.
- Fold bag in half with wrong sides together and Hexagons 1-8 showing on top.
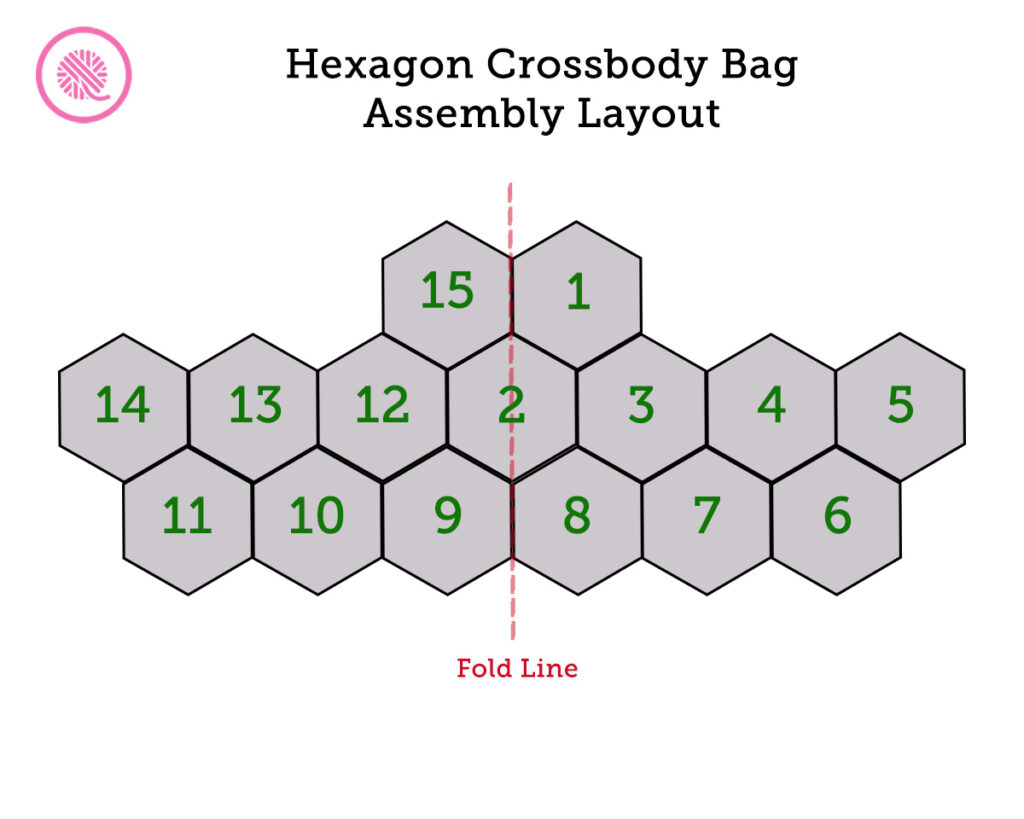
All instructions below reference the hexagons by their number in the diagrams.
Seaming:
NOTES:
You need enough yarn to measure 3 times the length of each seam.
The seams use the whip stitch to create a strong join.
Diagrams are shown for each seam you will need to sew.
When seaming the sides and bottom you will sew through both layers of hexagons to create a secure edge. I also recommend putting in an extra stitch along the outer corners where two hexagons meet to add extra stability.
The other seams join the edges between the hexagons on the front and the back. Pay close attention to the seaming instructions since you will have to turn the bag over to continue some seams.

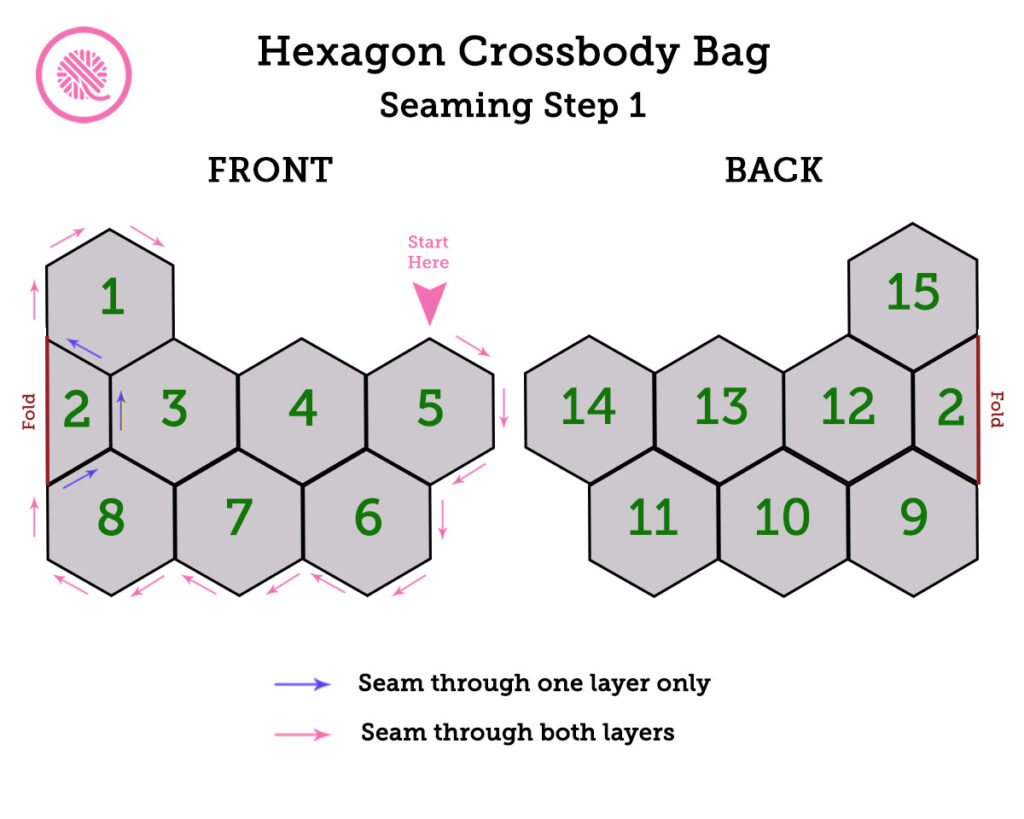
Seam 1 (outer edges):
- Sew outside edge through both layers. Begin at the top point of Hexagon #5 and seam around the outer 3 sides of #5. Continue seaming around the outer edges of Hexagons 6, 7, and 8 stopping when you reach the corner of #8 and #2.
- Sew through top layer only. Sew Hexagons 8 and 2 along their edges. Continue seaming up along the edges of #2 and #3 followed by the edges of #1 and #2.
- Sew outside edge through both layers. Sew 3 sides of Hexagon #1.
- Cut yarn leaving a 6 inch yarn tail.
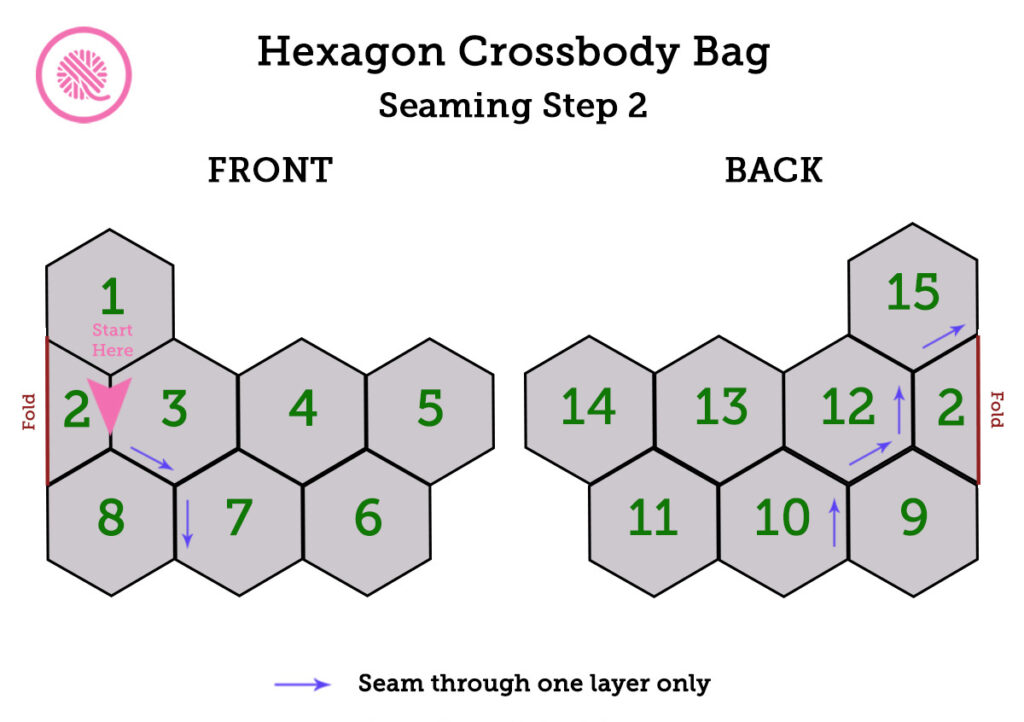
Seam 2:
- FRONT: Begin at the corner where Hexagons 2, 3, and 8 meet. Sew the edges of #3 and #8 followed by #7 and #8. TURN bag over.
- BACK: Sew the edges of #9 and #10, then #9 and #12. Continue with the edge of #2 and #12 and finish with the seam between #2 and #15.
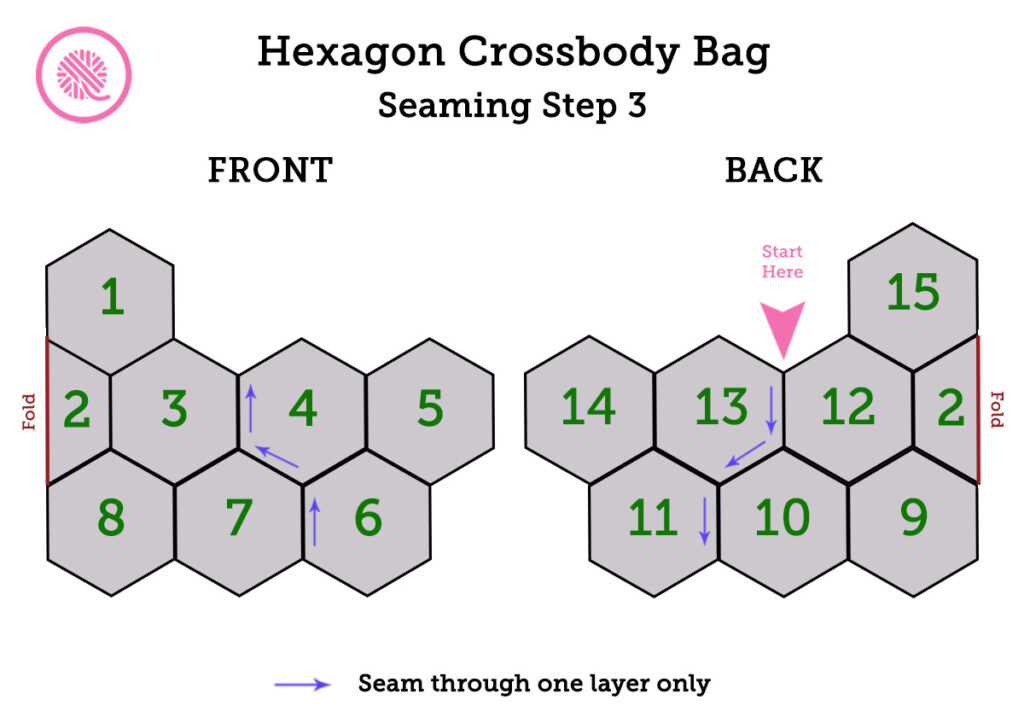
Seam 3:
- BACK: Begin at the top corner of Hexagon 12 and 13. Sew the edges of #12 and 13 together. Continue seaming with edges #10 and 13 followed by #10 and #11. TURN bag over.
- FRONT: Sew the edges of #6 and #7, then #4 and #7. Finish the seam with the edges of #3 and #4.
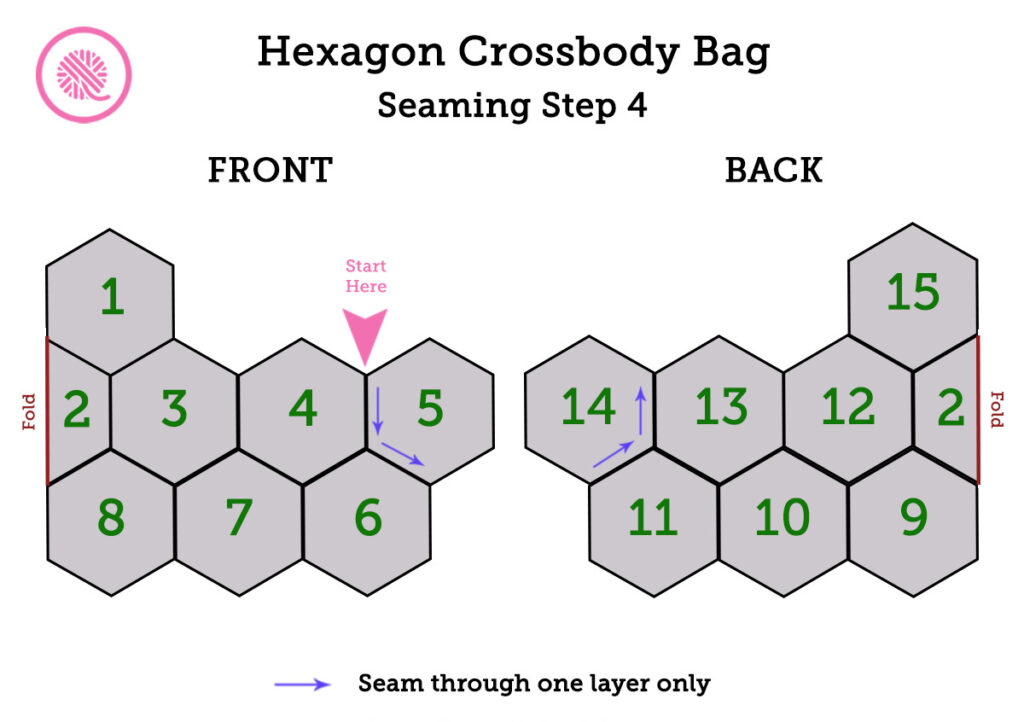
Seam 4:
- FRONT: Begin at the top corner of #4 and #5. Sew the edges of #4 and #5 then the edges of #5 and #6. TURN bag over.
- BACK: Sew the edges of #11 and #14 then the edges of #13 and #14.
Seam 5:
There are 4 seams to finish on the back that are done with 2 pieces of yarn.
- BACK: Beginning at the corner of Hexagons 11, 13, and 14, stitch the edges of #11 and #13 together. Carry your yarn through the stitches of the finished seam between #10 and #13 then sew the edges of #10 and #12. Carry your yarn in the seam between #9 and #12 then sew the edges of #2 and #9.
- Begin at the top corner of #12 and #15 and sew the edges together.
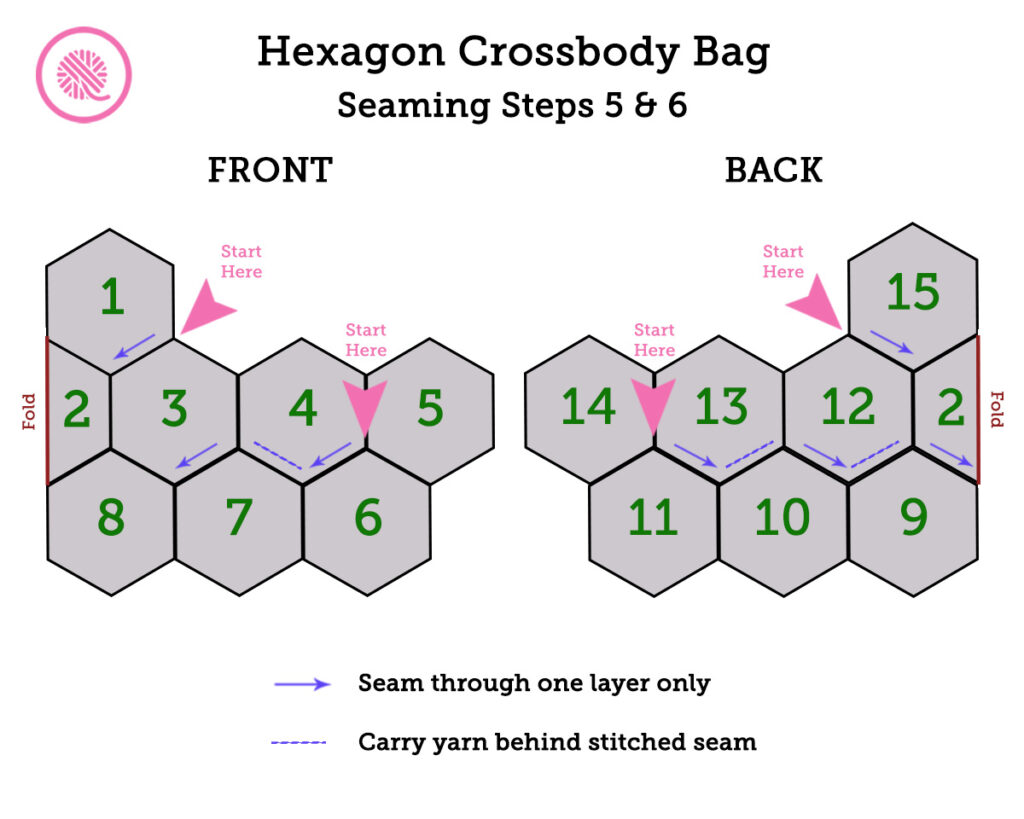
Seam 6:
There are 3 seams on the front that are finished with 2 pieces of yarn.
- FRONT: Beginning at the corner of Hexagons 4, 5, and 6, stitch the edges of #4 and #6 together. Carry your yarn through the stitch of the finished seam between #4 and #7. Sew the seam between #3 and #7.
- Begin at the top corner between #1 and #3 and finish the seam.
Seam 7 (optional pocket):
To make the top hexagon into a pocket sew the two bottom edges of Hexagons 1 (front) and 15 (back) through both layers.
FINISHING:
Weave in all yarn tails on the inside.
With contrast B, sew the D rings to the top of Hexagon 1 and the top of Hexagon 5.
Clip the strap to your bag.
Part 3 – Assembly & Seaming Tutorial Videos
NOTE: These videos show the loom knit version of the pattern. The assembly & seaming are identical no matter how you make the hexagons.
Right handed
Left handed