
Easter Bunny Cake. Want to a fun project to make and eat with kids?! It’ a fun tradition to start with your family & friends to make and give a personalized cake! Make it chocolate, white, strawberry or even purple.
You are only limited by your imagination…and YES you are creative!
I actually learned this Easter Bunny Cake in a Home Economics class in Jr High. Today I was asked to give instructions on how to make one. Have fun!
Easter Bunny Cake
Instructions for a white, with pink accents, but change to fit your colors needed.
Supplies:
- 2 – 9″round cakes (for instructions use 9″ or change sizes to fit your cake size) I like Strawberry, white or yellow. Pre-make these in advance to be cooled, especially if for a class setting. They could even be slightly frozen.
- Coconut (white)
- Coconut (pink or dye some with food coloring)
- White frosting (enough to cover most of two cakes)
- Pink Frosting (small amount)
- A small tube of black piping for mouth
- Gumdrops or round colored candy for eyes and nose
- black shoestring licorice
- ALTERNATE: If allergic to Coconut use white sugar beads or other to create fur.
Cut the ears and bow:
See the diagram below and picture for the bunny image. Use one 9″ round cake for the bunny face. The other gets two arc cuts to make the ears and the middle part makes a bow. *Try to match the same curve as the outside of the circle. imagine you are cutting a baseball image.* I suggest cutting it on parchment or wax paper to make moving the bow easier. Use a spatula or the paper to move the ears into place.
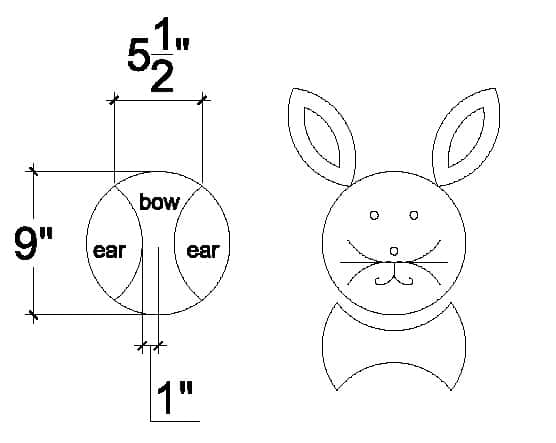
Cut round cake following the 2 curved lines inside the circle. Layout of cake to the right. The two outside pieces are ears and the middle is the bow tie. Complete with an uncut cake, in the center, for the face of your Easter Bunny Cake. Decorate to “line” the ears and make a face.
Decoration instructions:
Poke with a toothpick, fork or slightly cut or mark the inside area of the ears to outline where the pink of the ears will go. The ears will be white on the sides and edges. The inside will be pink, like the inside of a real bunny’s ears. Ice them in the appropriate colors and sprinkle the same coconut color on top to make it look furry. Ice the face in white and place the candies on the face. Blue or green gumdrops for the eyes, a red, black or pink gumdrop for the nose and licorice for the whiskers. Use your small tube of black icing for the mouth or use more licorice. Sprinkle the white coconut on the face. Place the bow below the face and use the pink icing on top. (Alternate you could make a boy bunny in blue or use any other color, you’ll just need more icing or add food coloring to your left over white icing if finished with the bunny part.)
Show us your Easter Bunny cake!! I’d love to see your own creations! Send your pictures to contribute@goodknitkisses.com and I’ll post them on this blog. Happy Easter everyone! -Kristen
©2011 GoodKnit Kisses (update 3/18/15)
©2015 GoodKnit Kisses