

Inside: How to loom knit the double knit Honeycomb Stitch. Includes free scarf pattern with written instructions and tutorial videos for left and right handers.
When you want something extra squishy and warm, always look for double knits.
Double knit fabrics are extra thick and soft making them ideal for the coldest winters. I know many of us learned to loom knit on long looms so double knitting always takes me back to my humble beginnings.
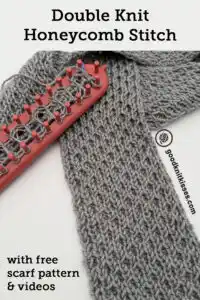
The double knit honeycomb stitch takes a basic double knit rib and offsets the rows to create this beautiful textured design.

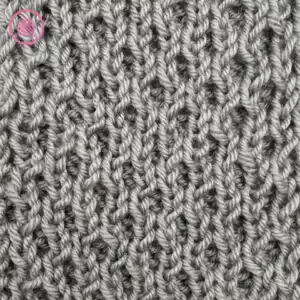
This stitch pattern uses a 4 row repeat that is easy to learn. And I’ve got all the tools to help you master the honeycomb stitch. From the detailed written instructions with photos to the full length, captioned tutorial videos, I’ve equipped you to make a scarf as you learn this design.
Let’s get started!
For a lighter weight, single knit version of this stitch pattern, try the loom knit Honeycomb Scarf pattern.
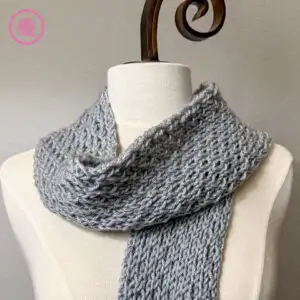
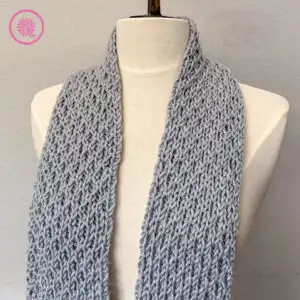
Double Knit Honeycomb Stitch Scarf
By Kristen Mangus
The squishy double knit Honeycomb Scarf is guaranteed to keep you cozy and warm. This beautiful scarf is full of texture using the double knit honeycomb stitch. This pattern is worked flat on a double knitting loom using a 4 row repeat.
Pattern includes written instructions, diagrams, and links to fully captioned tutorial videos for both left and right handed loom knitters.
An ad-free downloadable PDF of this pattern is available for purchase in my GoodKnit Kisses online store, Etsy or Ravelry at the links below:


MATERIALS
(Materials list may contain affiliate links to products I used to make this project. Using these links costs you nothing, but helps support GKK.)
Yarn
Medium (#4) Premier Everyday Soft Worsted (4 oz/113 g; 203 yds/186 m)
Color Mist (Grey) 100-23 used in sample. 1 ball.
Loom
11/16” large gauge (LG) long loom with at least 12 peg pairs
12 peg Knifty Knitter pink long loom used in sample.
Notions
Scrap yarn in contrasting color to use as anchor yarn
Crochet hook (for bind off)
Tapestry needle (if seaming and/or weaving in ends)
ABBREVIATIONS
Alt = Alternate
Approx = Approximate(ly)
CO = Cast on
K = Knit
Rep = Repeat
St(s) = Stitch(es)
For a refresher on loom knitting basics see the blog posts below to get started:
13 Questions for Beginner Loom Knitters
How to Loom Knit Basics (cast on, knit, purl, & bind off)
How to Loom Knit Basic Stitch Patterns (garter st, seed st and ribbing)
How to Loom Knit in the Round
GAUGE 10 sts and 18 rows per 4” x 4” (10 × 10 cm) in pattern. (Counting 1 side only)
SKILL LEVEL Easy
MEASUREMENTS 4.75” (12 cm) x 60” (152.4 cm)
NOTES
This pattern can be used with any double knit loom gauge and an appropriate weight yarn.
The pattern is written as a scarf, but you can knit to a shorter length then seam it to make a cowl, if you prefer.
Each row is knit working from the front (lower) board to the back (upper) board in double rib stitch, offsetting every 2 rows for honeycomb stitch.
Peg numbering in this pattern is from left to right. All peg numbers mentioned in the pattern refer to peg pairs: one peg on the front board and one on the back.
Cast on (see detailed instructions below): The full cast on is 2 rows. On the first row only you will ewrap the pegs.
Knitting:
- Do not ewrap the pegs after the first cast on row. Lay the yarn loosely across the front of the peg as if to flat knit. This creates a classic, smooth knit stitch shaped like a “V”.
- Pay attention to your tension. Be careful not to pull yarn too tightly when wrapping. TIP: Knit over last wrapped peg first to lock in, then knit over first to last peg wrapped in order or it may become too tight.
Double Knit Honeycomb Stitch: This design uses a 4 row repeat. There are 2 wrapping sequences used in double rib stitch. Every other row you will switch wrapping sequences. Shifting between these two wrapping patterns creates the honeycomb design. (See detailed row instructions below.)

INSTRUCTIONS
Double Rib Cast On
Cast on 12 pairs of pegs using the method below:
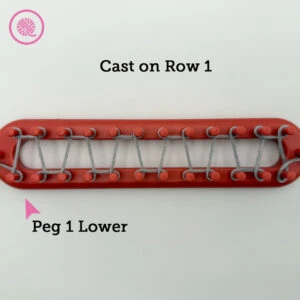
Cast On Row 1:
- Place slip knot on anchor peg or hold loosely if no anchor peg.
- E-Wrap yarn around outside of Peg 1 on LOWER board.
- Then e-wrap around outside of Peg 1 on UPPER board.
- Next e-wrap around Peg 2 on UPPER board.
- Next e-wrap around Peg 2 on LOWER board (wrapping looks like an open box at lower board between Pegs 1 and 2).
- Continue to around Peg 3 on LOWER board.
- Next e-wrap around Peg 3 on UPPER board (wrapping looks like an open box at upper board).
- Continue e-wrapping in this pattern by wrapping two pegs on one board, then two pegs on the opposite board. The double rib pattern alternates until you reach Peg 12 on the LOWER board.
- Lay anchor yarn.

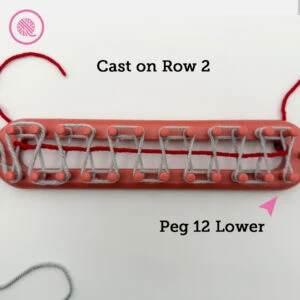
Cast On Row 2:
- From here on DO NOT E-wrap. Lay yarn loosely across front of peg as if to flat knit.
- Guide yarn around back of peg and straight up to Peg 12 on the UPPER board. Wrap the outside of Peg 12.
- Continue back toward the beginning in the double rib pattern, until you reach peg 1 on the LOWER board. All pegs except Peg 12 LOWER are wrapped.
- Knit the bottom loop over the top loop on all pegs with 2 loops. After knitting all pegs have 1 loop.

Setup Rows:
Row 1: (Slip Peg 1 LOWER.) Wrap around Pegs 1 and 2 on UPPER board. Wrap around Pegs 2 and 3 on LOWER board. Follow the same wrapping pattern as you used for the cast on. Knit off all pegs.
Row 2: (Slip Peg 12 LOWER.) Follow wrapping pattern back to Peg 1 and knit over.
Honeycomb Stitch Pattern:
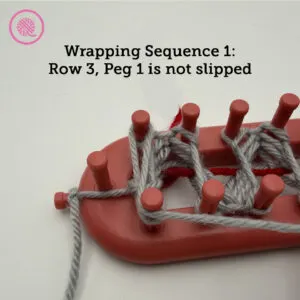
Wrapping Sequence 1:
Row 3: (Do not slip 1st peg. Wrap will offset “boxes” from previous two rows.) Wrap around outside of Peg 1 on UPPER board. Next wrap around Pegs 1 and 2 on LOWER board. Wrap around Pegs 2 and 3 on UPPER board (wrapping looks like an open box at upper board between pegs 1 and 2). Continue wrapping pegs in this pattern by wrapping two pegs on one board, alternating to opposite board for two pegs; the double rib pattern alternates until you reach peg 12 on the UPPER board.

Row 4: (Slip Peg 12 LOWER.) Follow wrapping pattern back to Peg 1 and knit over.
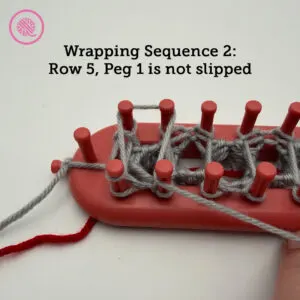
Wrapping Sequence 2:
Row 5: (Do not slip 1st peg. Wrap will offset “boxes” from previous two rows.) Wrap around outside of Peg 1 on LOWER board. Next wrap around Pegs 1 and 2 on UPPER board. Wrap around Pegs 2 and 3 on LOWER board (wrapping looks like an open box at lower board between pegs 1 and 2). Continue wrapping pegs in this pattern by wrapping two pegs on one board, alternating to opposite board for two pegs; the double rib pattern alternates until you reach peg 12 on the LOWER board.

Row 6: (Slip Peg 12 LOWER.) Follow wrapping pattern back to Peg 1 and knit over.
Repeat Rows 3-6 until knitting is approximately 60” in length or desired length.

Bind off:
- Using crochet hook, pick up stitch on last peg opposite where the working yarn is. (Ex: If the working yarn is on the upper board at the left, pick up the stitch on the upper board at the right.)
- Pick up stitch from peg on opposite board. You have 2 stitches on your hook.
- Pull the stitch closest to the tip of the hook through the other stitch to bind off.
- Pick up the next stitch on the same board to complete that pair and pull that stitch through the one on your hook.
- Move back to the opposite board and pick up the next stitch in the sequence and pull the stitch through.
- Repeat Steps 4-5 until you have one stitch left on your hook.
- Cut a long yarn tail for sewing for a seam or a shorter one for a scarf and pull through the last stitch.
- Weave in tail.
Finish cast on end:
Now we’re going to create a clean edge at the beginning.
- With your crochet hook, pick up the stitch at the opposite end of the row from the yarn tail. [Note: Make sure you do not pick up any strands of the anchor yarn.]
- Pick up the next stitch. Now you have 2 stitches on your hook.
- Pull the stitch closest to the tip of the hook through the other stitch.
- Repeat Steps 2 & 3 until you have one stitch left.
- Using the crochet hook, pick up the yarn tail and pull it through the last stitch.
- Gently pull the anchor yarn out of your cast on edge.
- Weave in tail.

PIN IT!

Double Knit Honeycomb Stitch Tutorial Videos
Select videos are available to GoodKnit Kisses YouTube members only. To get exclusive access to GKK VIP-only content, free PDF patterns, weekly Zoom meetup and more, sign in to YouTube and join as a VIP Member today! Find out more about GKK Membership HERE!