Inside: The needle knit Looped Towel pattern includes all written instructions and tutorial videos demonstrating the garter stitch, ribbing and three needle bind off techniques used in the pattern.
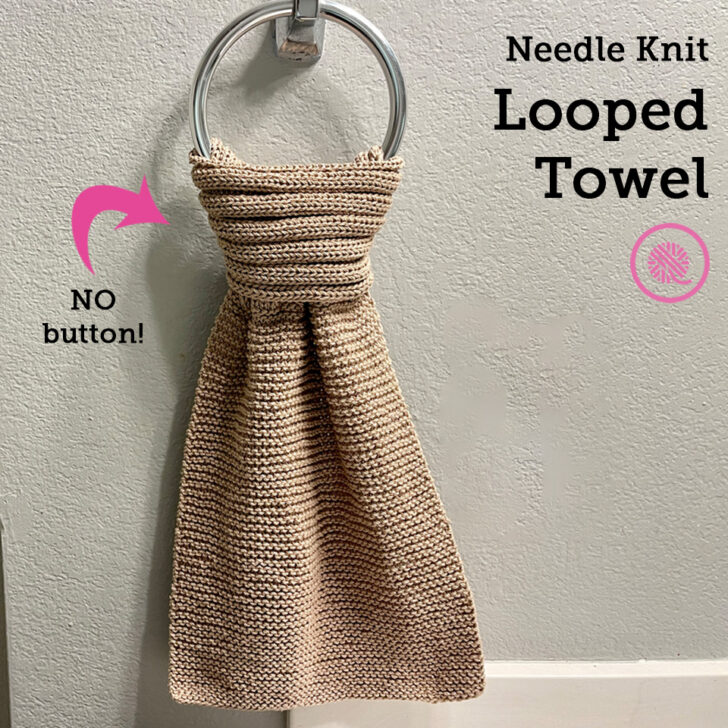
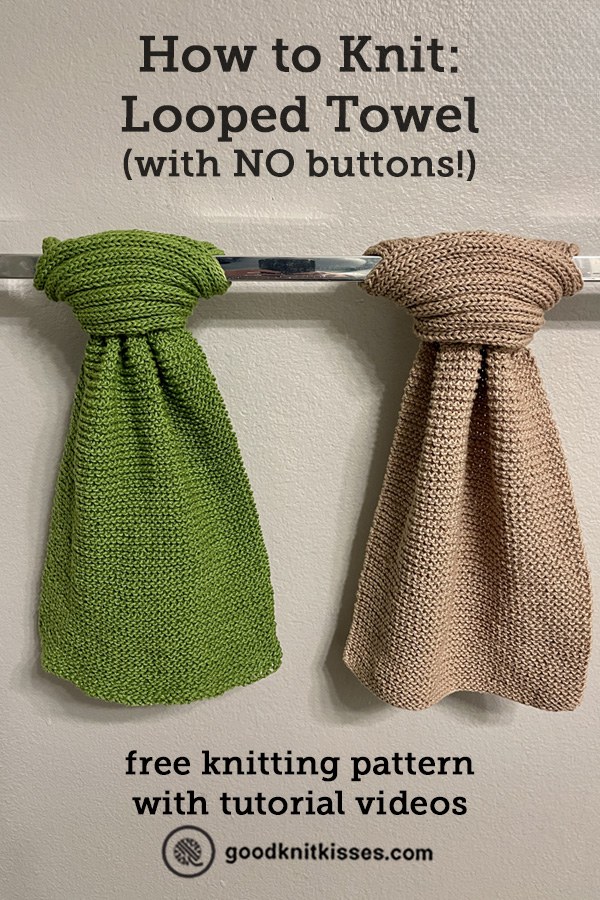
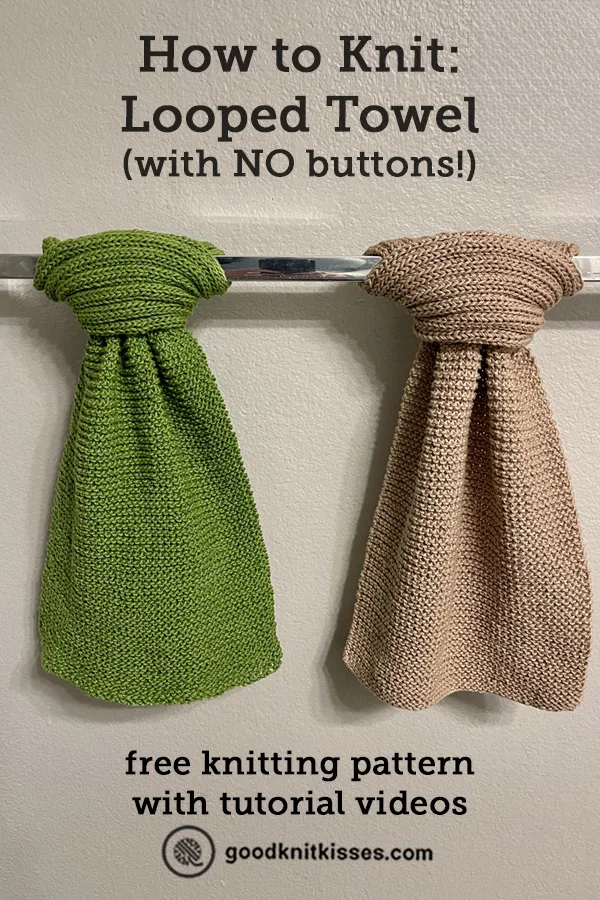
The perfect hanging towel is here!
For decades, we’ve been adding towel toppers to kitchen towels so we can hang them on our oven doors. But, it can be fidgety attaching the towel and then there’s a button you need to sew on or ties to add.
But now there’s a better way.
My Looped Towel wraps securely around any towel bar or oven door handle. My favorite part is that it’s knit in one piece with NO buttons, snaps or ties. Because you loop it around the bar, it can’t fall off, even when you open and close the oven.

The needle knit Looped Towel also make an ideal hand towel for a bathroom, especially if you have kids. Again, it’s ready to dry little hands, but they can’t easily pull it off the towel ring. Personally, I love how this looks on the towel ring. When looped around the knot at the top fits the curve of the ring perfectly.
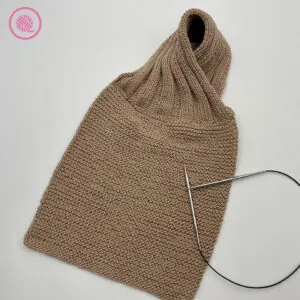
This quick and easy pattern uses a combination of garter stitch for the towel, 4×4 ribbing for the hanging loop, and a three needle bind off to seam it together. This pattern is inspired by our Seafarers’ Dickie pattern.
The pattern below contains written instructions and links to fully-captioned tutorial videos showing the garter stitch, ribbing and unique bind off method.
Needle Knit Looped Towel
By Kristen Mangus
A downloadable PDF of this pattern is available in my Etsy store or from Ravelry at the links below:


MATERIALS
(Materials list may contain affiliate links to products I used to make this project. Using these links costs you nothing, but helps support GKK.)
Yarn
Medium (#4) weight yarn
Yarn Bee Fundamental Cotton (164 yds./3.5 oz., 150 m/100 g) 2 balls needed. Color Camel used in sample.
Needles
US-7 (4.5 mm) circular needle with 16-20” cable
Knitter’s Pride Mindful Collection Interchangeable Lace Tips with 16” swivel cord used in sample.
Tapestry needle
ABBREVIATIONS
K = Knit
K2tog = Knit 2 stitches together
P = Purl
Pat = Pattern
Rep = Repeat
RS= Right Side
St(s) = Stitch(es)
WS= Wrong Side
New to knitting? I’ve got a How to Knit Beginner Video Series to teach you ALL the basics.
GAUGE 19 sts x 36 rows in 4” (10 cm) in garter st
SKILL LEVEL Easy+
MEASUREMENTS 10” x 26” (total length before seaming/bind off)
NOTES
Three needle bind off – This bind off method involves picking up a stitch along the last garter ridge on the wrong side of the fabric, then knitting that stitch with the next live stitch on your needle. This binds off and seams the towel at the same time. Since we’re picking up stitches you don’t actually need a third needle for this variation.
INSTRUCTIONS
Cast on 48 sts
Garter st section
Row 1 (WS): Knit all.
Rep Row 1. Place marker on RS Row.
Rep Row 1 in garter st until piece measures approx 11” (approx 100 rows) ending after a WS row.
4×4 Ribbing section
Row 2 (RS): *K4, P4. Rep from * to end of row.
Rep Row 2 until ribbing section measures 15” (26” total length) ending after a RS row.
Preparing to bind off
Since the 4×4 ribbing has wide knit and purl columns, it’s important to seam your towel correctly. If you lay the towel out flat, with the RS facing you, you will notice a raised knit column on one side and curled purl column on the opposite side. You want to seam your towel so the knit column is on the inside neck edge.
Lay your towel in front of you with the RS facing up and the garter section away from you. Fold the ribbing section in half so your needle with the live stitches is lined up with the last row of garter stitches. From the edge opposite your working yarn, pick up the bottom layer (garter st section) and flip it over. (Do not flip over the entire piece; just the bottom layer.) Now line up your needle with the live sts along the last garter row and continue with bind off.
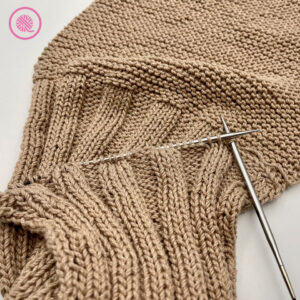
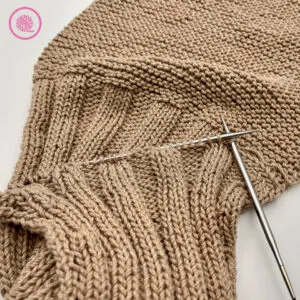
Three needle bind off
With main needle pick up first purl bump of last garter st row (looks like a smile). K2tog. Pick up next purl bump from garter stitch row. K2tog. Bind off 1 st.
*Pick up next purl bump, k2tog, bind off 1 st. Repeat from * until 1 st rem.
Cut yarn tail and pull through final st to fasten off. Weave in tails. Flip ribbing inside out so seam is on the WS.

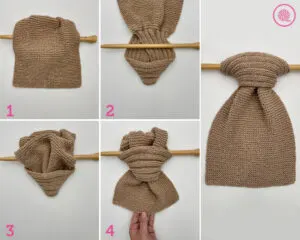
Hang on towel bar, ring or oven door:
- With RS facing you fold the ribbing back over the top of the bar.
- Lift the bottom of the towel up and bring the ribbing loop under the hanging towel.
- Tuck bottom of the towel through top of ribbing loop.
- Tug downward until the whole towel is exposed and the beginning of ribbing section is covered by the ribbed loop.
PIN IT!
Needle Knit Looped Towel Tutorial Videos
Select videos are available to GoodKnit Kisses YouTube members only. To get exclusive access to GKK VIP-only content, free PDF patterns, weekly Zoom meetup and more, sign in to YouTube and join as a VIP Member today! Find out more about GKK Membership HERE!
The following tutorial videos, for either right or left-handed knitters, teach you each skill needed to make this pattern.
- Garter Stitch (includes cast on)
- Ribbing: Ribbing video does not include 4×4 ribbing specifically, but the method is the same. Just be sure to count your knit and purl and stitches correctly in this pattern.
- Three Needle Bind Off (using 2 needles!)
Jamie Hackmann
Sunday 25th of February 2024
I’m looking for a way to add a loom knit piece, similar to what I’ve seen done in crochet. Do you have any suggestion?