Chevron Hat you may have seen, but not this one! New to the GoodKnit Kisses Blog is Michelle Irizarry. Her Light and Lacey Chevron Hat is unique and breezy. Design inspired by Faith Schmidt. We hope you enjoy, thanks Michelle! – Kristen Mangus
Light and Lacey Chevron Hat
Designer: Michelle M. Irizarry
The Light and Lacey Chevron Hat was inspired by Faith Schmidt’s “Loom Knit Light and Lacey Loom Scarf” which can be found on Ravelry. http://www.ravelry.com/patterns/library/loom-knit-light-and-lacey-loom-scarf. I had loom knit the scarf and loved how light and airy it turned out. The Chevron Hat, being light and lacey, is just perfect for the local Florida climate. I was looking for a loom knit chevron hat that would complement it but could not find a pattern in a similar style. I then noticed that the scarf had a repeat pattern based on multiples of 10 that could be easily adapted to the round and that is how this chevron hat came to be.
Materials
Knitting Loom:
Authentic Knitting Board All-n-One Loom was used for the sample. Sample and step by step instructions detailed below are for a 70 peg configuration.
Another similar small gauge loom with at least 70 pegs can be used.
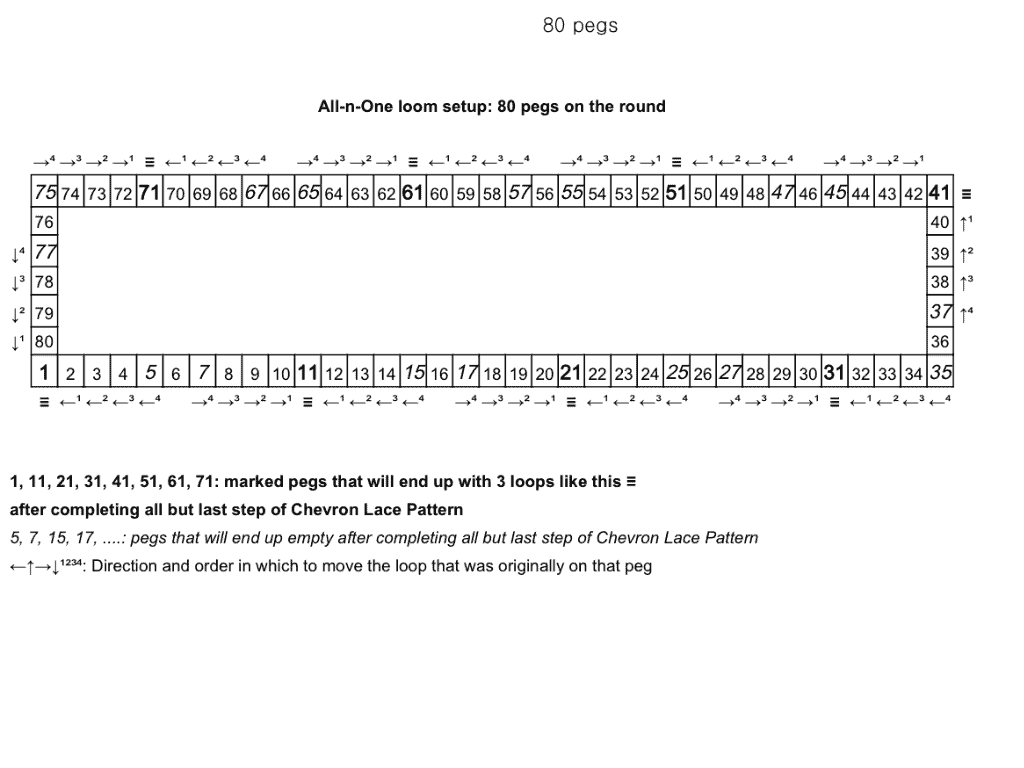
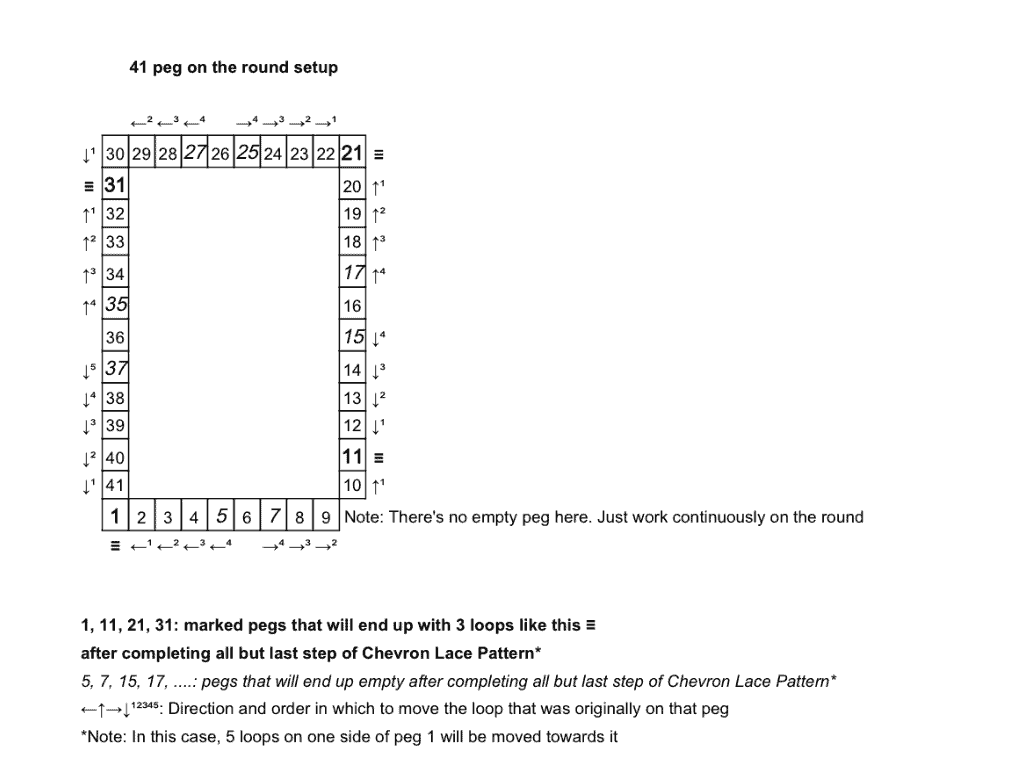
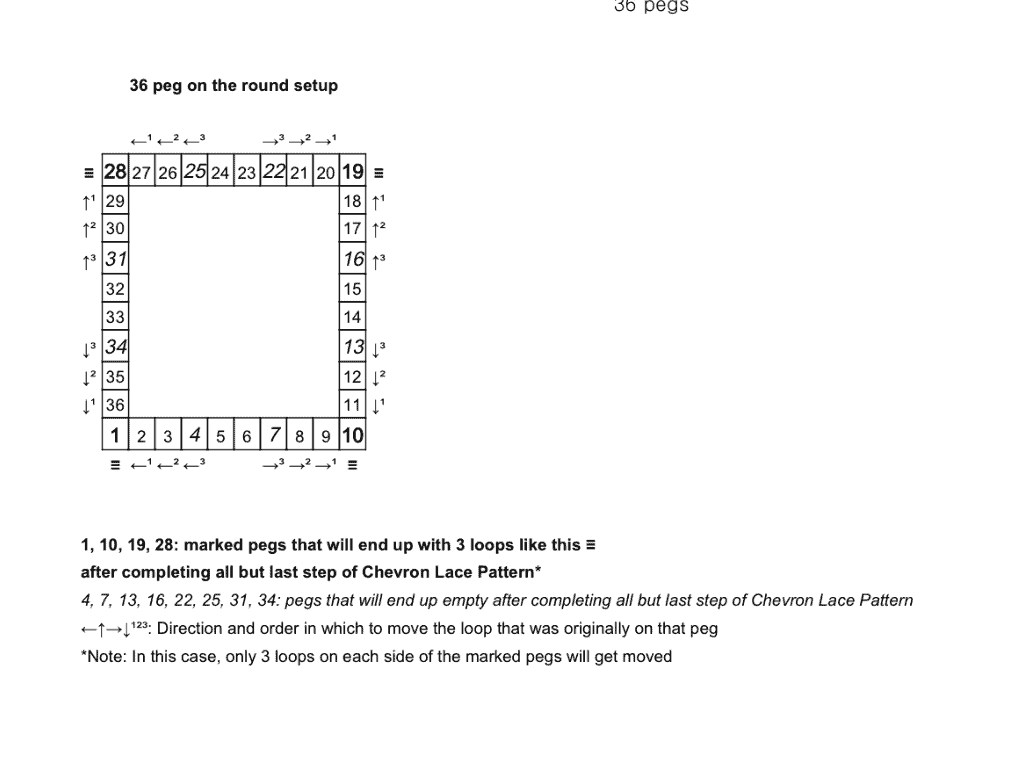
Since the chevron hat pattern is based on multiples of 10, the same idea could be adapted to a 40 peg (or even 36 or 41 peg) large gauge Knifty Knitter type loom. Diagrams to help with the Chevron Lace pattern for various peg configurations are included in this pdf file.

70 peg setup

Yarn:
Approximately 150-170 yards of worsted weight yarn (size 4). Lion Brand’s “Pound of Love” in pink (size 4) was used in sample.
Note: Using a self-striping yarn or changing the yarn color every few rows will accentuate the chevron “zig zag” pattern.
Notions:
Tapestry Needle, Knitting tool, stitch markers.
Gauge:
Approximately 20 rows and 14 stitches on 4 x 4 inches swatch
K – Knit
K2tog – Knit 2 pegs together
Pattern Notes:
E-wrap knit stitch is used everywhere
Instructions:
Set up the loom to work on 70 pegs on the round. Using stitch markers mark the following pegs: 1, 11, 21, 31, 41, 51, 61. These will be called the marked pegs.
Cast on 70 pegs using your favorite method. I used a Figure 8 cast-on since I like the braided look on the edge. Note: The edge will tend to curl but steam blocking will fix it.
Chevron Hat Lace pattern:
(See pdf file for diagram – assumes working in a counter-clockwise direction)
The pattern basically consists of moving the 4 loops on each side of each marked peg towards the marked peg.
Step 1: Move loop on peg 2 to peg 1. Move loop on peg 3 to peg 2. Move loop on peg 4 to peg 3. Move loop on peg 5 to peg 4. Peg 5 will end up empty. Peg 1 will have two loops.
Step 2: Move loop on peg 10 to peg 11. Move loop on peg 9 to peg 10. Move loop on peg 8 to peg 9. Move loop on peg 7 to peg 8. Peg 7 will end up empty. Peg 11 will have two loops.
Step 3: Move loop on peg 12 to peg 11. Move loop on peg 13 to peg 12. Move loop on peg 14 to peg 13. Move loop on peg 15 to peg 14. Peg 15 will end up empty. Peg 11 will now have three loops.
Step 4: Move loop on peg 20 to peg 21. Move loop on peg 19 to peg 20. Move loop on peg 18 to peg 19. Move loop on peg 17 to peg 18. Peg 17 will end up empty. Peg 21 will have two loops.
Step 5: Move loop on peg 22 to peg 21. Move loop on peg 23 to peg 22. Move loop on peg 24 to peg 23. Move loop on peg 25 to peg 24. Peg 25 will end up empty. Peg 21 will now have three loops.
Step 6: Move loop on peg 30 to peg 31. Move loop on peg 29 to peg 30. Move loop on peg 28 to peg 29. Move loop on peg 27 to peg 28. Peg 27 will end up empty. Peg 31 will have two loops.
Step 7: Move loop on peg 32 to peg 31. Move loop on peg 33 to peg 32. Move loop on peg 34 to peg 33. Move loop on peg 35 to peg 34. Peg 35 will end up empty. Peg 31 will now have three loops.
Step 8: Move loop on peg 40 to peg 41. Move loop on peg 39 to peg 40. Move loop on peg 38 to peg 39. Move loop on peg 37 to peg 38. Peg 37 will end up empty. Peg 41 will have two loops.
Step 9: Move loop on peg 42 to peg 41. Move loop on peg 43 to peg 42. Move loop on peg 44 to peg 43. Move loop on peg 45 to peg 44. Peg 45 will end up empty. Peg 41 will now have three loops.
Step 10: Move loop on peg 50 to peg 51. Move loop on peg 49 to peg 50. Move loop on peg 48 to peg 49. Move loop on peg 47 to peg 48. Peg 47 will end up empty. Peg 51 will have two loops.
Step 11: Move loop on peg 52 to peg 51. Move loop on peg 53 to peg 52. Move loop on peg 54 to peg 53. Move loop on peg 55 to peg 54. Peg 55 will end up empty. Peg 51 will now have three loops.
Step 12: Move loop on peg 60 to peg 61. Move loop on peg 59 to peg 60. Move loop on peg 58 to peg 59. Move loop on peg 57 to peg 58. Peg 57 will end up empty. Peg 61 will have two loops.
Step 13: Move loop on peg 62 to peg 61. Move loop on peg 63 to peg 62. Move loop on peg 64 to peg 63. Move loop on peg 65 to peg 64. Peg 65 will end up empty. Peg 61 will now have three loops.
Step 14: Move loop on peg 70 to peg 1. Move loop on peg 69 to peg 70. Move loop on peg 68 to peg 69. Move loop on peg 67 to peg 68. Peg 67 will end up empty. Peg 1 will now have three loops.
Note: Up to here the marked pegs (1, 11, 21, 31, 41, 51, 61) have 3 loops each while the following pegs end up empty: 5, 7, 15, 25, 27, 35, 37, 45, 47, 55, 57, 65, 67.
After step 14; 3 loops on pegs 1 and 11; pegs 5 and 7 are empty
Step 15: Move the loops down on all pegs and E-wrap all the pegs. Lift up all the bottom loops over the top loop until only one loop remains on each peg. Do not lift the loops on the pegs that have only one loop in them (that would be the case on pegs 5, 7, 15, 17, 25, ….)
After pegs are wrapped in step 15; pegs 1 & 11 have 4 loops; pegs 5 & 7 have 1 loop; all remaining pegs have 2 loops
Pattern:
Round 1: Knit all pegs
Round 2: Knit all pegs
Round 3: Follow Chevron Lace pattern
Round 4: Knit all pegs
Round 5: Knit all pegs
Repeat rounds 3-5: ten additional times or until the hat measures approximately 7 inches long (from peak of cast on edge to top).
Round 3 creates two large holes every 10 pegs and a stitch above the holes. Rounds 4 and 5 creates two extra stitches above the holes.
Next round: *k2tog. Rep * to the end. (35 stitches remain)
To k2tog move loop on peg 1 to peg 2 (2 loops on peg 2), wrap peg 2 with working yarn (3 loops on peg 2) and pull the two bottom loops over top loop. Then move loop on peg 3 to peg 4 (2 loops on peg 4), wrap peg 4 with working yarn (3 loops on peg 4) and pull the two bottom loops over the top loop. Continue in a similar manner around the loom.
Bind Off:
Thread the tapestry needle with a long piece of the working yarn. To cast-off remove each of the 35 stitches from the pegs by picking each loop from the bottom with the tapestry needle.
Pull on the yarn tight to close to hole at the top of the hat, move the yarn to the inside of the hat and make a knot.
Light and Lacey Chevron Hat prior to blocking
Finish: Steam block the hat to better define the chevron pattern (pin down each peak for better definition) and prevent the edge from rolling. This will stretch the hat somewhat so take that into account when deciding how long to make your hat. The sample stretched about 15-20% after steam blocking (to about 8.5 inches long from peak of cast on edge to top).
Weave the ends in.
During steam blocking
Chevron hat after steam blocking
Finished Chevron Hat
Michelle M. Irizarry is a self-taught fine art painter who also dabbles in knitting and crochet. Her fine art work can be found at: www.facebook.com/mirizacom.
Michelle would like to thank Faith Schmidt for the initial inspiration pattern before the Light and Lacey Chevron Hat. Faith’s blog “Distracted Knits” can be found here:
http://distractedknits.weebly.com/
Editor’s notes: We hope you enjoy making the Light and Lacey Chevron Hat. Please note that Kristen has not tested the pattern. You may want to knit longer or use more pegs for your size. Also it would be cute to rotate the peak to show in the middle of the forehead like a “widows’s peak”! (A special thank you to our editor Carol Lilydot!!)