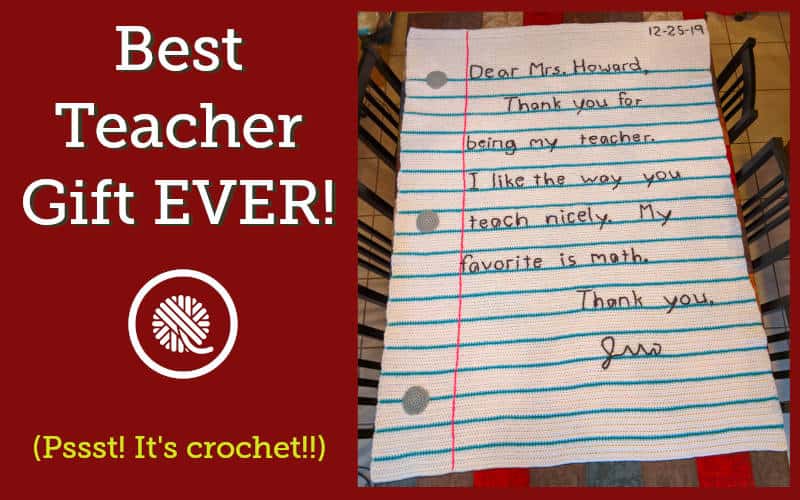
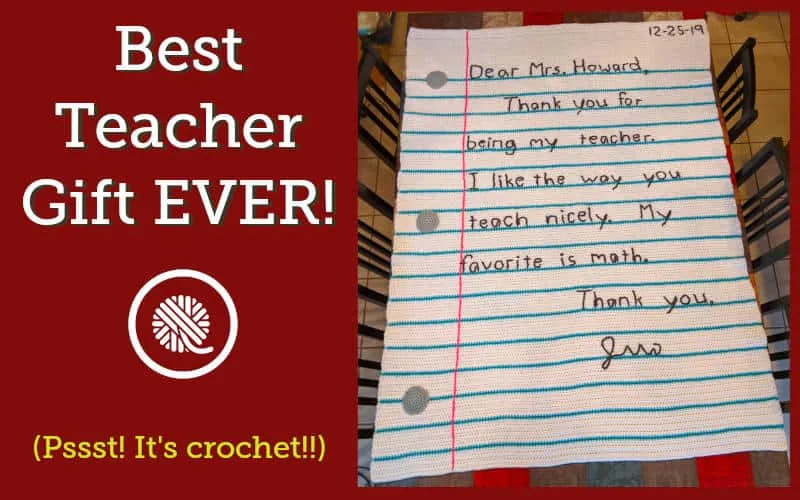
Inside: This crochet Thank You Note Blanket pattern is the ultimate teacher gift complete with notebook paper and a heartfelt message.
My friend and fellow crafter, Summer Cromartie, shared pictures of this incredible blanket she crocheted as a gift for her son’s teacher. We chatted about it and she agreed to share her pattern and inspiration with all of us.
This is hands down the ultimate teacher gift and I don’t know of any teacher that wouldn’t cherish this afghan forever.
Kristen Mangus
Since I can’t crochet a car before Christmas …
My first grader is a bit of a handful.
He speaks his mind and has no fear communicating with adults as if they are peers.
My son’s teacher is a saint for putting up with his quirks while reaching through to his heart and mind to prepare him for the his future.
In short, this sweet woman deserves a car.
Unfortunately, I don’t have the means to make that happen, but I’m pretty handy with yarn!
We live in Texas so I knew that if I wanted to make her a blanket I better get started immediately since no one in the South uses blankets past March.
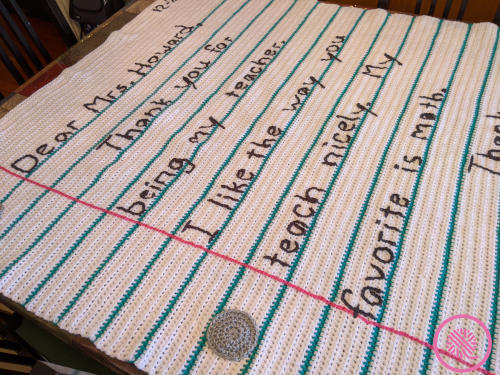
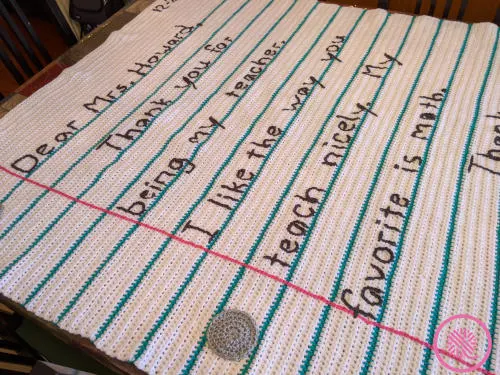
I had seen a picture online of a blanket that looked like notebook paper. It was perfect! I bought the supplies and got to work right away.
Writing on paper? Brilliant!
While I was busily working hdcs like a madwoman, my nephew saw it and said, “Aunt Summer, you should write a letter to her on it!” The thought had never occurred to me, but he was right. Not only was it possible, but it was a fantastic idea!
I had played around with surface crochet before by making little swirly hearts on some projects but never anything this involved. I was also pretty scared of all the tails I was going to have to weave in, but I couldn’t get the idea out of my head. It was perfect!
I had my son hand-write a letter to his teacher saying what he likes about her. Adorable! After I finished the blanket notebook paper I was both terrified and overjoyed to get to add his words to this wonderful gift.
I’m not going to lie, getting started and working out the letters took some trial and error. But once I got going, I never wanted to stop. It was so fun to be able to write on top of a blanket like this!
Before I knew it, all that was left was to sign the note. I decided to make the signature illegible instead of signing my son’s name as he would write it. I wanted this gift to be about her and not us. Now she can keep the blanket in her classroom, perhaps in a reading area. When people see it they will be reminded of how truly special she is!
I don’t know if I’ll be able to wait until Christmas to give it to her. I’m bursting with excitement, and I can’t wait for her to see my son’s sweet words.
I still say she deserves a car, so maybe I’ll crochet her a toy one in the spring!
Crochet Thank You Note Blanket
Pattern and Photography by Summer Cromartie
Published by GoodKnit Kisses
Tech Edited by Joann Gay
This easy crochet pattern uses half-double crochet notebook paper and a surface crocheted personal note from your child.
MATERIALS
Products listed below may contain affiliate links to products I use. They cost you nothing, but help support GKK.
Yarn
Big Twist Classic Solids. Bulky 5 weight. (312g / 11oz, 585 m / 640 yards)
Contrast A Notepaper. White. 2 skeins
Contrast B Ruled lines. Teal. 1 skein
Big Twist Rainbow Classic Solids (312g / 11oz, 562 m / 615 yards)
Contrast C Punched Holes. Gray. 1 skein (very little; may use scraps)
Contrast D Margin line. Bubblegum 1 skein (very little; may use scraps)
Red Heart Super Saver Solids (198g / 7oz, 333 m / 364 yards)
Contrast E Lettering. Charcoal. 1 skein
Hook
US J/6 mm or size needed to obtain gauge
Tapestry needle
Scissors
Stitch markers to aid in placement of lines for surface crochet
ABBREVIATION
Ch = Chain
hdc= half-double crochet
Rep = Repeat
St(s) = Stitch(es)
If you need a crochet refresher my How to Crochet Basic Stitches lessons and videos can help!
GAUGE
12 sts x 11 rows in 4” in hdc stitch
SKILL LEVEL Easy
MEASUREMENTS 59.5” x 46.5” (151 cm x 118 cm)
NOTES
Blanket is crocheted from the top down in all hdc using white for the paper and teal for the notebook lines.
Punched holes in the margin are crocheted separately and stitched on when the blanket is done.
The red margin and text of the note are added using surface crochet (also called surface slip stitch). See Lettering notes below about adding the text.
INSTRUCTIONS
NOTEBOOK PAPER
With A, Ch. 146.
Top Margin:
Row 1: Hdc in 3rd chain from the hook. Hdc in every chain to end of row.
Row 2: Ch 2. Hdc in each st across.
Rep Row 2 22 more times. Break A. (24 rows total)
Blue Line:
Attach B. Rep Row 2 once. Break B. (1 row)
White Space:
Attach A. Rep Row 2 7 times. Break A. (7 rows)
Rep Blue Line and White Space sections a total of 17 times. (160 rows)
Work one more Blue Line. (161 rows)
Bottom Margin:
Attach A. Rep Row 2 6 times. Break A. (167 rows).
Weave in tails.
RED MARGIN
Margin line is placed using surface crochet just after the 29th hdc from the left edge. Place stitch markers at stitch 29 on every teal line and in each white space as a guide.
With D, surface crochet a straight line from the bottom edge to the top. Break D. Weave in tails.


PUNCHED HOLES
Make 3.
Rnd 1: With C, Make a magic circle. ch 2. 8 hdc in circle. Pull tail to close magic circle. Slip st to close rnd. Ch 1 (does not count as a st). (8 sts)
Rnd 2: 2 hdc in each st around. Slip st to close rnd. Ch 1. (16 sts)
Rnd 3: *1 hdc in next st, 2 hdc in following st. Rep from * to end of rnd. Slip st to close rnd. Ch 1. (24 sts)
Rnd 4: *1 hdc in next 2 sts, 2 hdc in following st. Rep from * to end of rnd. Slip st to close rnd. Ch 1. (32 sts)
Finish off leaving a long tail to sew hole to blanket.
Sew holes onto blanket centering them between the left edge and margin using the following placement as a guide:
Hole 1: Centered across top teal line
Hole 2: Center of blanket between lines 8 and 9
Hole 3: Centered across line 16
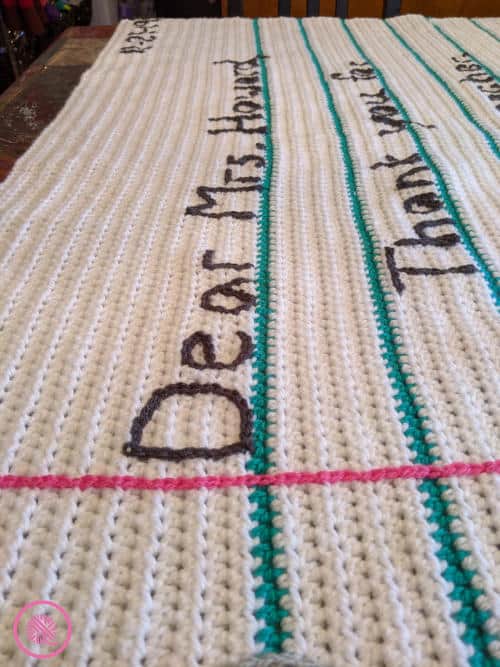
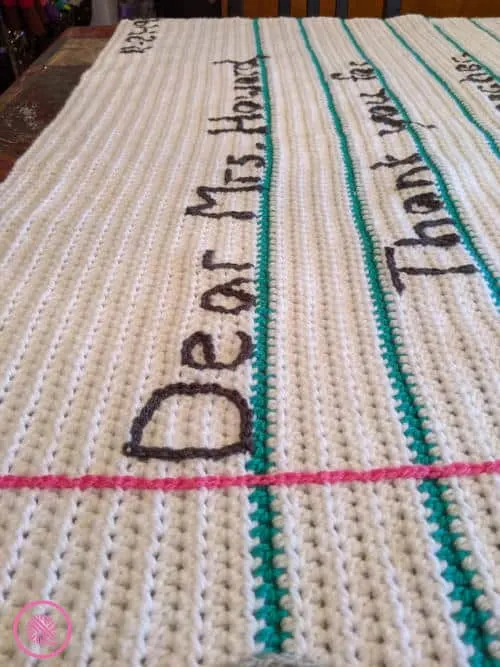
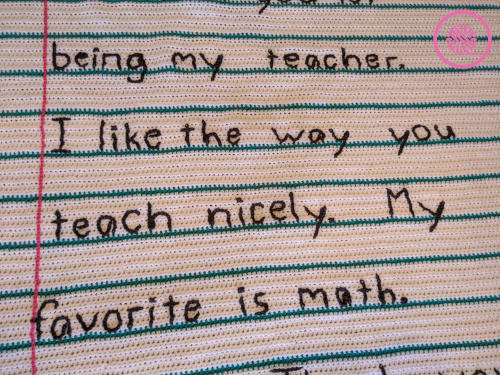
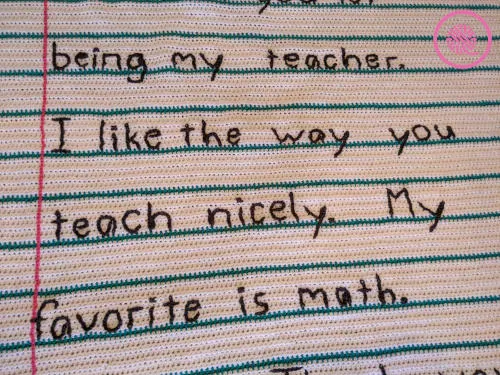
LETTERING
Letter size: Uppercase and tall letters are 6 rows tall. Lowercase letters are 3 rows tall.
Spacing: Most letters are 3-5 sts wide. (Lowercase “i” and “l” are only 1 st wide.) Leave 1 to 2 sts between each letter. Leave 7-10 sts between words.
Plan to crochet into the holes just above the teal row you are “writing” on. Children are sloppy writers so it’s fine if it doesn’t line up perfectly.
Plan out your letters in advance!! I recommend using graph paper to map out where you will place each word.
When possible try and crochet the entire letter at once. This is not possible with uppercase “I”, “T”, or “X” or lowercase “i”, “j”, “f” or “t” so you will need to add a new strand to dot your “i” and cross your “t”. I used a yarn needle and stitched an “x” for the dots and for the periods at the ends of the sentences. Example: To make a lowercase “h” it is best to start at the top of the letter and stitch straight down to the teal line. Then retrace that line a couple rows up before you stitch the hump of the “h”
Unless you choose to use cursive there are LOTS of ends to weave in. Embrace them!
As your teachers told you, It’s okay to make mistakes. (Surface crochet is easy to rip out.)

Text
With E, surface crochet text of note onto blanket.
Weave in tails.


Crochet Thank You Note Blanket Skills Playlist
The videos in this playlist teach you all the skills you need to make this project. Including:
- Half-double crochet stitch (hdc)
- Change colors and weave in ends
- Crochet a magic circle
- Sew on an applique
- Surface crochet / Surface slip stitch
- Crochet letters using surface crochet
Left-handed crocheters, keep scrolling! I’ve got videos for you below too.
Vicki Brandon
Tuesday 15th of September 2020
Such a great blanket idea! Your instructions and videos are so easy to follow, which is super great for us newbies!
How long did it take to make from start to finish? I’m looking at making 3-4 for my daughters’ teachers.
Vicki Brandon
Tuesday 15th of September 2020
I am in love with this blanket! How long did it take you from start to finish? I am looking at making a few for my daughters’ teachers as either Christmas gifts or (most likely) end of the year gifts. You do beautiful work and your videos are so easy to follow! Thank you!
Elizabeth A Keating Weeks
Thursday 23rd of April 2020
Thanks Kristen, I will refer to these videos as I am completing my blanket. Betty Weeks
Kathy Mc
Sunday 8th of December 2019
This is incredible! I’m sure his teacher will cherish it!