
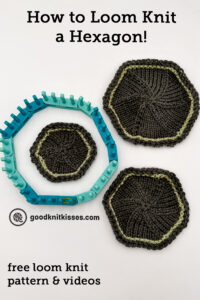
Inside: Learn how to loom knit a hexagon shape that can be used in a multitude of projects. Includes written instructions and videos.
A hexagon! That’s it?
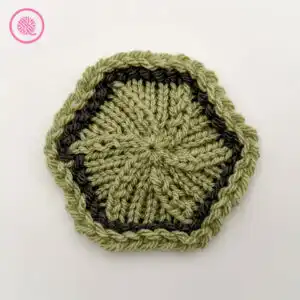
This may look like a simple shape because that’s exactly what it is. While this basic hex can be the end of your project if you’re making a coaster. It is also be the beginning of something bigger.

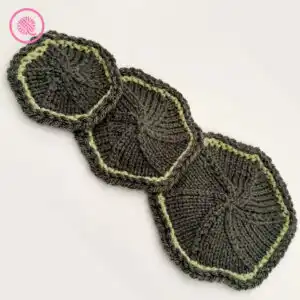
When you think about stitching these hexagons together you open a world of possibilities. Anything from scarves and cowls, to table runners and blankets. Picture it… hexagons as the bottom of a purse or the ends of a bolster pillow. This is so much more than just a simple shape.
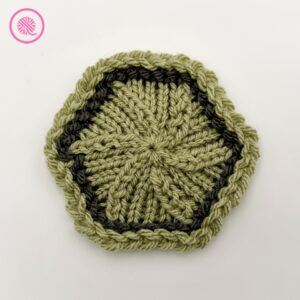
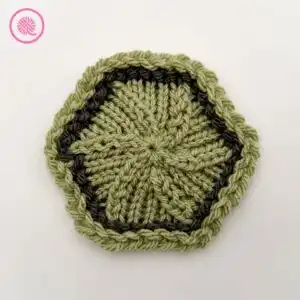
Before you learn how to loom knit a hexagon let’s talk about the pattern. First, this design features a garter stitch edge with an accent stripe. If you prefer solid colors, just skip the color change.
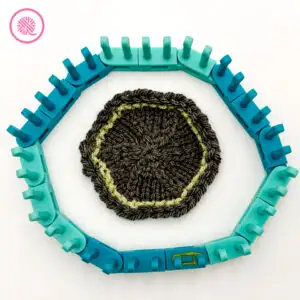
You’ll also notice that instead of a bunched up, cinched center, I uses decreases to create a smooth, flat shape. Because of these decreases, I strongly recommend using either a KB Flexee Loom or an adjustable loom with a slider. It’s essential to be able to shrink the size of your loom as you work the decreases so you don’t end up with gaps.
Lastly, I used the U knit stitch instead of the traditional E wrap. Using this smoother stitch makes the star shape created by the decreases stand out better.
The pattern below includes written instructions for 3 sizes. But you can make these in any size using a mulitple of 6. You’re only limited by the size of your loom.

How to Loom Knit a Hexagon
By Kristen Mangus
An ad-free downloadable PDF of this pattern is available for purchase in my GoodKnit Kisses online store, Etsy or Ravelry at the links below:


MATERIALS
(Materials list may contain affiliate links to products I used to make this project. Using these links costs you nothing, but helps support GKK.)
Yarn
Bulky (#5) weight yarn in 2 colors
Yarn Bee Soft & Sleek Chunky (142 g/ 5 oz, 193 m/211 yds) used in sample.
Contrast A – Color Sage
Contrast B – Color Dark Grey
Loom
⅝” large gauge (LG) loom with 36 (48, 60) pegs.
KB Flexee Loom Chunky used in sample. (See Loom Setup below.)
Notions
Crochet hook for cast on
Tapestry needle for weaving in ends
7 stitch markers: 1 to mark beginning of round and 6 to mark decreases
ABBREVIATIONS
DEC = Decrease
UK = Uwrap knit
P = Purl
Rep = Repeat
Rnd = Round
St(s) = Stitch(es)
For a refresher on loom knitting basics see the blog posts below to get started:
13 Questions for Beginner Loom Knitters
How to Loom Knit Basics (cast on, knit, purl, & bind off)
How to Loom Knit Basic Stitch Patterns (garter st, seed st and ribbing)
How to Loom Knit in the Round
GAUGE 7 sts x 13 rows in 2” in stockinette stitch pattern
SKILL LEVEL Easy
SIZE Small (Med, Large)
MEASUREMENTS
Width 4.5” (6”, 7”) [11.4 (15.2, 17.8) cm]
Circumference 14.25” (16.5”, 22.5”) [36.2 (41.9, 57.2) cm]
NOTES
Pattern is worked in the round. For right handed knitters work from right to left (clockwise). Left handed knitters should work in the opposite direction (counter clockwise).
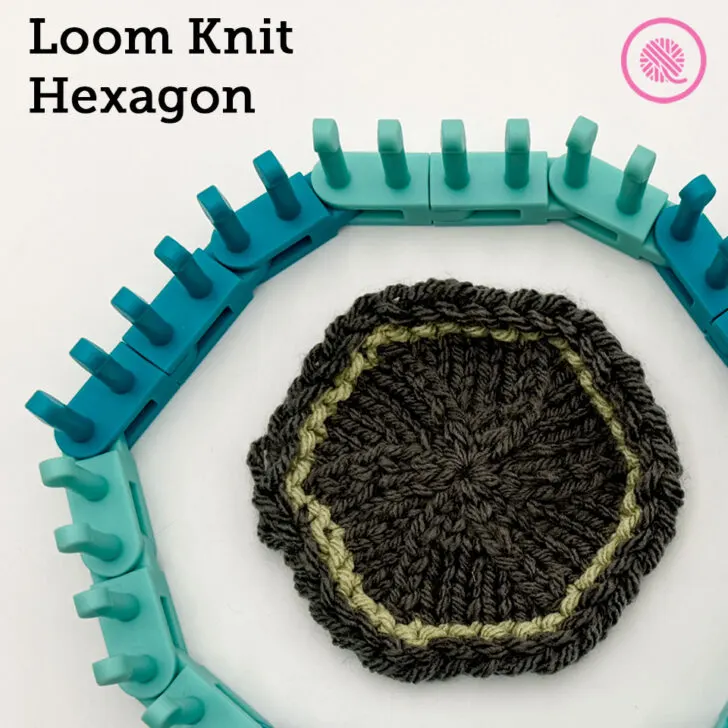
This pattern works best on a Flexee loom or an adjustable loom with a slider to decrease the number of pegs in use. Working this pattern on a fixed peg loom will cause gaps in the center.

Flexee Loom Setup: Set up your loom into 6 equal sections alternating light and dark links. Snap 3 (4, 5) DARK links together, next attach 3 (4, 5) LIGHT links together. Repeat alternating DARK and LIGHT pegs in groups of 3 (4, 5) until all links are used. Place 1 stitch marker at Peg 1. For right-handed knitters, place at right end of DARK link sequence to work toward left (clockwise) and for left handers place on the left. Reserve remaining stitch markers to be placed on pegs for DEC sts and move at decreases as needed for next rounds.
Cast on: I recommend the chain cast on for single hexagons or the long tail cast on if you plan to sew them together.. See video for how to eliminate slip knot.
INSTRUCTIONS
In Contrast A, Cast on 36 (48, 60) sts and connect in the round. Place stitch marker on Peg 1 to mark beginning of round.
Rnd 1: UK all.
Rnd 2: With Contrast B, UK all.
Rnd 3: P all. Cut tail to weave in later
Rnd 4: With Contrast A, UK all.
DECREASE:
DEC = Move peg 2 to peg 1 and knit together.
Starting at the beginning of the round, place a stitch marker every 6 (8, 10) pegs. As you work the decrease be sure to move the stitch marker as you shift stitches around your loom.
Rnd 5: *DEC. Knit 4 (6, 8) moving and placing each st on empty peg. DEC and move to empty peg; place stitch marker here if using. Remove empty loom link. Knit 4, (6, 8). Rep from * around. 30 (42, 54) sts. TIGHTEN LOOSE STS.
Rnd 6: UK all.
On following odd rounds, decrease all marked pegs, making sure to move stitch marker with each new DEC.
Rnd 7: *DEC. Knit 3 (5, 7) placing each st on empty peg. DEC and move to empty peg. Remove empty loom links as needed. Knit 3 (5, 7). Rep from * around. 24 (36, 48) sts.
Rnd 8: UK all.
Rnd 9: *DEC. Knit 2 (4, 6) placing each st on empty peg. DEC and move to empty peg. Remove empty loom links as needed. Knit 2 (4, 6). Rep from * around. 18 (30, 42) sts.
Rnd 10: UK all.
Rnd 11: *DEC. Knit 1 (3, 5) placing each st on empty peg. DEC and move to empty peg. Remove empty loom links as needed. Knit 1 (3, 5). Rep from * around. 12 (24, 36) sts.
Rnd 12: UK all.
[SMALL Size: Cut yarn leaving a 6” tail and continue with FINISHING below.]
Rnd 13: *DEC. Knit X (2, 4) placing each st on empty peg. DEC and move to empty peg. Remove empty loom links as needed. Knit X (2, 4). Rep from * around. X (18, 30) sts.
Rnd 14: UK all.
Rnd 15: *DEC. Knit X (1, 3) placing each st on empty peg. DEC and move to empty peg. Remove empty loom links as needed. Knit X (1, 3). Rep from * around. X (12, 24) sts.
Rnd 16: UK all.
[MEDIUM Size: Cut yarn leaving a 6” tail and continue with FINISHING below.]
Rnd 17: *DEC. Knit X (X, 2) placing each st on empty peg. DEC and move to empty peg. Remove empty loom links as needed. Knit X (X, 2). Rep from * around. X (X, 18) sts.
Rnd 18: UK all.
Rnd 19: *DEC. Knit X (X, 1) placing each st on empty peg. DEC and move to empty peg. Remove empty loom links as needed. Knit X (X, 1). Rep from * around. X (X, 12) sts.
Rnd 20: UK all.
[LARGE Size: Cut yarn leaving a 6” tail and continue with FINISHING below.]
FINISHING
Pull yarn tail through rem sts and draw up tightly to close center. Fasten securely. Weave in all tails.
PIN IT!

How to Loom Knit a Hexagon Tutorial Videos
Select videos are available to GoodKnit Kisses YouTube members only. To get exclusive access to GKK VIP-only content, free PDF patterns, weekly Zoom meetup and more, sign in to YouTube and join as a VIP Member today! Find out more about GKK Membership HERE!
NOTE: The stitch counts and placement of the stitch markers in the video are for the Small size. Use the same method, but adjust your stitch counts and markers for the larger sizes according to the instructions below.