Inside: Learn to loom knit a boho inspired crossbody bag with this free pattern. Includes written instructions, detailed diagrams and tutorial videos.
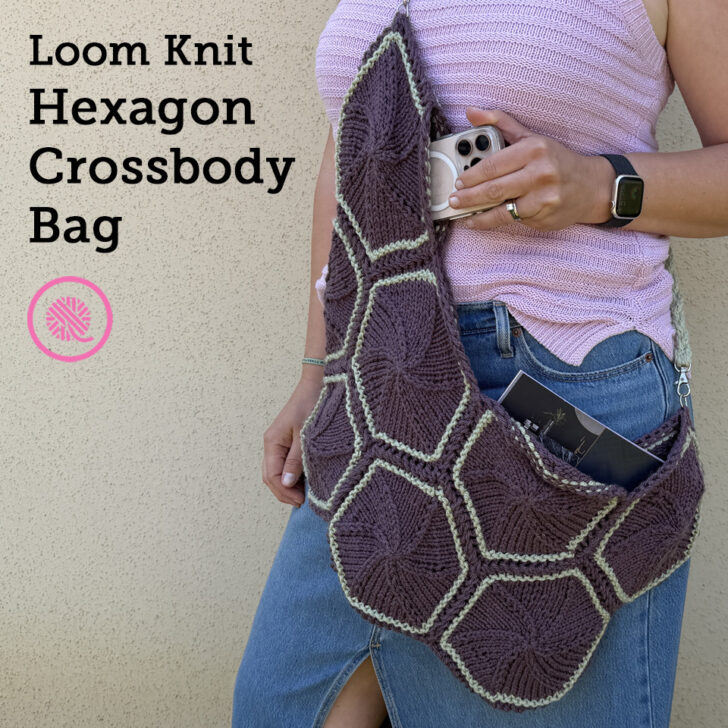
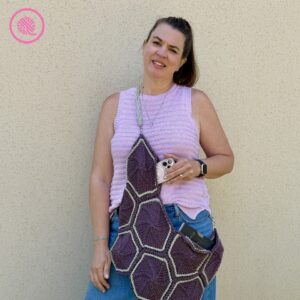
My loom knit Hexagon Crossbody Bag is an oversized, asymmetrical purse with boho vibes.
It’s sturdy, soft design makes it ideal for long days out shopping or at the beach. I also included an optional cell phone pocket at the top. This pattern uses 15 loom knit hexagons using bulky weight yarn in 2 colors. The braided i-cord strap with swivel hooks and D rings makes a strong, secure way to carry your bag.
Pattern includes written instructions, detailed diagrams for assembly and seaming, and links to fully captioned tutorial videos demonstrating the pattern.
Loom Knit Hexagon Crossbody Bag
By Kristen Mangus
An ad-free downloadable PDF of this pattern is available for purchase in my GoodKnit Kisses online store, Etsy or Ravelry at the links below:


MATERIALS
(Materials list may contain affiliate links to products I used to make this project. Using these links costs you nothing, but helps support GKK.)
Yarn
Bulky (#5) weight yarn in 2 colors
Yarn Bee Soft & Sleek Chunky (142 g/ 5 oz, 193 m/211 yds) used in sample.
Contrast A – Color Sage 3 (1 ball)
Contrast B – Color Dark Grey (3 balls)
Loom
⅝” large gauge (LG) loom with 60 pegs
KB Flexee Loom Chunky used in sample. (See Loom Setup below.)
Notions
Tapestry needle for weaving in ends and seaming
7 stitch markers for loom: 1 to mark beginning of round and 6 to mark decreases
30 locking stitch markers for assembly
2 – ½” Swivel Snap Hooks with D rings
ABBREVIATIONS
DEC = Decrease
UK = Uwrap knit
P = Purl
Rep = Repeat
Rnd = Round
St(s) = Stitch(es)
For a refresher on loom knitting basics see the blog posts below to get started:
13 Questions for Beginner Loom Knitters
How to Loom Knit Basics (cast on, knit, purl, & bind off)
How to Loom Knit Basic Stitch Patterns (garter st, seed st and ribbing)
How to Loom Knit in the Round
GAUGE 7 sts x 13 rows in 2” in stockinette stitch pattern
SKILL LEVEL Easy
MEASUREMENTS Approx. 12” tall x 22” long [30.5 cm x 56 cm] (not including strap and top pocket)
NOTES
Resizing: You can make this pattern using any size hexagon. For a smaller bag, see my How to Loom Knit a Hexagon blog for additional sizes.
This bag is unlined and doesn’t have closures, but you can easily add those if you prefer them. It can accommodate a zipper, magnetic closures, snaps or buttons. I do not recommend using velcro with yarn.
Loom Knit Boho Inspired Crossbody Bag
Part 1: Knitting the Hexagons
NOTES
Hexagons are worked in the round on a loom with a number of pegs divisible by 6. For right handed knitters work from right to left (clockwise). Left handed knitters should work in the opposite direction (counter clockwise).
This pattern works best on a Flexee loom or an adjustable loom with a slider to decrease the number of pegs in use. Working this pattern on a fixed peg loom will cause gaps in the center.
Flexee Loom Setup: Set up your loom into 6 equal sections alternating light and dark links. Snap 5 DARK links together, next attach 5 LIGHT links together. Repeat alternating DARK and LIGHT pegs in groups of 5 until all links are used. Place 1 stitch marker at Peg 1. For right-handed knitters, place at right end of DARK link sequence to work toward left (clockwise) and for left handers place on the left. Reserve remaining stitch markers to be placed on pegs for DEC sts and move at decreases as needed for next rounds.
Cast on: I recommend the long tail cast on for this pattern.
INSTRUCTIONS
Make 15 hexagons.
In Contrast A, Cast on 60 sts and connect in the round. Place stitch marker on Peg 1 to mark beginning of round.
Rnd 1: UK all.
Rnd 2: With Contrast B, UK all.
Rnd 3: P all. Cut tail to weave in later
Rnd 4: With Contrast A, UK all.
DECREASES:
DEC = Move peg 2 to peg 1 and knit together.
Starting at the beginning of the round, place a stitch marker every 10 pegs. As you work the decrease be sure to move the stitch marker as you shift stitches around your loom. On following odd rounds, decrease all marked pegs making sure to move stitch marker with each new DEC.
Rnd 5: *DEC. Knit 8 moving and placing each st on empty peg. DEC and move to empty peg; place stitch marker here if using. Remove empty loom link. Knit 8. Rep from * around. 54 sts. TIGHTEN LOOSE STS.
Rnd 6: UK all.
Rnd 7: *DEC. Knit 7 placing each st on empty peg. DEC and move to empty peg. Remove empty loom links as needed. Knit 7. Rep from * around. 48 sts.
Rnd 8: UK all.
Rnd 9: *DEC. Knit 6 placing each st on empty peg. DEC and move to empty peg. Remove empty loom links as needed. Knit 6. Rep from * around. 42 sts.
Rnd 10: UK all.
Rnd 11: *DEC. Knit 5 placing each st on empty peg. DEC and move to empty peg. Remove empty loom links as needed. Knit 5. Rep from * around. 36 sts.
Rnd 12: UK all.
Rnd 13: *DEC. Knit 4 placing each st on empty peg. DEC and move to empty peg. Remove empty loom links as needed. Knit 4. Rep from * around. 30 sts.
Rnd 14: UK all.
Rnd 15: *DEC. Knit 3 placing each st on empty peg. DEC and move to empty peg. Remove empty loom links as needed. Knit 3. Rep from * around. 24 sts.
Rnd 16: UK all.
Rnd 17: *DEC. Knit 2 placing each st on empty peg. DEC and move to empty peg. Remove empty loom links as needed. Knit 2. Rep from * around. 18 sts.
Rnd 18: UK all.
Rnd 19: *DEC. Knit 1 placing each st on empty peg. DEC and move to empty peg. Remove empty loom links as needed. Knit 1. Rep from * around. 12 sts.
Rnd 20: UK all.
Cut yarn leaving a 6” tail and continue with FINISHING below.
FINISHING
Pull yarn tail through rem sts and draw up tightly to close center. Fasten securely. Weave in all tails.
Loom Knit Hexagons Tutorial Videos
Select videos are available to GoodKnit Kisses YouTube members only. To get exclusive access to GKK VIP-only content, free PDF patterns, weekly Zoom meetup and more, sign in to YouTube and join as a VIP Member today! Find out more about GKK Membership HERE!
NOTE: The stitch counts and placement of the stitch markers in the video are for the Small size. Use the same method, but adjust your stitch counts and markers for the larger sizes according to the instructions in the pattern.
Right handed
Left handed
Loom Knit Boho Inspired Crossbody Bag
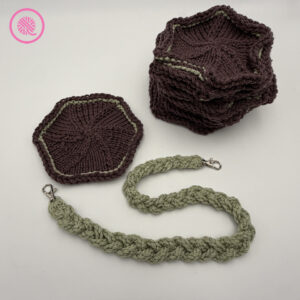
Part 2: I-cord Braided Strap
This strap is sturdy and strong. I’m very tall so I made a long strap. If you are average or petite you will want to make your i-cords about 6” shorter.
NOTES
The strap uses three 2-stitch i-cords braided together. Braiding the i-cords and seaming shortens the total length so loom knit each i-cord at least 2” longer than the length you desire for your final strap.
Swivel Snap Hooks: This product is sewn to the end of the strap and clips onto your bag. They are found at the affiliate link listed above or in the sewing notions area of your local craft store.
INSTRUCTIONS
Make 1 braided strap.
Loom Knit 3 I-cords:
- With Contrast B, cast on 2 stitches leaving a 12-18” tail.
- Flat knit both stitches.
- Bring the working yarn around the back of the pegs to the first peg. (You only work the row in one direction for the entire i-cord.)
- Flat knit both again.
- Repeat Steps 2-4 until your i-cord measures 32” or until your desired length plus 2”. (NOTE: Remember to tug on your i-cord to lengthen and set the stitches before you measure.)
- Bind off by cutting a 12-18” yarn tail then wrap and knit over the first peg pulling the yarn tail all the way through. Wrap and knit over the second peg pulling the tail through. Tug on yarn tail to tighten.
Repeat Steps 1-6 to make 3 i-cords.
Seam i-cord ends:
Lay all three cords on table next to each other lining up the end of each cord and making sure the ends are not twisted. Measure 1” (approx. 6 rows) from edge of cords. On next row secure all 3 i-cords together with a large stitch marker making sure to go through the middle of each cord.
Now we are going to attach the ends of the i-cords into a flat panel. Using yarn tail from middle cord, sew through the first stitch of one of the outer cords. Sew through the edge of the stitch on the row above before sewing through the first stitch on all three cords. Now continue sewing through all 3 cords row by row up to the stitch marker. Working back in the opposite direction, continue sewing through all 3 cords row by row back to the beginning. Weave in tail and cut.
Attach first swivel snap hook:
Slide swivel hook into place pulling through remaining tails. Fold over to line up cord end to stitch marker. Using one yarn tail, sew through both layers from one side to the other making to sure to sew through each i-cord. Sew back through to other side to reinforce. Weave in tail and cut. Repeat this process on the next row down with the other yarn tail. This creates a strong secure seam for the hook. Remove stitch marker.
Braid:
Secure the hook to a table using tape or clip onto something secure for tension. Make a simple 3-strand braid using the instructions below.
- Pick up one outer strand and place it crossing the center stand. Pull the center strand toward the outside edge.
- Pick up the opposite outer strand and cross it over the center strand. Pull the center strand toward the outside edge.
- Repeat Steps and 1 and 2 alternating sides finishing when you have 1” of the i-cord left.
Secure with locking stitch marker as you did with the other end making sure not to twist the cord ends.
Seam ends and attach second hook:
Repeat instructions above to sew the three cords together then attach the second hook.
Repeat all steps to make another strap, if needed.
I-Cord Braided Strap Tutorial Videos
Right handed
Left handed
Loom Knit Boho Inspired Crossbody Bag
Part 3: Assembly & Seaming
INSTRUCTIONS
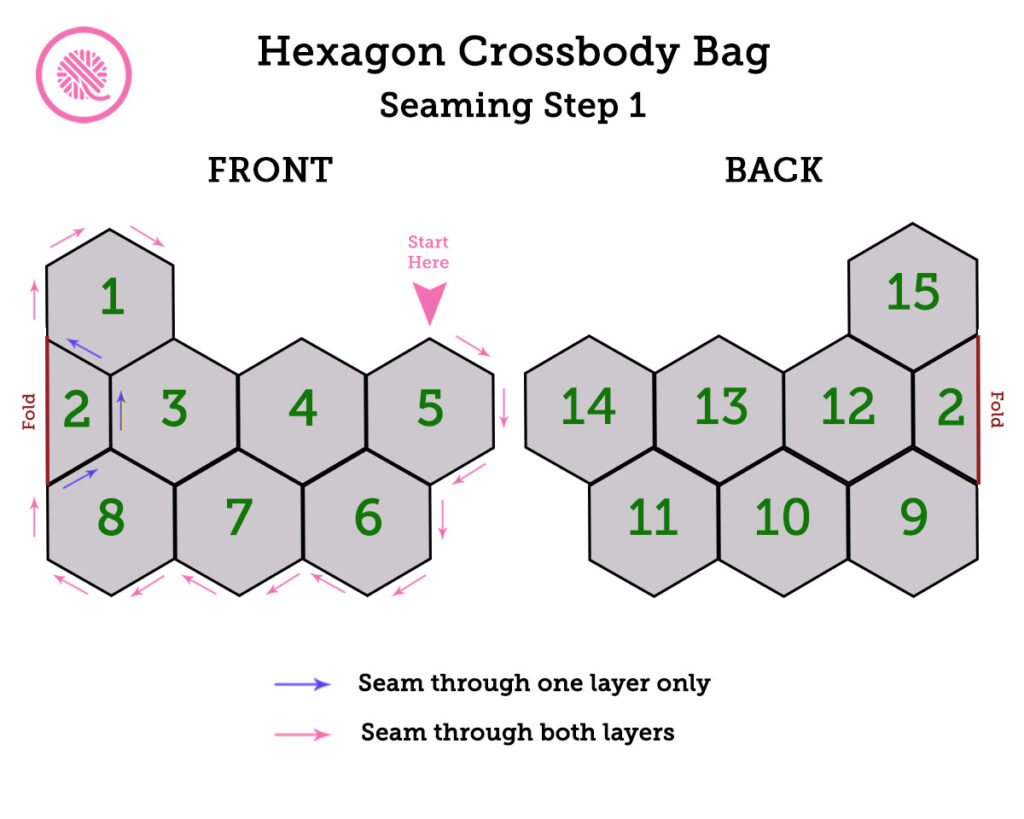
Layout:
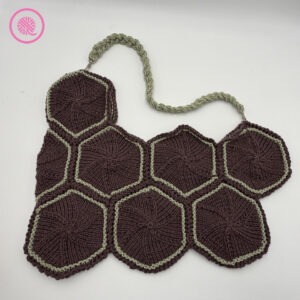
- Arrange the 15 hexagons according to the diagram below. You have 2 hexagons in the center of the first row, 7 hexagons in the second row and 6 in the third row.
- Use locking stitch markers to attach all corners where the hexagons meet.
- Fold bag in half with wrong sides together and Hexagons 1-8 showing on top.
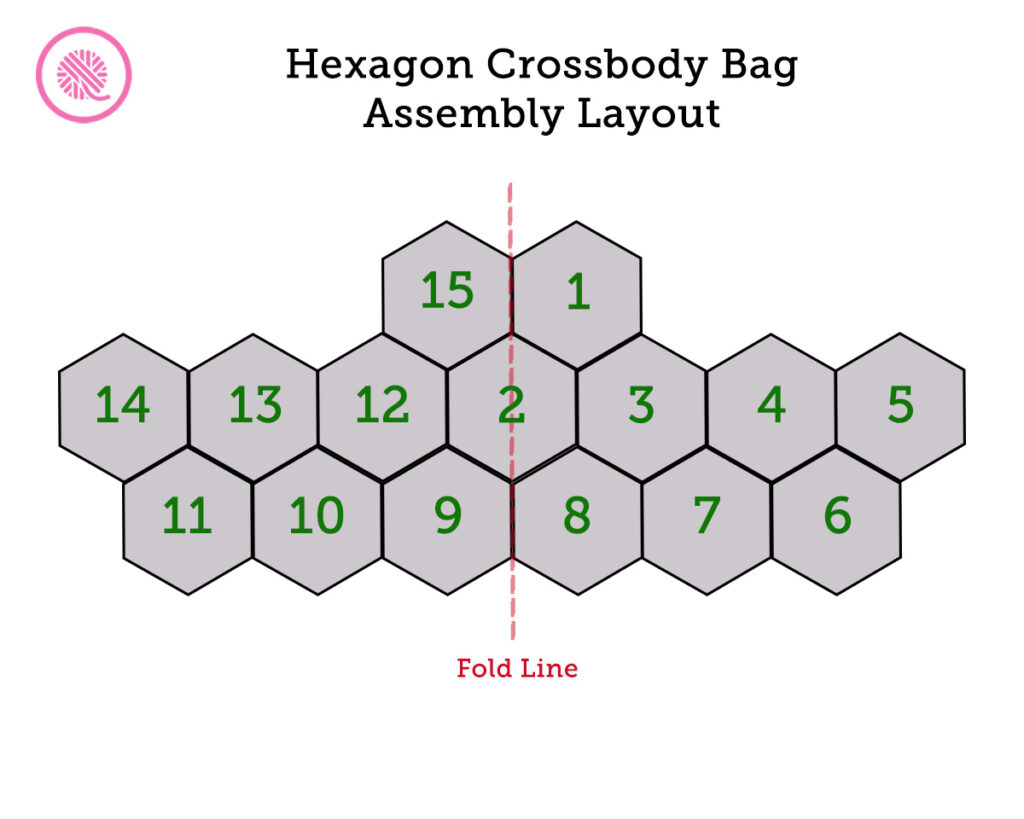
All instructions below reference the hexagons by their number in the diagrams.
Seaming:
NOTES:
You need enough yarn to measure 3 times the length of each seam.
The seams use the whip stitch to create a strong join.
Diagrams are shown for each seam you will need to sew.
When seaming the sides and bottom you will sew through both layers of hexagons to create a secure edge. I also recommend putting in an extra stitch along the outer corners where two hexagons meet to add extra stability.
The other seams join the edges between the hexagons on the front and the back. Pay close attention to the seaming instructions since you will have to turn the bag over to continue some seams.
Seam 1 (outer edges):
- Sew outside edge through both layers. Begin at the top point of Hexagon #5 and seam around the outer 3 sides of #5. Continue seaming around the outer edges of Hexagons 6, 7, and 8 stopping when you reach the corner of #8 and #2.
- Sew through top layer only. Sew Hexagons 8 and 2 along their edges. Continue seaming up along the edges of #2 and #3 followed by the edges of #1 and #2.
- Sew outside edge through both layers. Sew 3 sides of Hexagon #1.
- Cut yarn leaving a 6 inch yarn tail.
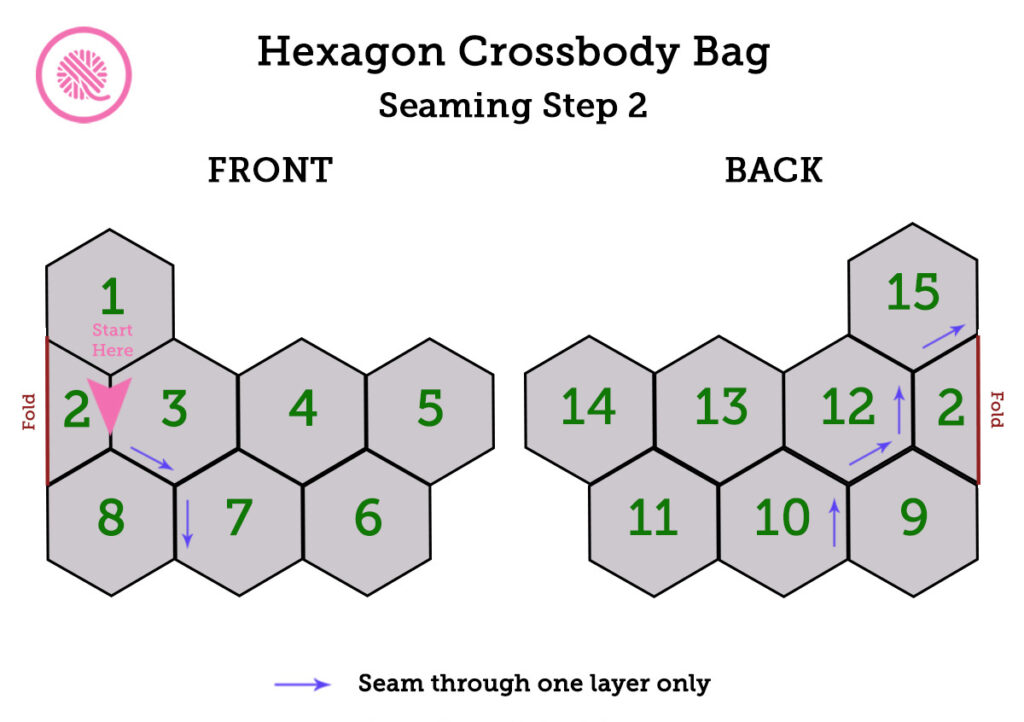
Seam 2:
- FRONT: Begin at the corner where Hexagons 2, 3, and 8 meet. Sew the edges of #3 and #8 followed by #7 and #8. TURN bag over.
- BACK: Sew the edges of #9 and #10, then #9 and #12. Continue with the edge of #2 and #12 and finish with the seam between #2 and #15.
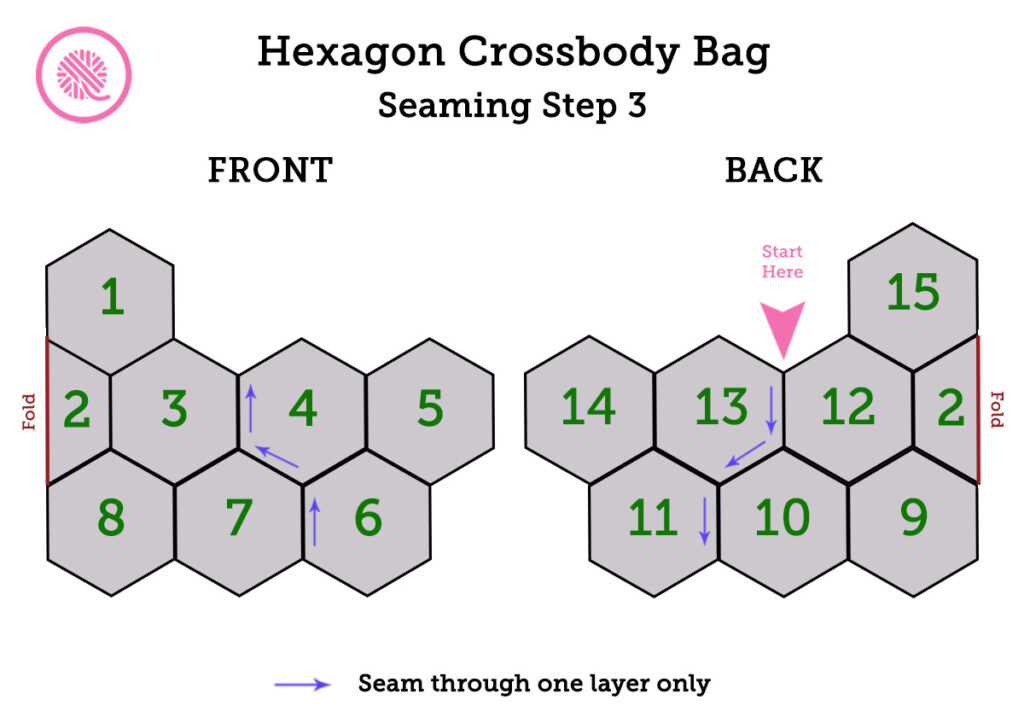
Seam 3:
- BACK: Begin at the top corner of Hexagon 12 and 13. Sew the edges of #12 and 13 together. Continue seaming with edges #10 and 13 followed by #10 and #11. TURN bag over.
- FRONT: Sew the edges of #6 and #7, then #4 and #7. Finish the seam with the edges of #3 and #4.
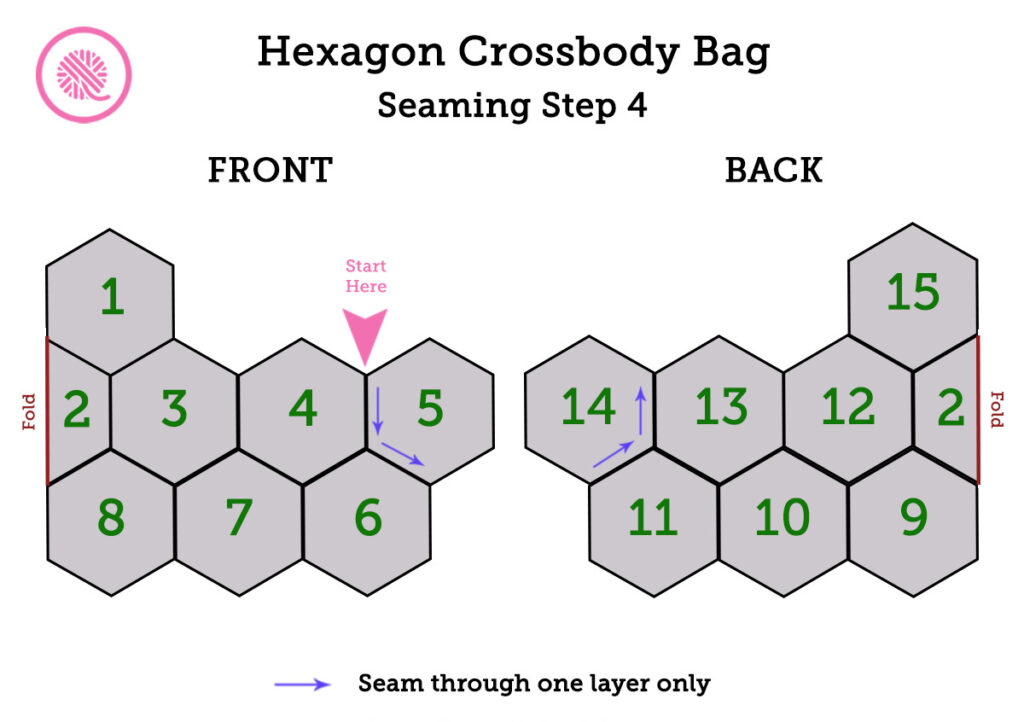
Seam 4:
- FRONT: Begin at the top corner of #4 and #5. Sew the edges of #4 and #5 then the edges of #5 and #6. TURN bag over.
- BACK: Sew the edges of #11 and #14 then the edges of #13 and #14.
Seam 5:
There are 4 seams to finish on the back that are done with 2 pieces of yarn.
- BACK: Beginning at the corner of Hexagons 11, 13, and 14, stitch the edges of #11 and #13 together. Carry your yarn through the stitches of the finished seam between #10 and #13 then sew the edges of #10 and #12. Carry your yarn in the seam between #9 and #12 then sew the edges of #2 and #9.
- Begin at the top corner of #12 and #15 and sew the edges together.
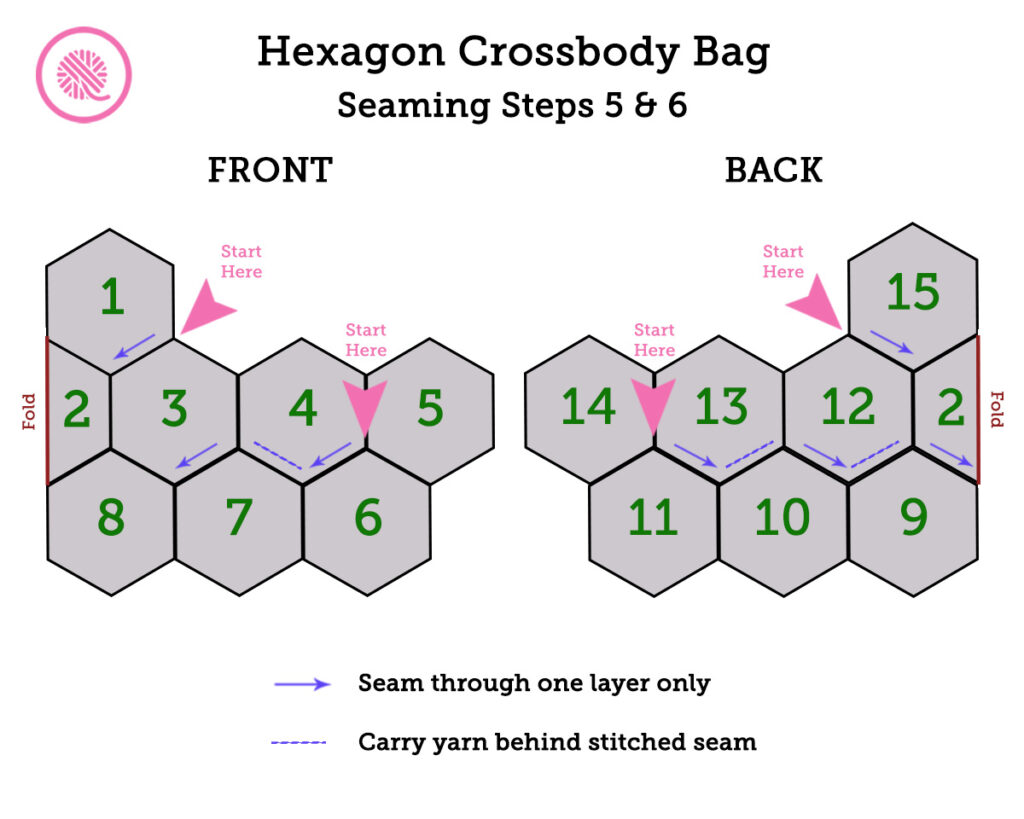
Seam 6:
There are 3 seams on the front that are finished with 2 pieces of yarn.
- FRONT: Beginning at the corner of Hexagons 4, 5, and 6, stitch the edges of #4 and #6 together. Carry your yarn through the stitch of the finished seam between #4 and #7. Sew the seam between #3 and #7.
- Begin at the top corner between #1 and #3 and finish the seam.
Seam 7 (optional pocket):
To make the top hexagon into a pocket sew the two bottom edges of Hexagons 1 (front) and 15 (back) through both layers.
FINISHING:
Weave in all yarn tails on the inside.
Sew the D rings at the top of Hexagon 1 and the top of Hexagon 5.
Clip the strap to your bag.