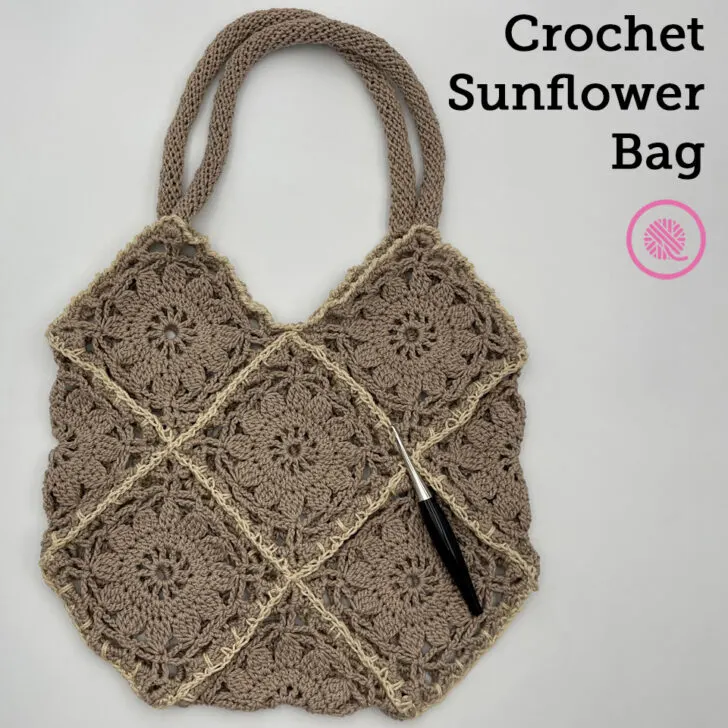
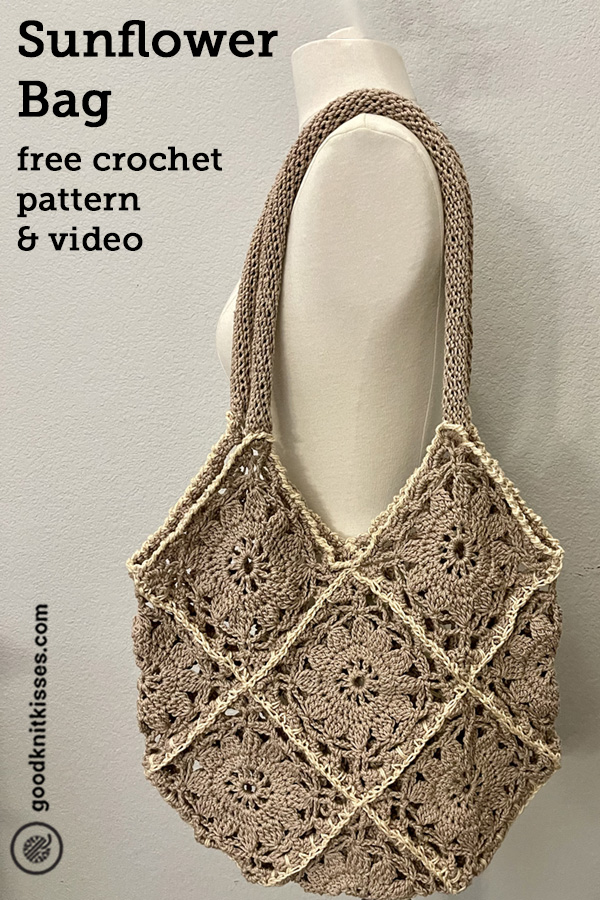
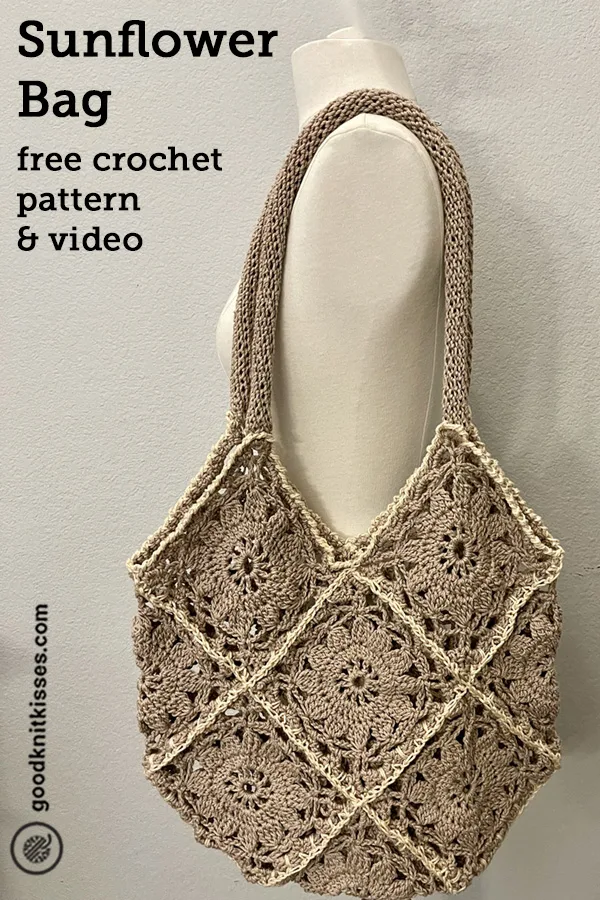
Inside: Crochet Sunflower Bag free pattern includes detailed written instructions for each component, schematics, photos, and tutorial videos showing the Sunflower square, layout, seaming, edging, handles, and optional fabric lining and pocket. Tutorial videos are available for both right and left handed crocheters.
Carry your garden with you!
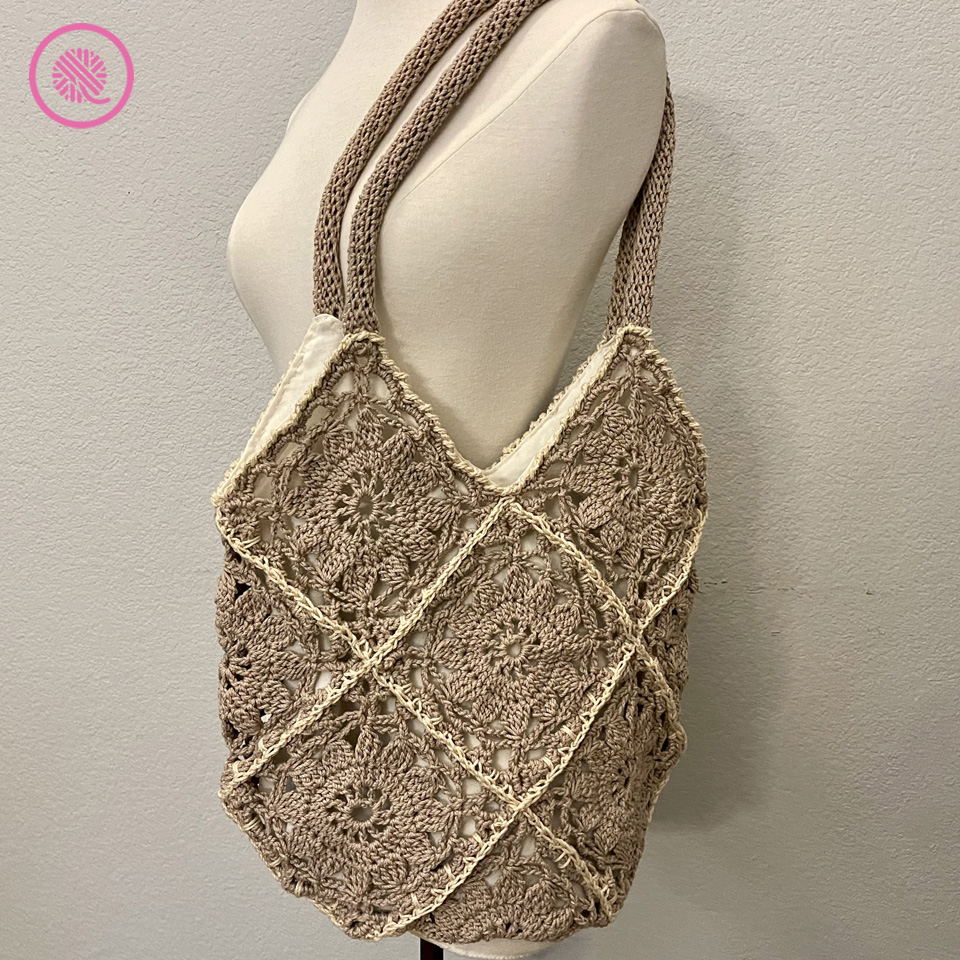
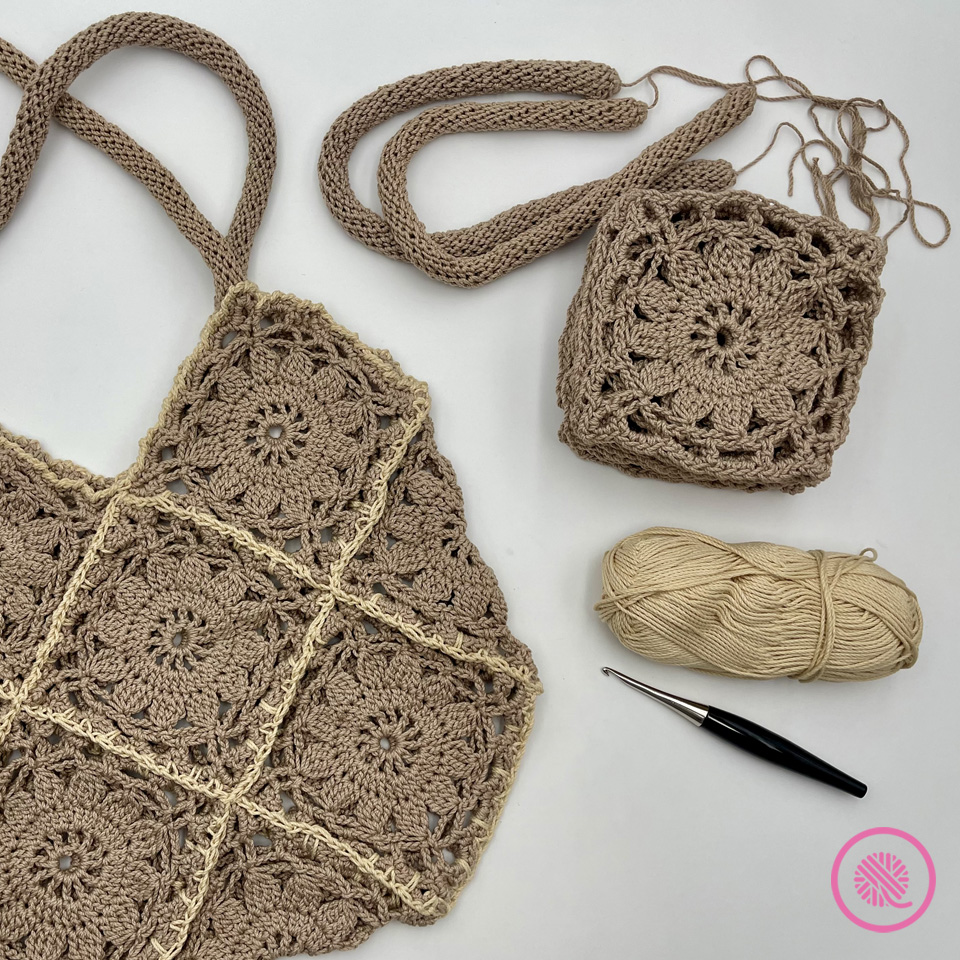
The light and lacy crochet Sunflower Bag makes a beautiful tote or purse. Or leave out the lining for a stretchy market bag. I used mercerized cotton to make sure it has great stitch definition and will be strong enough to last for years.
This soft and airy shoulder bag uses 13 Sunflower Squares pieced together along with sturdy, stylish spiral handles that are comfortable on your shoulder. I also include instructions to add an optional fabric lining and pocket if you want to use the bag as a purse.
I’ve made two of these already, one with and one without the liner, for my daughter. The one without the liner makes an ideal beach bag!
This pattern includes detailed written instructions, schematics for seaming the bag and tutorial videos demonstrating how to crochet the squares and handles, seam the bag and make and sew in the lining and pocket. It’s a full crochet along tutorial for both right and left handed crocheters.
Crochet Sunflower Bag
By Kristen Mangus
A downloadable PDF of this pattern is available in my Etsy store or from Ravelry at the links below:


MATERIALS
(Materials list may contain affiliate links to products I used to make this project. Using these links cost you nothing, but helps support GKK.)
Yarn
Medium (#4) worsted weight yarn
Yarn Bee Fundamental Cotton (164 yds./3.5 oz., 150 m/100 g)
Contrast A: 490 yds. Color Camel used for squares and handles in sample. 3 balls needed
Contrast B: 48 yds. Color Beige used for seam and edging in sample. 1 ball needed.
Hook
US Size H-8 (5 mm) hook
Furls Crochet Odyssey (5 mm size H) in Black & Nickel used in sample.
Notions
Tapestry needle
Scissors
15 locking stitch markers or safety pins (for bag assembly)
Fabric for lining – approx. ¾-1 yd [18” x 36” (46 x 91.5 cm) used for bag lining and additional for interior pocket] (optional)
Iron for pressing fabric (optional)
Straight pins (optional)
Sewing needle and thread in matching color to sew lining to bag (optional)
ABBREVIATIONS
Beg = Beginning
Ch = Chain
CL = Cluster
CS = crab stitch
dc = double crochet
hdc = half-double crochet
Rem = Remaining
Rep = Repeat
Rnd = Round
sc = single crochet
Sk =skip
Sl = slip stitch
Sp = space
St(s) = Stitch(es)
tr = treble crochet
YO = Yarnover
If you need a refresher, be sure to check out my How to Crochet series!
SKILL LEVEL Easy+
MEASUREMENTS
Bag body: 16” x 16” (40.5 x 40.5 cm)
Bag body with handles*: 16” x 27” (40.5 x 68.5 cm)
*Handles will stretch approx. 4” (10 cm) with a loaded bag.
PIN IT!
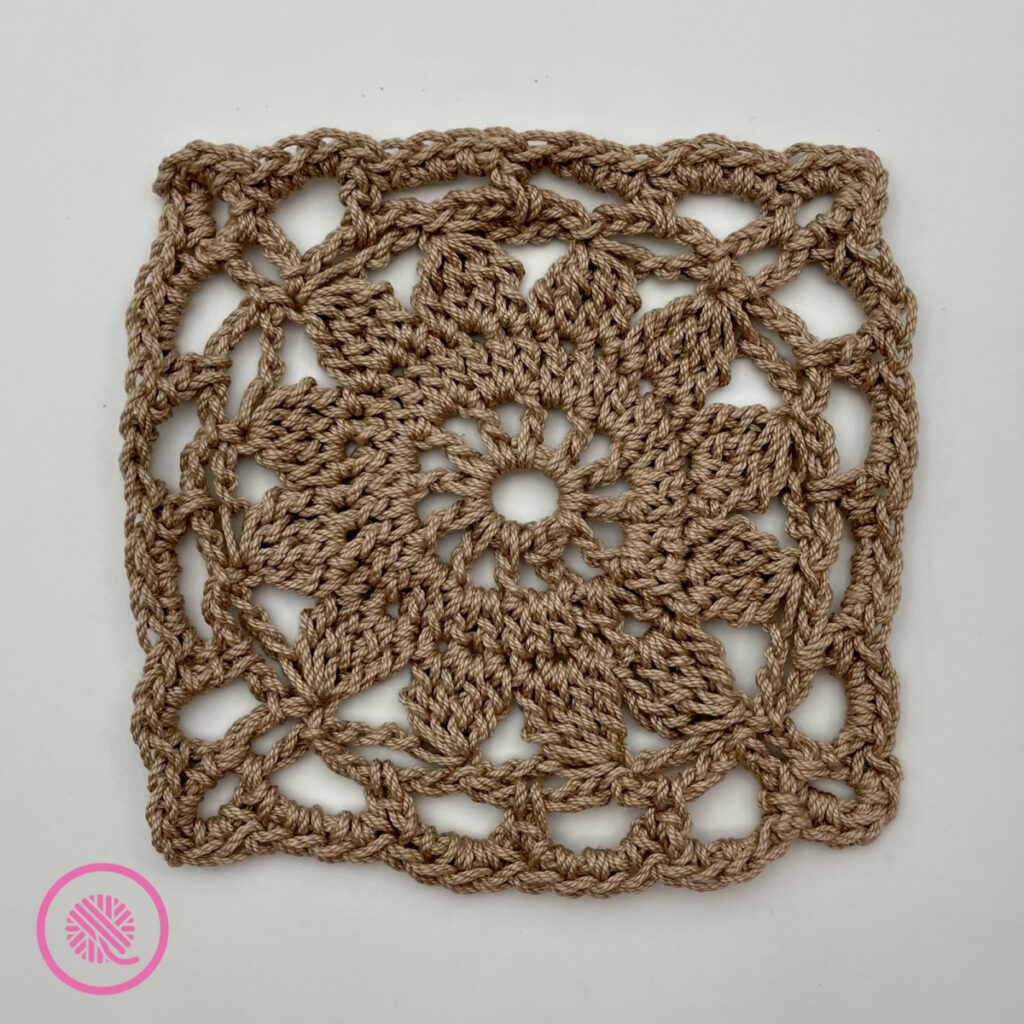
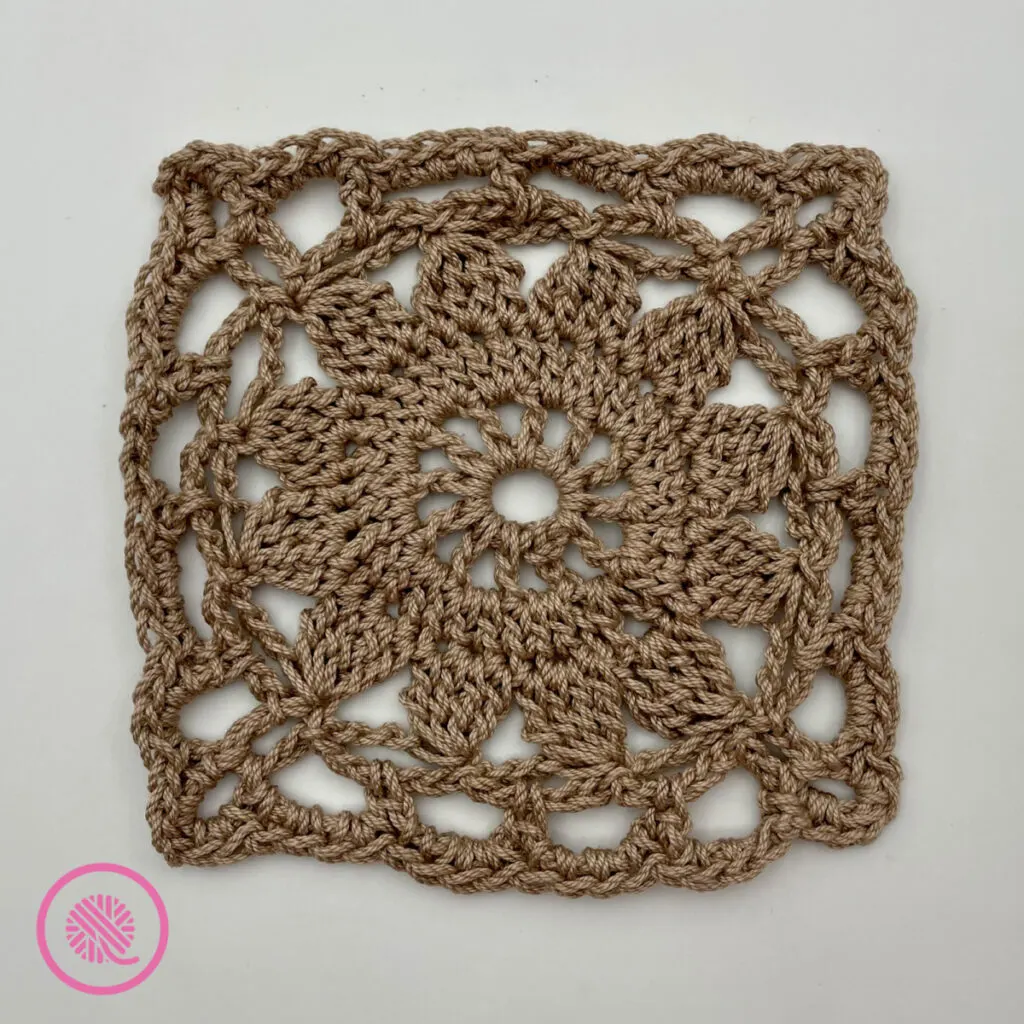
Part 1: Sunflower Square (Make 13)
The Sunflower Square is the base for this bag. This lacy square is worked from the center outward with a large sunflower center encircled with vines and a scalloped edge.
You will need to make 13 squares
NOTES
Each square measures approximately 5.75” x 5.75” (14.5 cm x 14.5 cm). If you want to use a basic granny square or other design this is size you need.
Petal-Cluster (Petal-CL): Makes 4 tr in 3 dc from prev round and joins petal tip together.
*(YO twice, insert hook in dc of prev rnd and draw up a loop, YO and draw through 2 loops on hook, YO and draw through 2 loops on hook, 2 loops remain on hook)**; rep from * across in next dc, ending rep at ** twice, 4 loops rem on hook; rep from * across in next dc, ending final rep at ** once, 5 loops rem on hook; YO and draw through all 5 loops on hook. 1 Petal-CL made. [Cluster of 4 trebles over 3 stitches = 1 treble in 1st dc, 2 trebles in 2nd dc and 1 treble in 3rd dc]
INSTRUCTIONS
Center
Chain 7. Sl st in first ch st to form center ring.
Rnd 1 – Flower center
Ch 3 (will count as first dc plus 1 ch).
*Dc in center of ring. Ch 1.
Repeat from * 10 times. [12 dc total; count beg ch].
Sl st to join round into the 2nd ch at beginning.
Rnd 2 – Outer flower center
Ch 2 (will count as first dc).
Dc twice in 1st ch-sp of the previous rnd.
*Dc in next dc. Dc twice in next ch-sp.
Repeat from * until 36 dc total.
Sl st to join round into the 2nd ch at beginning.
Rnd 3 – Petals
This round works a Petal Cluster of 4 tr into 3 dc from prev rnd. See Notes for details. [The first Petal-CL starts with 4 ch sts so there are fewer sets of 2 loops to pull through; count beg ch as tr here.]
Ch 4.
Make 1 Petal-CL in next 2 dc (1st ch-4 counts as 1st tr in Petal-CL) and ch 4.
*Make 1 Petal-CL in next 3 dc and ch 4.
Repeat from * until 12 petals made; ending in a ch-4.
Sl st to join rnd into the join at the 1st petal.
Rnd 4 – Square Setup & Vines
Ch 5 and sl st in base of the ch-5 (top of petal). This forms the 1st corner loop to make a square.
*Ch 5 and sl st into the top of the next petal of prev rnd; this forms a vine. Rep from * twice.
In the current petal ch 5 and sl st into top of same petal to form next corner loop.
Rep from * until 4 corners made. (4 corner loops and 3 vines of ch-5 between each corner loop made).
Sl st to join rnd at the base of the 1st corner loop (The first ch-5 from the rnd).
Rnd 5 – More Vines
Prev rnd ended at base of corner loop; you’ll need to get to the middle part of that loop.
Sl st in the 1st 3 ch sts of loop to get to corner top.
Ch 5 and sl st at the top of the prev rnd corner loop; This forms the 1st corner loop of this rnd on top of the prev corner loop.
*Ch 5 and sc into the ch-5-sp (vine) of the prev rnd.
Rep from * 2 times.
Ch 5 and sl st at the top of the prev rnd corner loop ch-5-sp; Ch 5 and sl st in the ch-5-sp of the prev rnd corner loop. This forms the next corner loop.
Continue from * until loop in every corner loop/vine of the prev rnd; 4 corner loops and 4 new vines of ch-5 between each corner loop made this rnd ending at 1st corner.
Sl st to join rnd at the base of the 1st corner loop (The first ch-5 from the rnd).
Rnd 6 – Edging Round
In corner loop, sc twice, ch 2, 2 sc; makes 1 square corner.
*In next vine 4 sc, rep from * three times.
**In next corner loop, sc twice, ch 2, 2 sc; makes square corner. In next four vines 4 sc. Rep from ** continuing until you reach end of rnd.
Sl st to join round into the 1st sc at 1st square corner at beginning.
Cut yarn and fasten off.
Weave in all tails with tapestry needle. Block square to 5.75” x 5.75” (14.6cm x 14.6cm)
Make 13 squares.
Crochet Sunflower Square Video Tutorial
Select videos are available to GoodKnit Kisses YouTube members only. To get exclusive access to GKK VIP-only content, free PDF patterns, weekly Zoom meetup and more, sign in to YouTube and join as a VIP Member today! Find out more about GKK Membership HERE!
This crochet along tutorial videos include all steps to make the Sunflower squares.
For multicolor squares, see the color changes used in the Garden Party Square for Rnds 1-5. Note: Rnd 6 is not the same for the Sunflower square.
Part 1: Center Flower (Rnds 1-3)
Part 2: Trailing Vines (Rnds 4-6)
Right handed
Left handed
Part 2: Seaming and Edging
NOTES
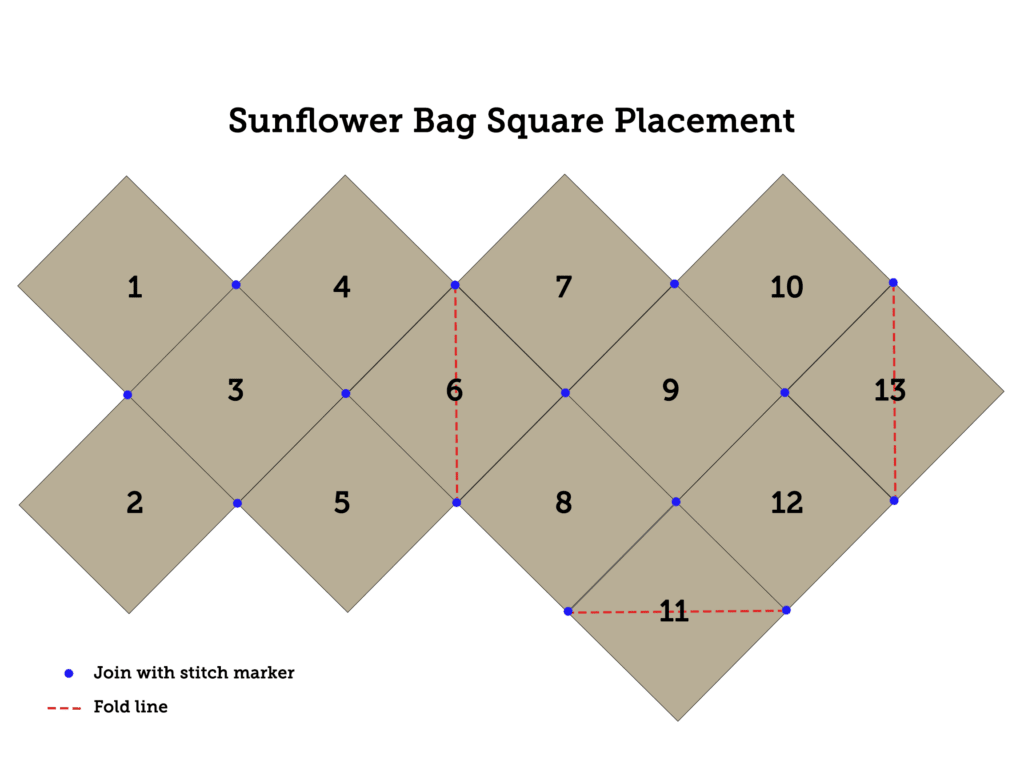
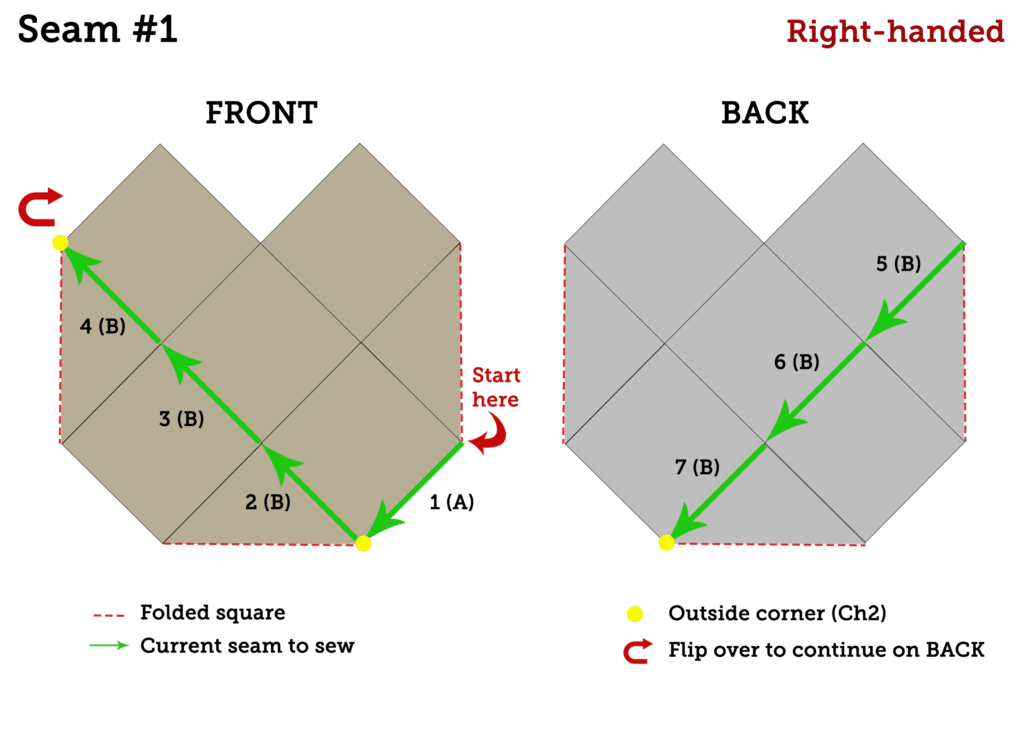
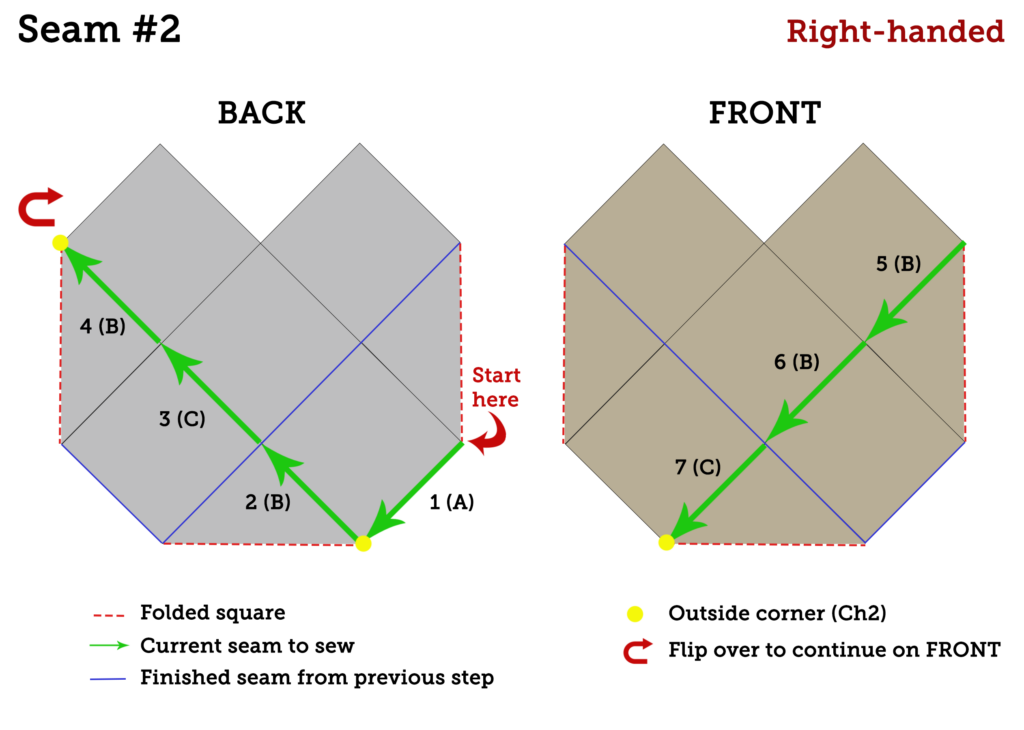
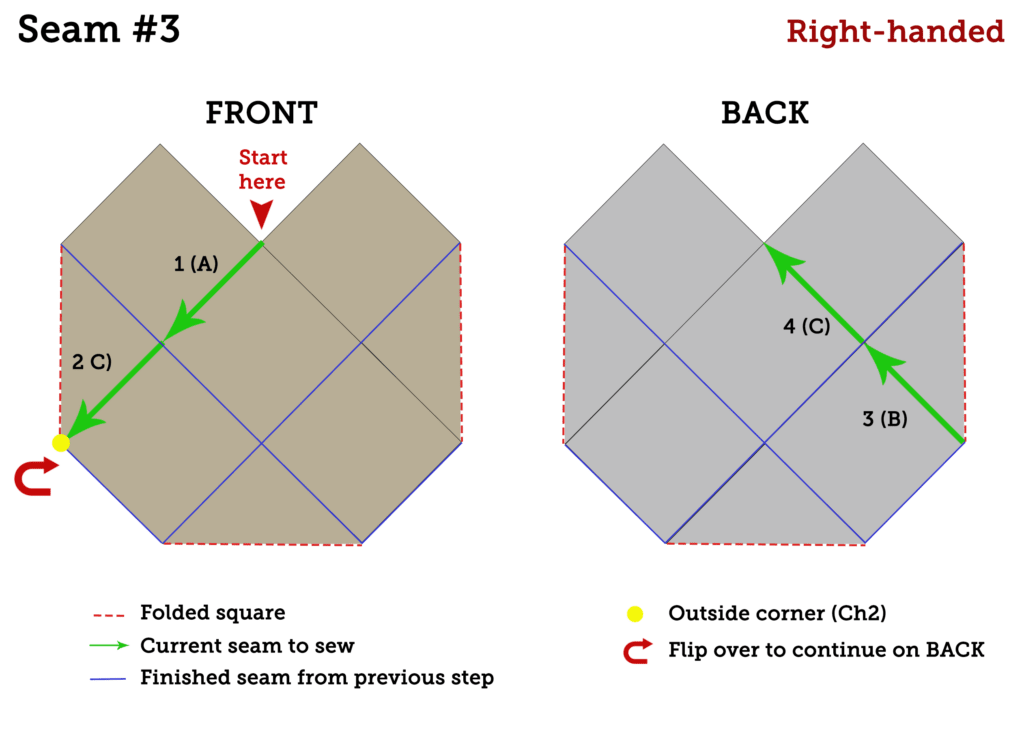
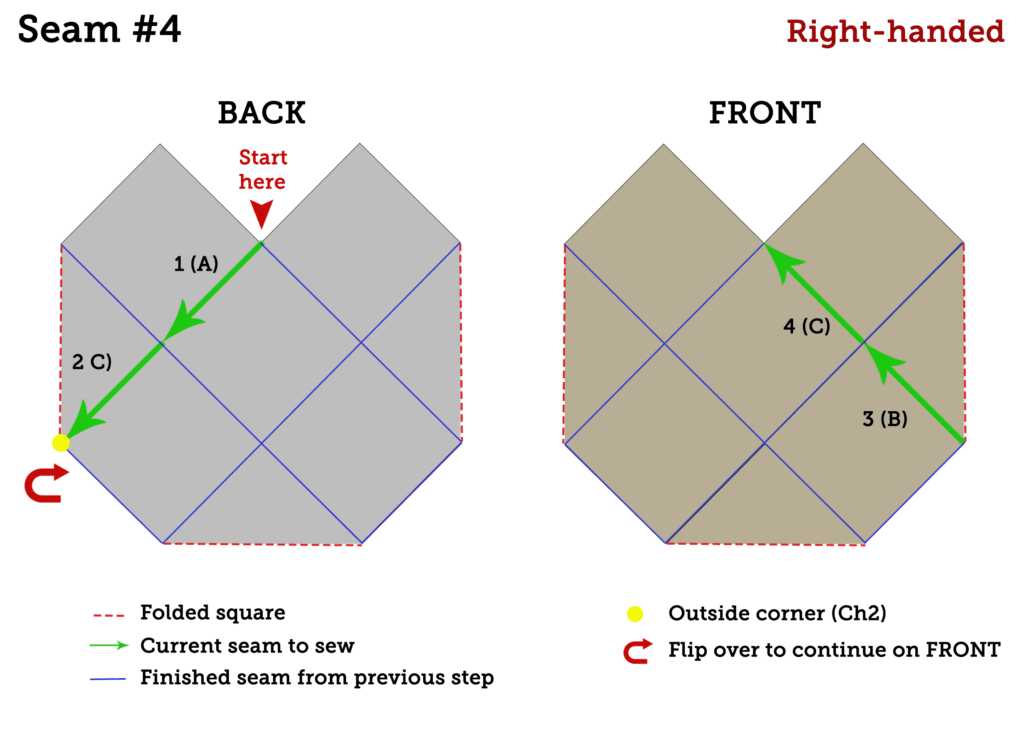
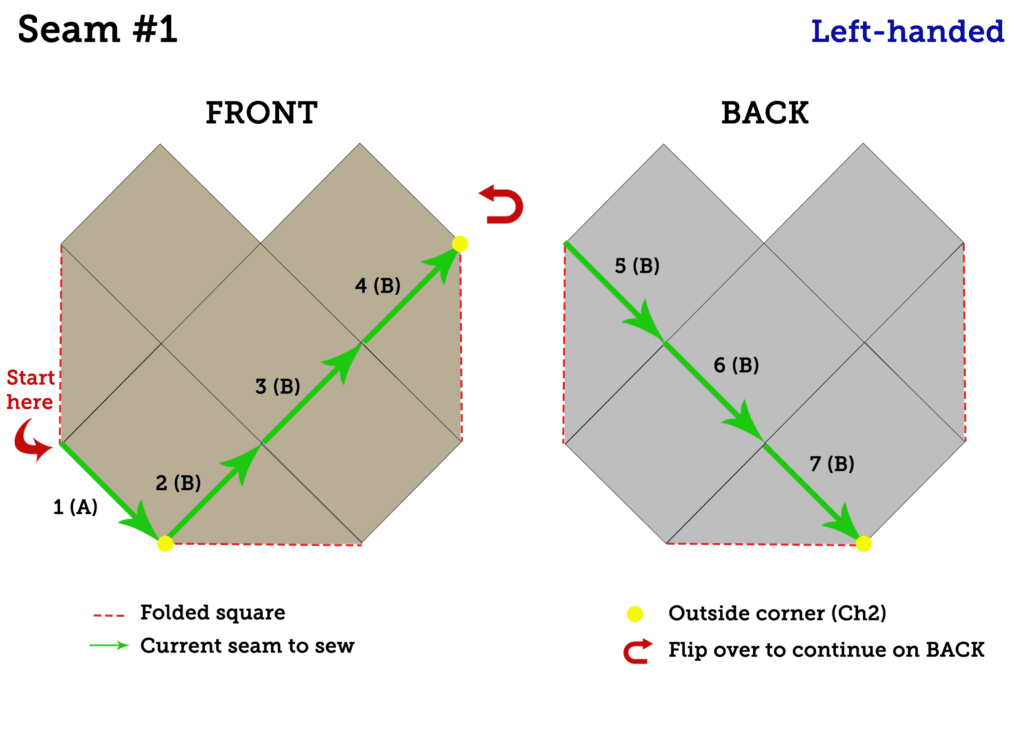
I divided the seaming into sections, first lay out the squares on a flat surface, then work 4 separate seams joining all the squares and, lastly, add a decorative crab stitch edging to the top edge of the bag.
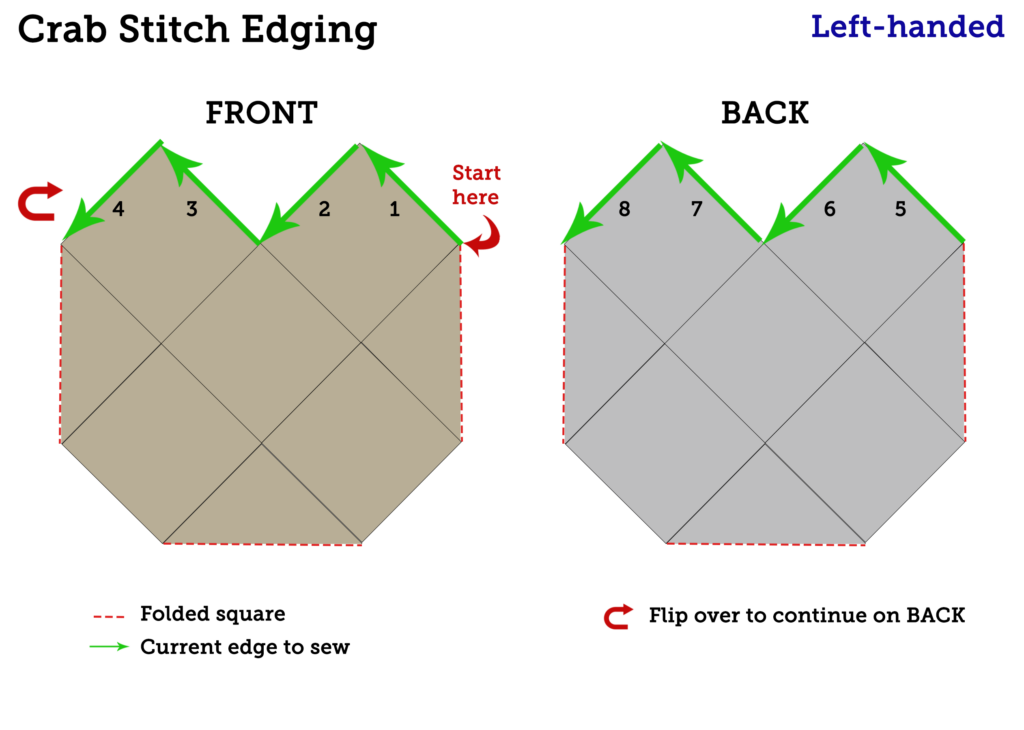
Right/Left handed: For the seaming and edging sections I created different diagrams for right and left handed people. Be sure you’re following the correct diagrams.
Outer corners: All outer corners, turning a corner on one side of the bag or flipping bag over, use a ch2 to prevent puckering.
Seam Methods: While the basic method is the same throughout, how that seam begins depends on is new squares are added at the beginning of the seam and whether or not you cross an existing seam. On the schematics below seams are listed in the order you stitch them and include the letter denoting which seam method you use. Ex: 1(A)
Seam A (basic seam): Sc in first 2 sc in corner. Ch1. *Hdc in vine. Ch1. Sc in next sc between vines. Rep from * until 1 vine rem. Hdc in last vine. Ch1. 2 sc in last 2 sc. Sl to join.
Seam B (add new squares): Sl to existing corner & pick up new corner(s). Continue with Seam A.
Seam C (go over existing seam): Ch1. Sl to existing corner & pick up new corner(s). Continue with Seam A.
Edging: This bag uses the crab stitch along the top edge. Specific notes on the crab stitch are found below Step 3.
Crochet Sunflower Bag Seaming Video Tutorial
Right handed
Left handed
INSTRUCTIONS
Step 1: Lay out the squares
First, arrange your squares RS down in the pattern shown in the schematic below.
Then, join all corners with locking stitch markers or tie them with scrap yarn. You want to create one piece.
Next, pick up squares 1-5 and fold along the diagonal of square 6 to lay them on top of the remaining squares.
Lastly, fold squares 11 and 13 along the fold lines to align the corners. Attach the corner to the others on the stitch marker at the join.

Step 2: Seaming-Right-handed (see below for left-handed)
Seam #1 Steps:
1 (A): With Contrast B, begin on lower RIGHT diagonal edge on FRONT of bag. Work a Seam A being sure to crochet through both front and back squares.
2 (B): Ch2. (corner). Work a Seam B being sure to pick up edges of square only on FRONT of bag.
3 (B): Work Seam B front squares only.
4 (B): Work Seam B front squares only. Ch2. TURN bag over to continue on BACK.
5 (B): Work Seam B back squares only.
6 (B): Work Seam B back squares only.
7 (B): Work Seam B back squares only. Cut yarn.

Seam #2 Steps:
1 (A): Begin on lower right diagonal edge on BACK of bag. Work a Seam A being sure to crochet through both front and back squares.
2 (B): Ch2. (corner). Work a Seam B being sure to pick up edges of square only on BACK of bag.
3 (C): Work Seam C back squares only.
4 (B): Work Seam B back squares only. Ch2. TURN bag over to continue on FRONT.
5 (B): Work Seam B front squares only.
6 (B): Work Seam B front squares only.
7 (C): Work Seam C front squares only. Cut yarn.

Seam #3 Steps:
1 (A): Starting at top center on FRONT of bag work a Seam A on front squares only.
2 (C): Work a Seam C front squares only. Ch2. TURN bag to continue on BACK.
3 (B): Work Seam B on back squares only.
4 (C): Work Seam C on back squares only. Ch2. Do NOT cut yarn. Continue with Seam #4 using the same working yarn.

Seam #4 Steps:
1 (A): Continuing from Seam #3 at top center on BACK work Seam A on back squares only.
2 (C): Work Seam C on back squares only. Ch2. FLIP bag over to continue on FRONT.
3 (B): Work Seam B front squares only.
4 (C): Work Seam C front squares only. Cut yarn. Weave in all tails from inside bag.

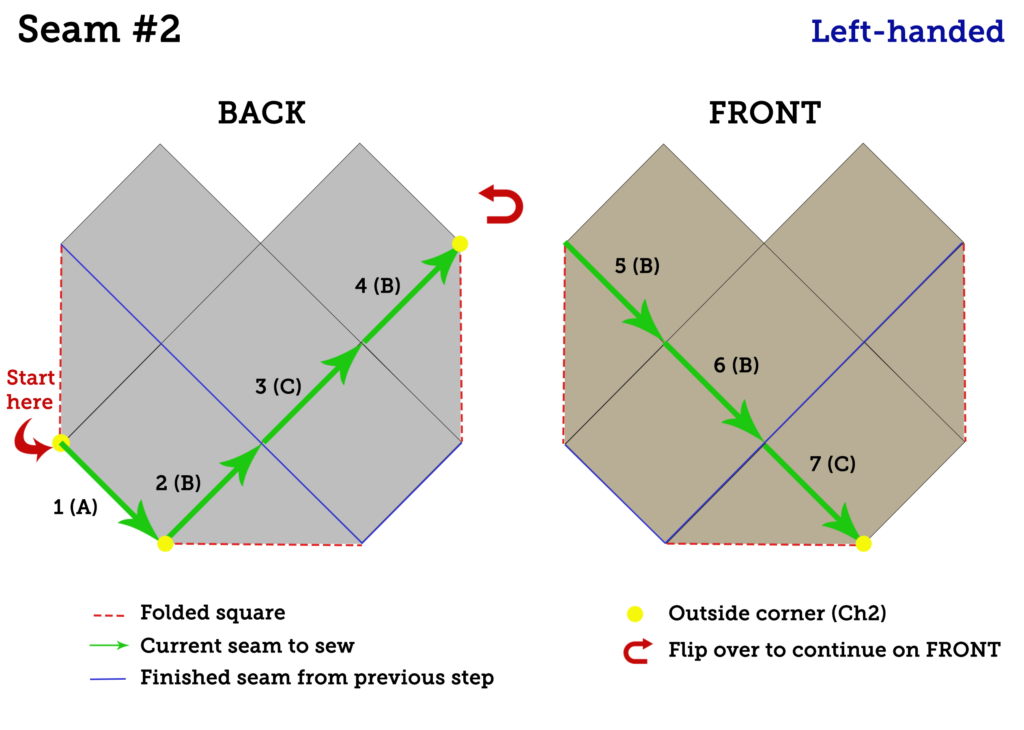
Step 2: Seaming-Left-handed (see above for right-handed)
Seam 1:
1 (A): With contrast B, begin on lower LEFT diagonal edge on FRONT of bag. Work a Seam A being sure to crochet through both front and back squares.
2 (B): Ch2. (corner). Work a Seam B being sure to pick up edges of square only on FRONT of bag.
3 (B): Work Seam B front squares only.
4 (B): Work Seam B front squares only. Ch2. TURN bag over to continue on BACK.
5 (B): Work Seam B back squares only.
6 (B): Work Seam B back squares only.
7 (B): Work Seam B back squares only. Cut yarn.

Seam #2 Steps
1 (A): Begin on lower LEFT diagonal edge on BACK of bag. Work a Seam A being sure to crochet through both front and back squares.
2 (B): Ch2. (corner). Work a Seam B being sure to pick up edges of square only on BACK of bag.
3 (C): Work Seam C back squares only.
4 (B): Work Seam B back squares only. Ch2. TURN bag over to continue on FRONT.
5 (B): Work Seam B front squares only.
6 (B): Work Seam B front squares only.
7 (C): Work Seam C front squares only. Cut yarn.

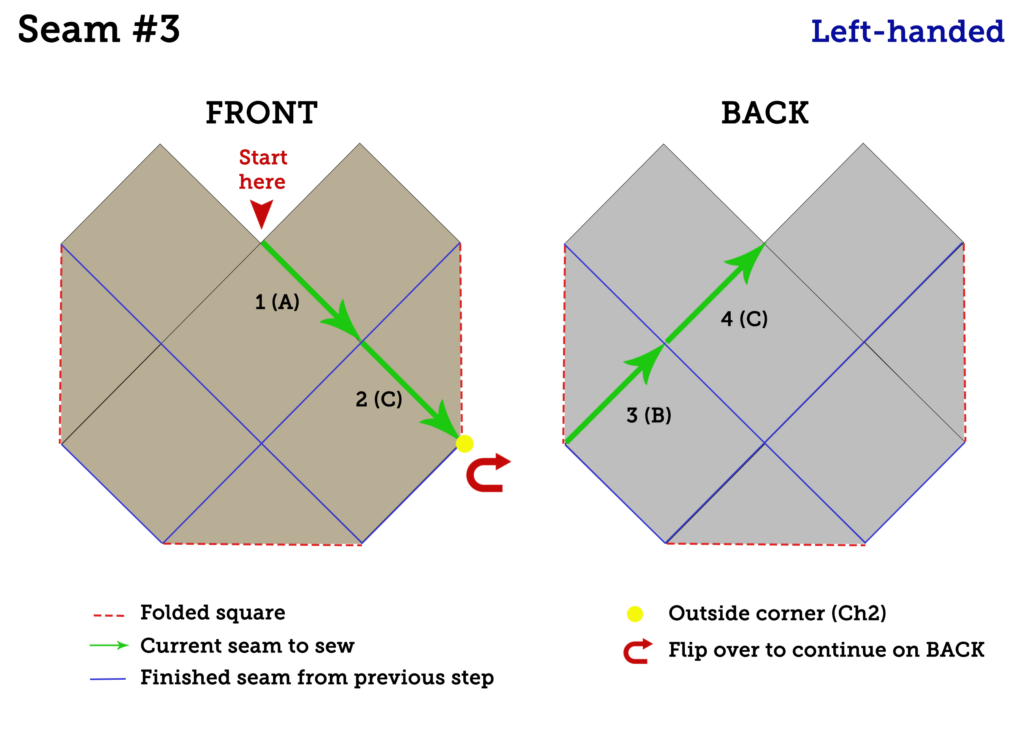
Seam #3 Steps
1 (A): Starting at top center on FRONT of bag work a Seam A on front squares only.
2 (C): Work a Seam C front squares only. Ch2. TURN bag to continue on BACK.
3 (B): Work Seam B on back squares only.
4 (C): Work Seam C on back squares only. Ch2. Do NOT cut yarn. Continue with Seam #4 using the same working yarn.

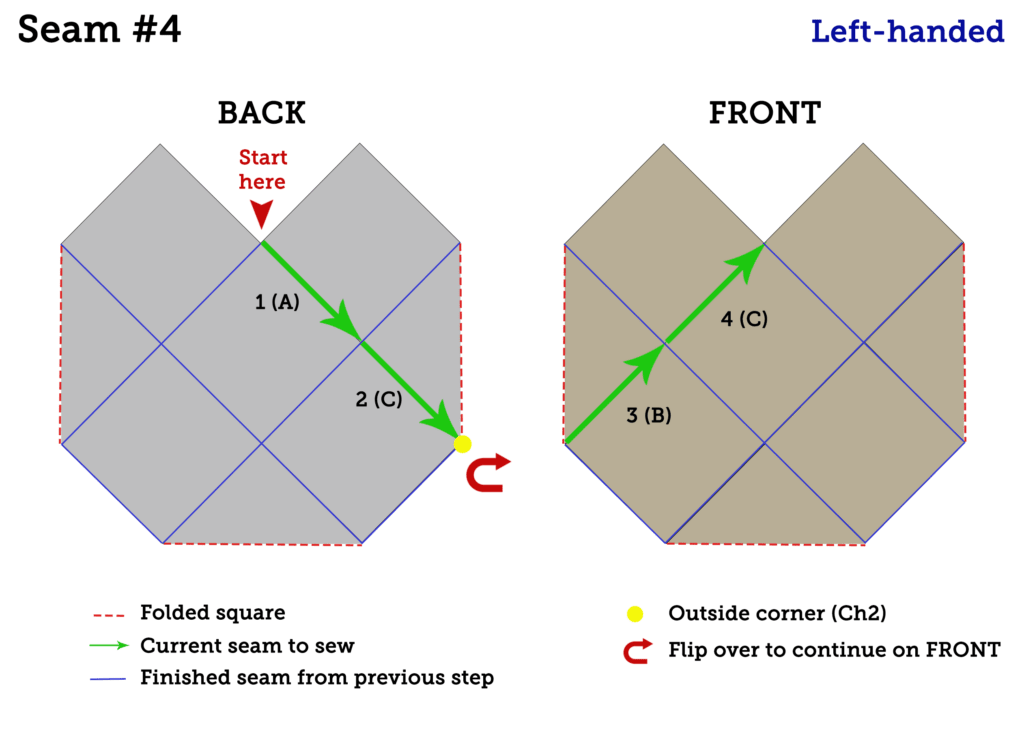
Seam #4 Steps
1 (A): Continuing from Seam #3 at top center on BACK work Seam A on back squares only.
2 (C): Work Seam C on back squares only. Ch2. FLIP bag over to continue on FRONT.
3 (B): Work Seam B front squares only.
4 (C): Work Seam C front squares only. Cut yarn. Weave in all tails from inside bag.

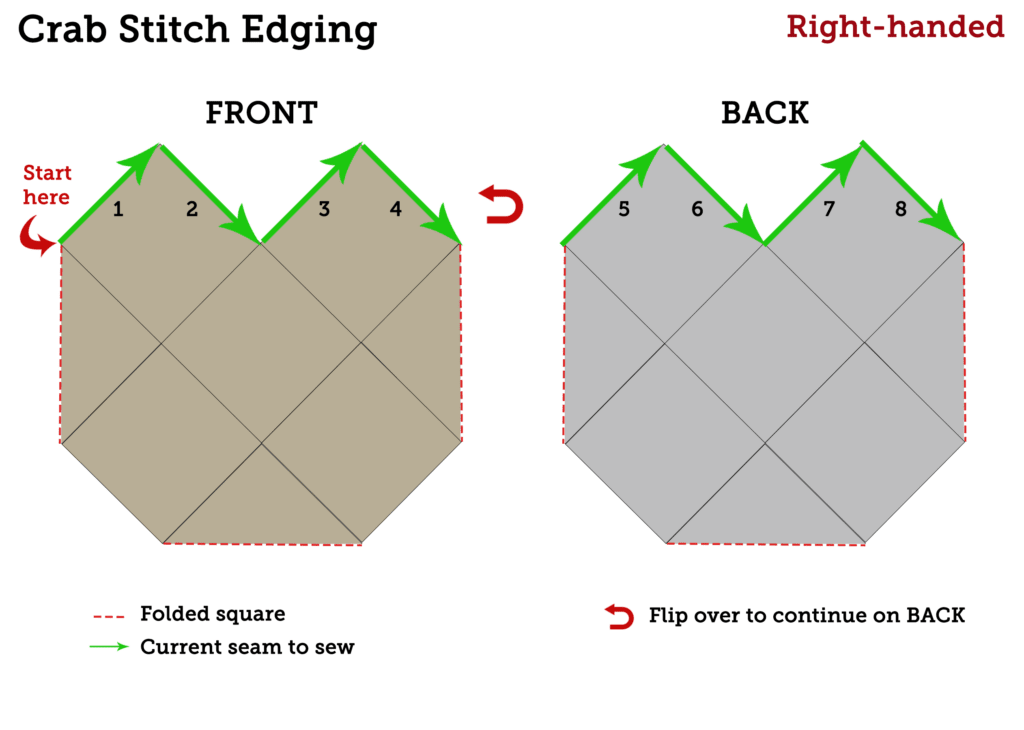
Step 3: Crab Stitch Top Edging
ABBREVIATIONS
CS = Crab stitch
NOTES
This bag has a crab stitch edging along the top opening. The crab stitch creates a strong, bumpy decorative edge on the bag.
This stitch is worked in the OPPOSITE direction you typically crochet. However, you will still be holding your hook like you normally would. Right handers you’ll be working toward the right; lefties work toward the left.
When working across the top of the vines along the edge you work only 3 CS across the 4 sc sts. This prevents the edge from bunching up.
TUTORIAL VIDEOS
This video shows how to work the crab stitch as an edging around the top of your bag.
Right-handed: https://youtu.be/XLw5tjqJvbI
Left-handed: https://youtu.be/4VOZWVy8ke4
Crochet Crab Stitch Video Tutorial
Right handed
Left handed
INSTRUCTIONS
With Contrast B, starting on the FRONT at the side edge work the crab stitch all the way around the bag following the direction listed in the diagram for either right or left handers.
1: Work 1 CS at side join. CS in next sc. *at Vine 2CS in next 2 sc, sk1, 1CS in next sc. Rep from * to last 2 sc. 2CS.
2: 2CS in next 2 sc. *2CS in next 2 sc, sk1, 1CS in next sc. Rep from * to last 2 sc. 2CS.
3. Sk1. 1CS. *2CS in next 2 sc, sk1, 1CS in next sc. Rep from * to last 2 sc. 2CS.
4: 2CS in next 2 sc. *2CS in next 2 sc, sk1, 1CS in next sc. Rep from * to last 2 sc. 2CS.
5. [At next side join]. 2CS. *2CS in next 2 sc, sk1, 1CS in next sc. Rep from * to last 2 sc. 2CS.
6: 2CS in next 2 sc. *2CS in next 2 sc, sk1, 1CS in next sc. Rep from * to last 2 sc. 2CS.
7. 2CS. *2CS in next 2 sc, sk1, 1CS in next sc. Rep from * to last 2 sc. 2CS.
8: 2CS in next 2 sc. *2CS in next 2 sc, sk1, 1CS in next sc. Rep from * to last 2 sc. 2CS.
Weave in tails from inside bag.


Part 3: Spiral Handles (Make 2)


NOTES
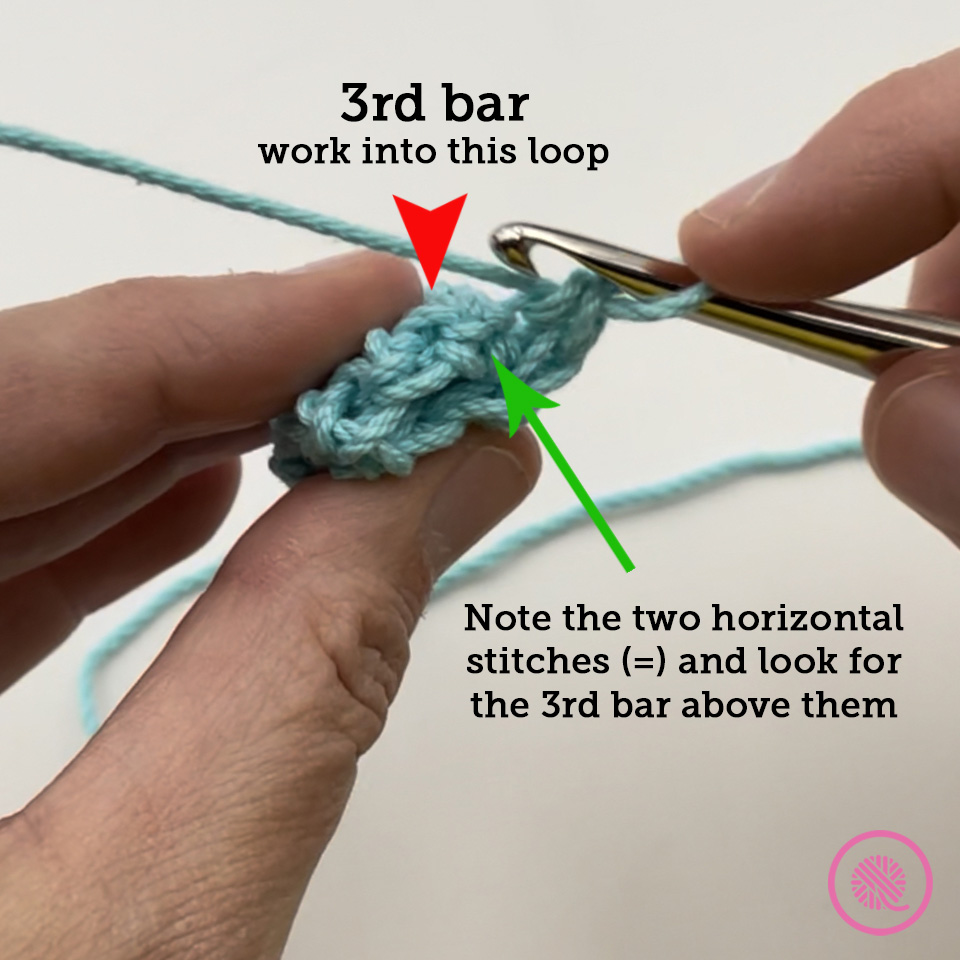
Spiral is worked in the round without joining at the end of each round. You work into the third bar of the stitch (see picture below) which causes the top edge of your work to roll inward. Be sure to watch the tutorial video below to get a clear picture of which stitch to crochet into. Note: You must keep your tension loose when working the spiral. If your tension is too tight it will be difficult to work in the third bar.
Measuring – Hold tape measure at beginning of your handle and stretch handle as far as you can. This mimics the weight on the bag as you wear it on your shoulder. Check measurement to see if you’ve reached your desired length. If it’s too long, pull out a few rounds and remeasure.
Crochet Spiral Handle Video Tutorial
Right handed
Left handed
INSTRUCTIONS
Make 2
Start with a magic circle; leaving a long tail for sewing to bag.
Rnd. 1: Sc (8 times) in magic circle. (8 sc)
Gently tug beginning yarn tail to close magic circle. NOTE: Do NOT join.
Rnd 2: Sc in back loop only. Rep seven times
Rnd 3: Look at the two horizontal/parallel lines, and note the loop coming out the top. This is the third bar of the stitch. Sc in this bar. *Sc in next bar. Rep from * to end of rnd.
Rep Rnd 3 until piece measures 22” [55.8 cm] or desired length. Rope will be a continuous spiral and stretchy.
Cut leaving a long tail for sewing to bag. Using tapestry needle, weave tail through next 8 sts and pull through to tighten. Make a knot to fasten off. At magic circle, pull tail to tighten and make a knot to fasten off.
Attach Handles
Sew one handle to the two top points on the front of the bag and sew the other handle to the back of the bag; making sure to sew to the inside of the bag under the crab stitch edging.
We recommend a whip stitch around the corner sc four times. Next continue stitching behind the crab stitch, between the handle, to reinforce and secure tightly at edge of bag. Fasten off and weave in tail. Repeat on each handle end.
Be sure not to cross the handles from front to back. See the diagram below.


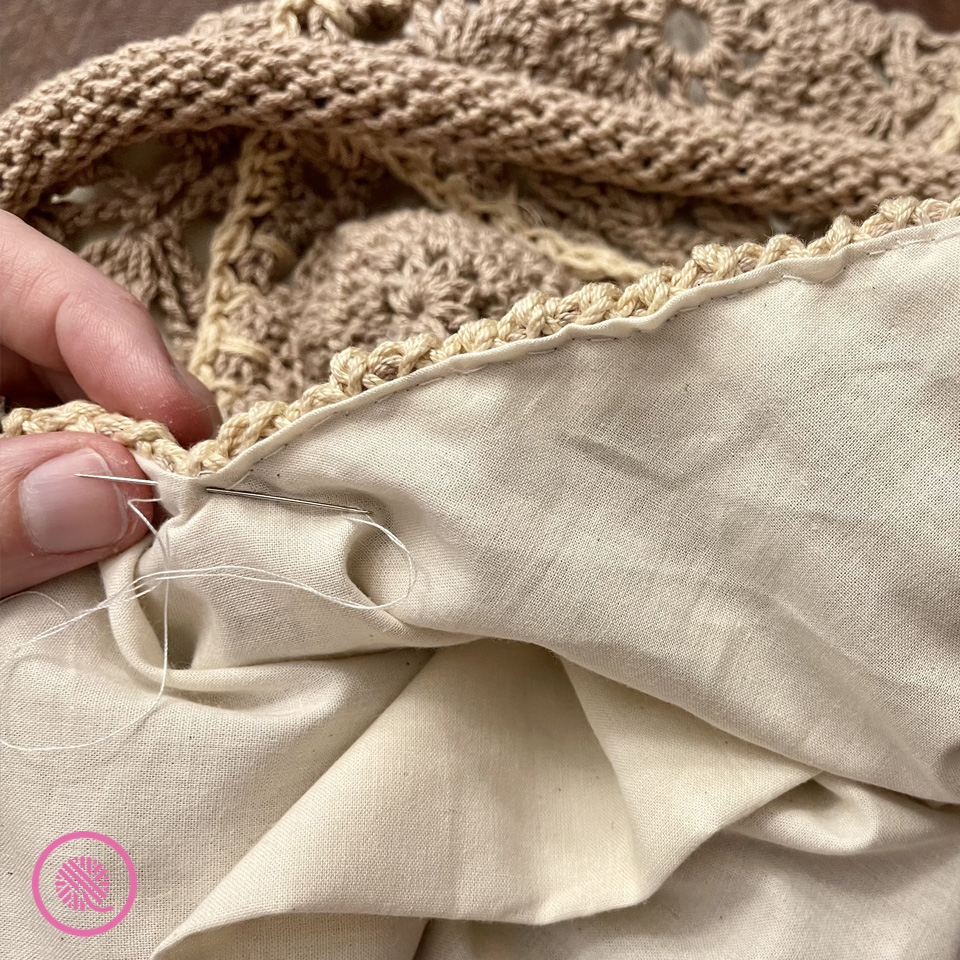
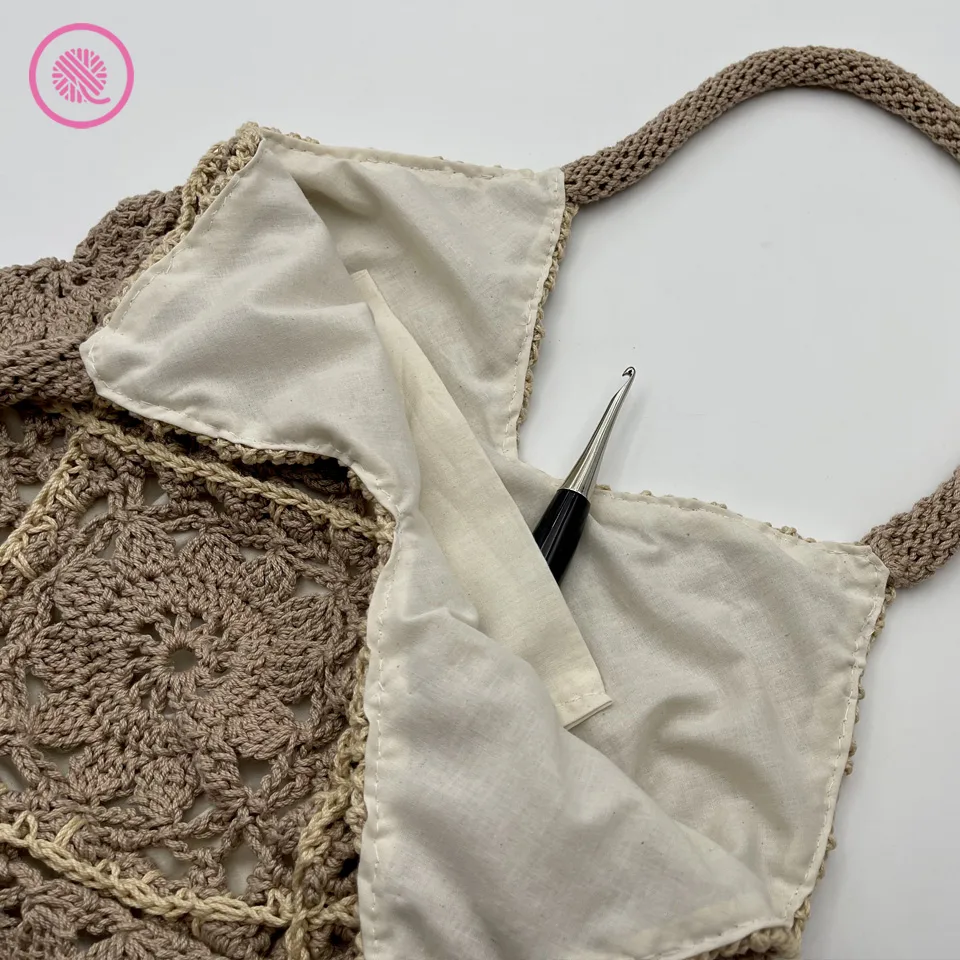
Part 4: Make and Sew in Lining (optional)

NOTES
These instructions teach you how to measure, cut out and sew a bag lining. I also included an optional interior pocket.
You can sew the bag lining by hand with a needle and thread or use a sewing machine.
I recommend ironing your fabric before cutting it out.
INSTRUCTIONS
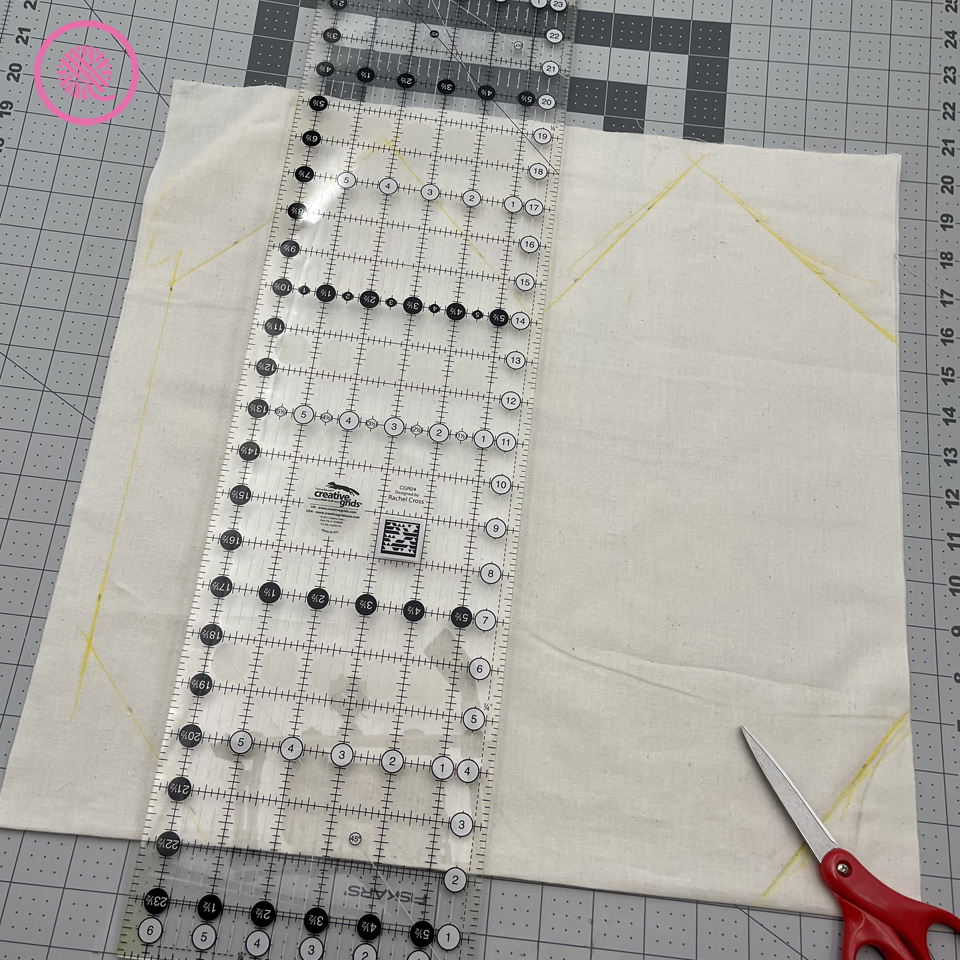
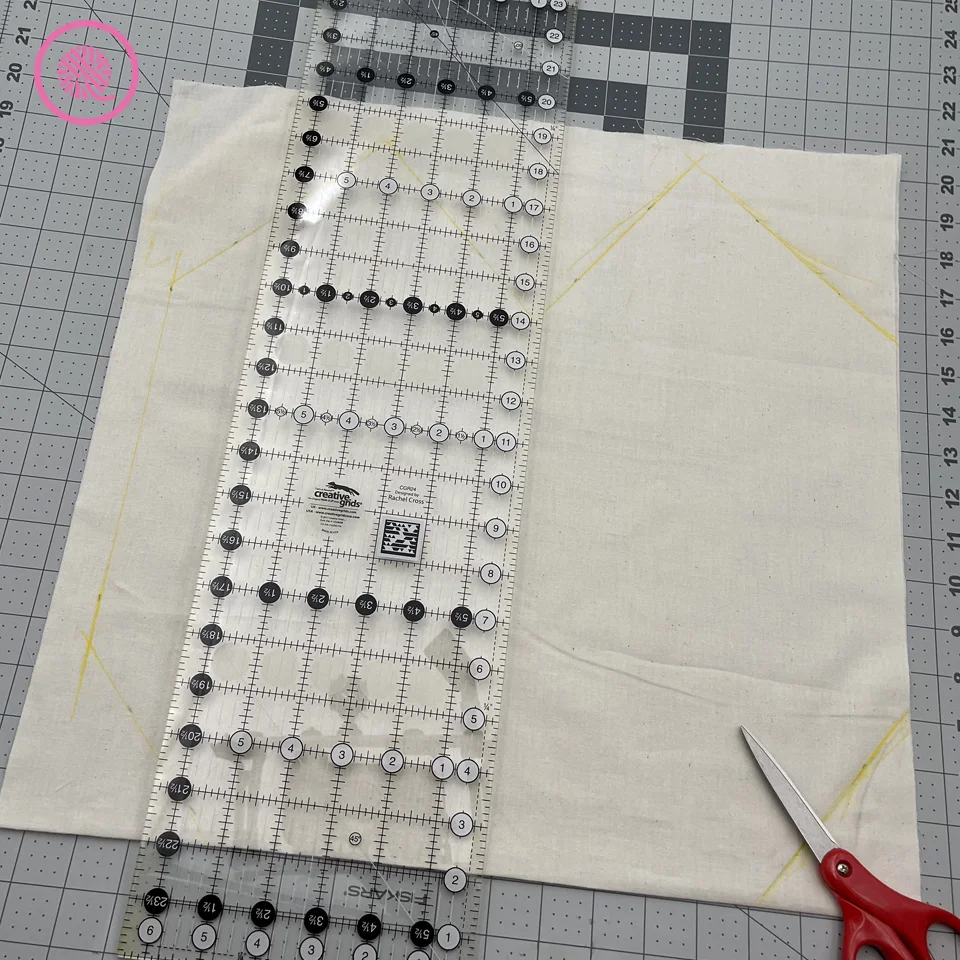
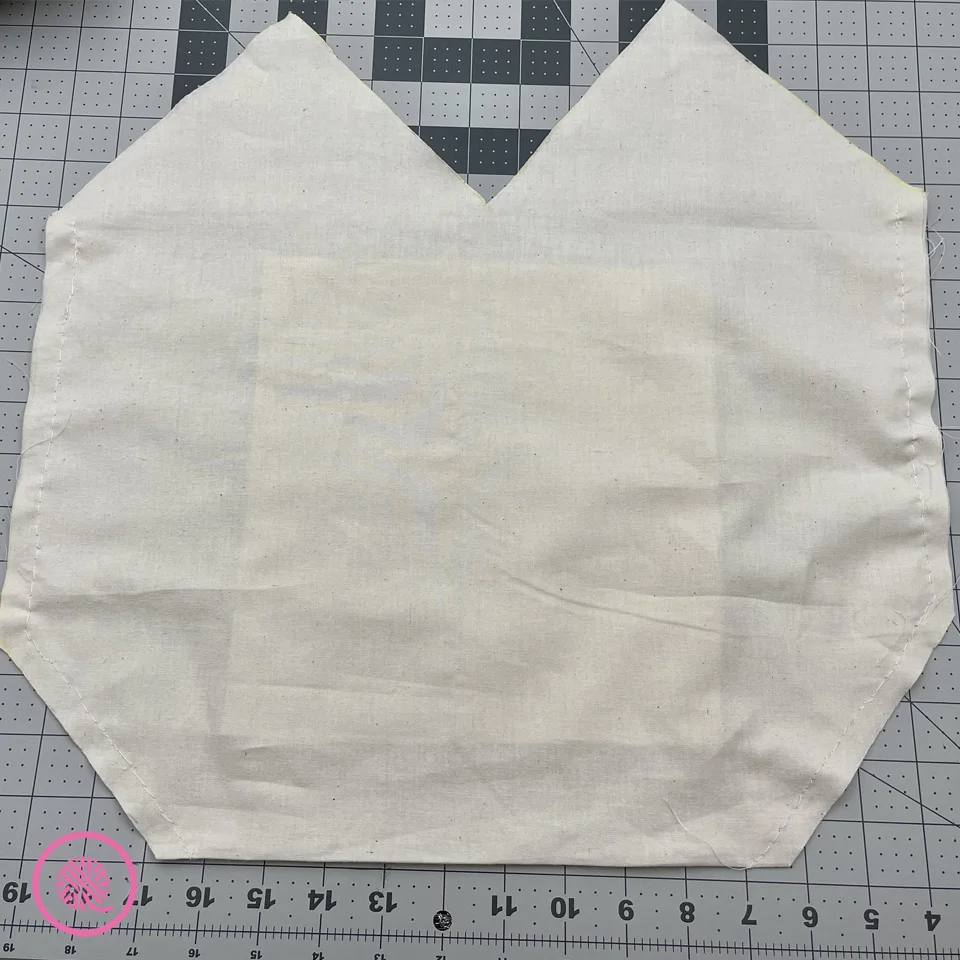
- Cut 1 18” x 36” rectangle out of your fabric and fold to make an 18” square. Press fabric along fold line.
- Lay bag on top of fabric with fold at the bottom of the bag.
- Using a pencil or chalk, mark the fabric about ½” away from the edge of the bag. I recommend using a straight edge ruler when marking.
- Cut out bag lining along marked lines making sure to cut through both layers of fabric.
- [Optional Pocket] Using the leftover fabric cut out a single rectangle approx. 10” x 19” that will fit inside your lining. Fold over ½” along each edge and press with iron. Fold pocket in half with folded edges on the inside to make a square and press fold flat.
- [Optional Pocket cont.] Unfold bag lining piece and lay pocket on inside of bag with pocket fold toward the top of the bag. Make sure the pocket is at least 1” below the top edge of the bag lining. Pin pocket to lining with straight pins. Using needle and thread or machine sew pocket to lining along side and bottom edges only leaving the top open.
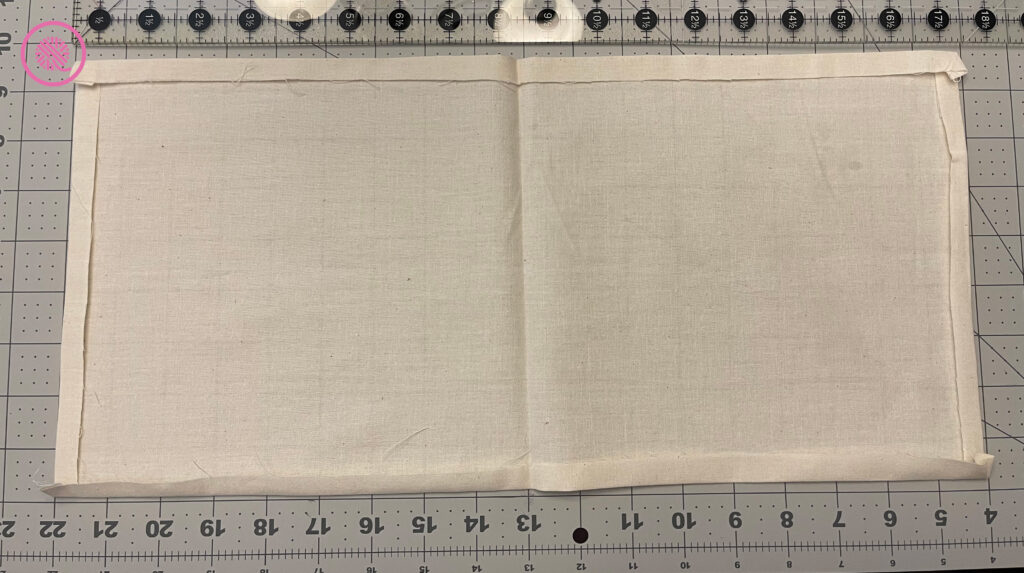
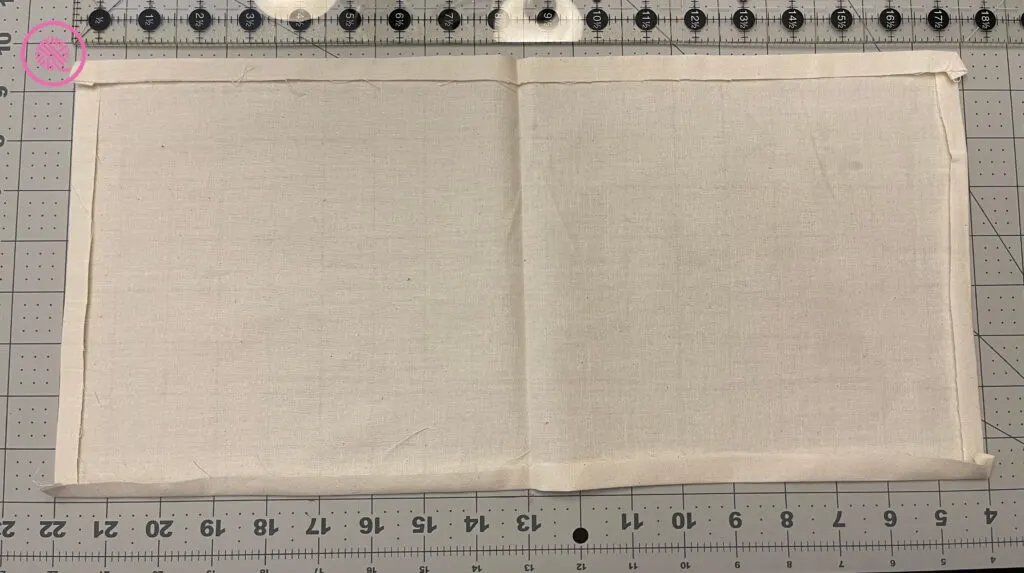
- Fold bag lining along bottom edge with pocket on the inside and align top edges. Pin side and bottom angled edges of bag lining through both layers. Sew bag lining edges.

and side seams sewn.
- Place bag lining inside bag lining up top edges and side seams. Starting at a side seam, fold top edge of lining over about ½” and pin to bag with folded edge between the lining and the bag.
- Continue all the way around the top edge folding over and pinning. At top points where handles attach, snip the point off the lining to get a smooth edge. At the bottom “valley” between the points snip a straight line ½” deep to allow you to fold over the edge.

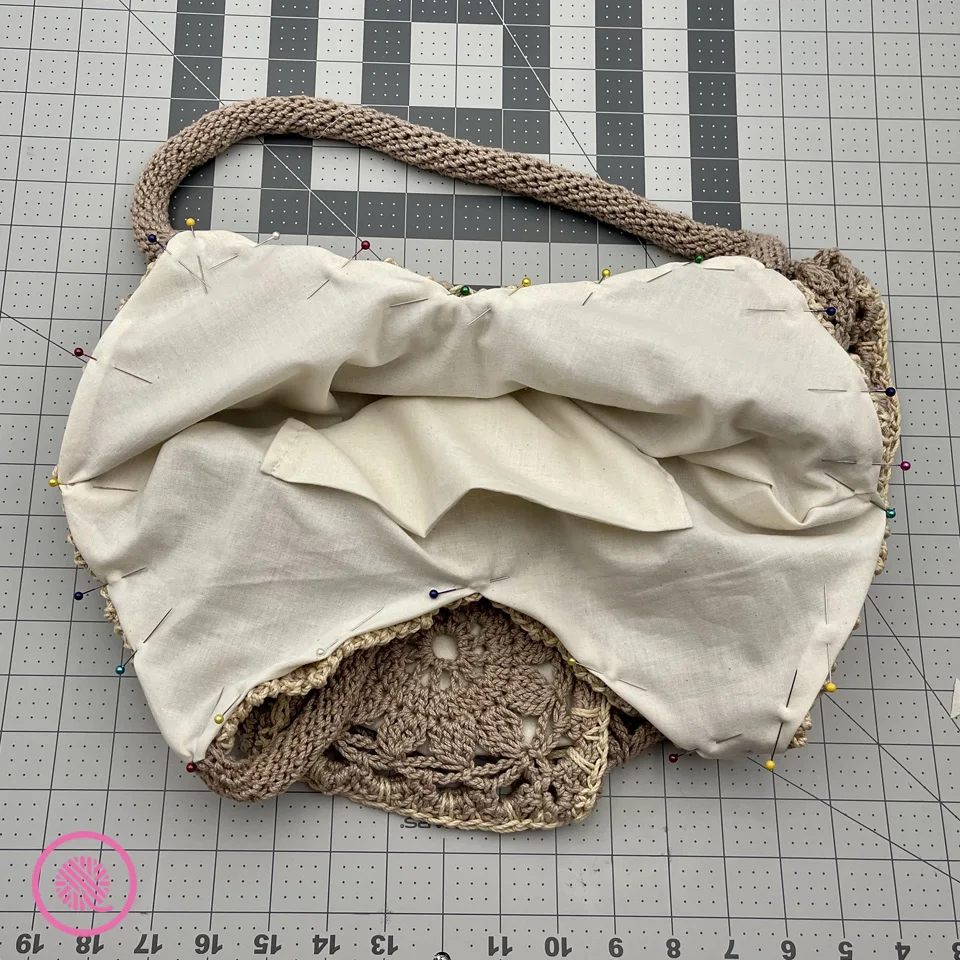
- Sew lining to bag just under the crab stitch edging along top of bag.