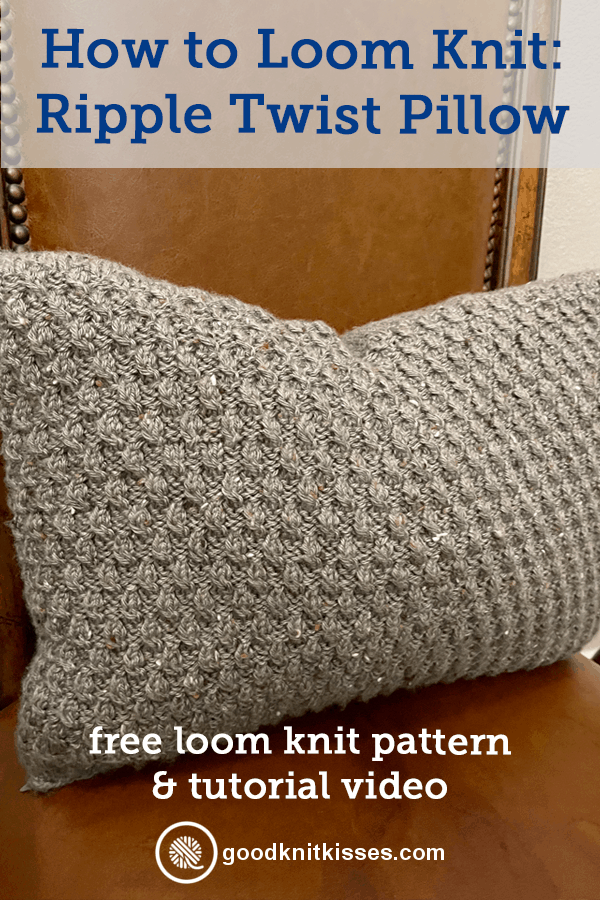
Inside: Written pattern for the loom knit Ripple Twist Pillow with chart and tutorial videos that show the stitch pattern, seaming with the mattress stitch and adding a zipper.
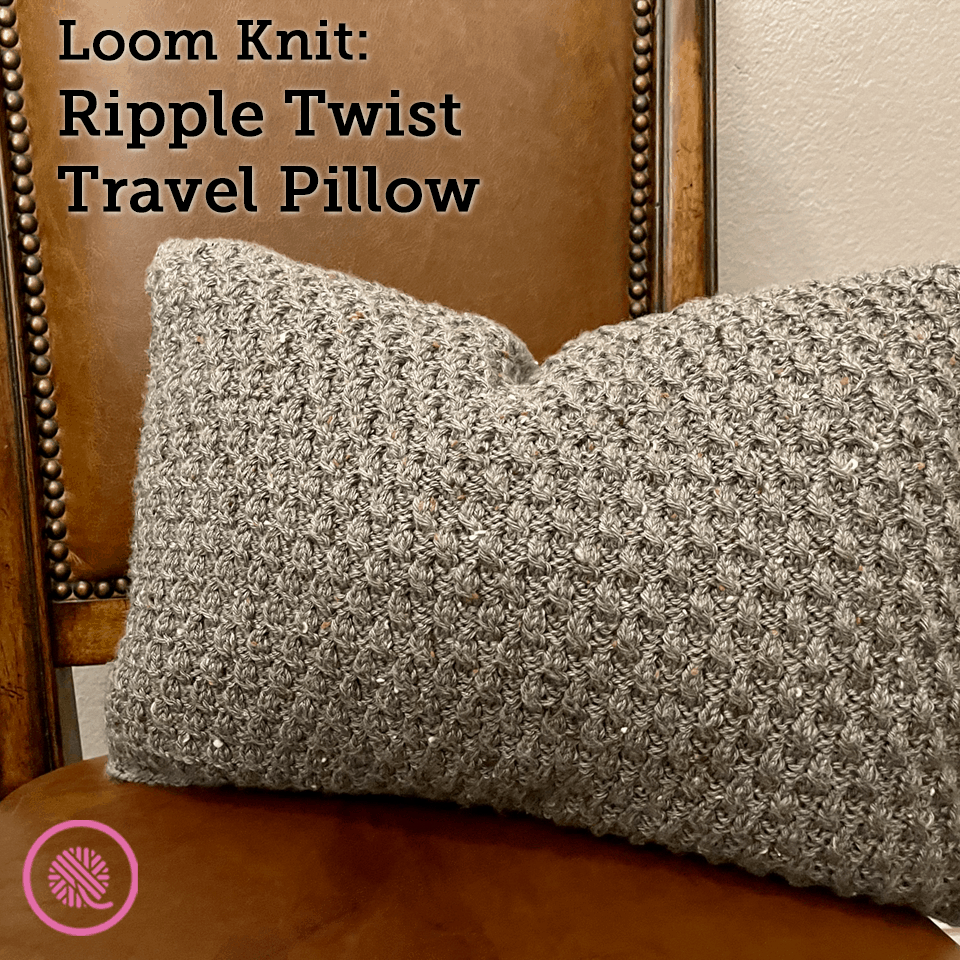
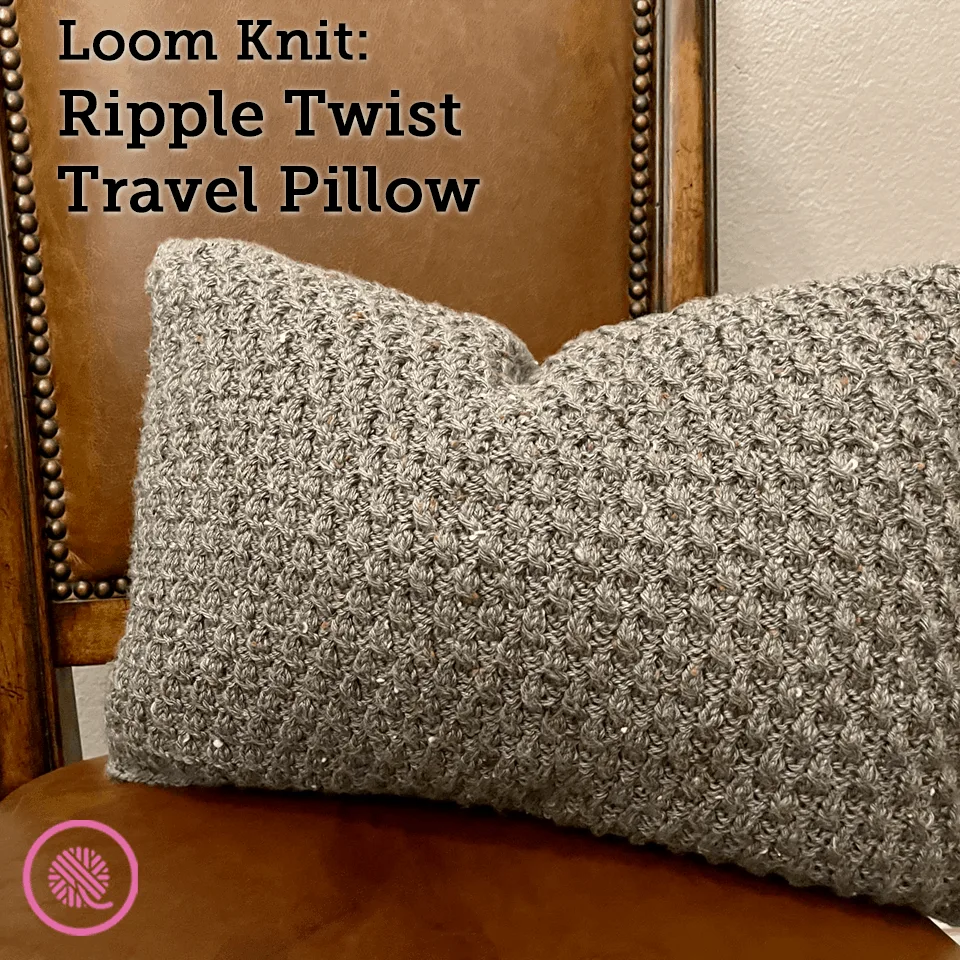
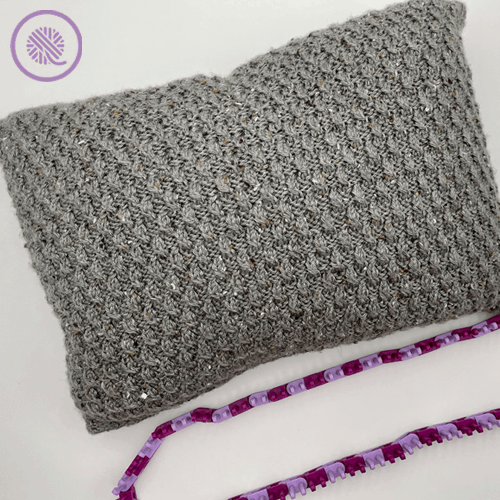
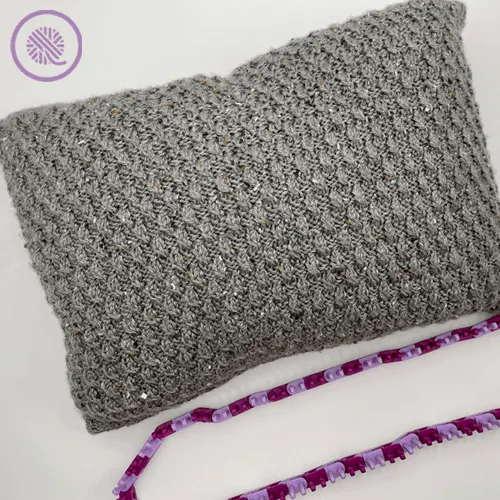
The Ripple Twist Pillow creates a unique basketweave pattern using twisted stitches. These twisted stitches are like mini cables that add a little flair to a plain weave.
This pattern makes a zippered cover for a small, travel size pillow. The ripple twist stitch pattern covers only the front of the pillow and it has a smooth stockinette back.
I designed the cover as one piece that is seamed on the sides and has a zipper sewn in close it up. If you’re nervous about seaming and sewing in the zipper try watching my tutorial videos below. I walk you through all the steps so you can sew with confidence.
You could seam the entire pillow closed, but I like the added zipper so I can remove the cover for washing.

This pattern is written specifically for a 14″ x 20″ pillow form. If you want to change the size just remember that the stitch pattern is a multiple of 4 +4. I recommend casting on fewer stitches than you need to reach the full 20″ width of the pillow. I knit mine to 18.5″ so it has to stretch just a bit to cover the pillow. This keeps the cover from being too loose and sagging.
If there is a + sign after the multiple for a stitch pattern that means there is an extra step to figure out your cast on. For example, if a stitch pattern tells you to cast on a multiple of 6+1. That means, first, you need to find a multiple of 6 that will give you the correct size project. If your gauge gives you 5 sts/in and you want about a 7″ washcloth you need the closest multiple of 6: 36 stitches. Then you need to ADD 1 more stitch to that, so your actual cast on would be 37 stitches for the project.
Loom Knit Ripple Twist Pillow
By Kristen Mangus
A downloadable PDF of this pattern is available in my Etsy store and from Ravelry at the links below:


MATERIALS
(Materials list may contain affiliate links to products I used to make this project. Using these links cost you nothing, but helps support GKK.)
Yarn
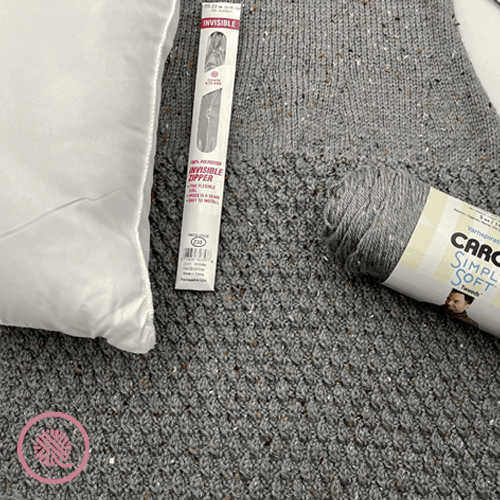
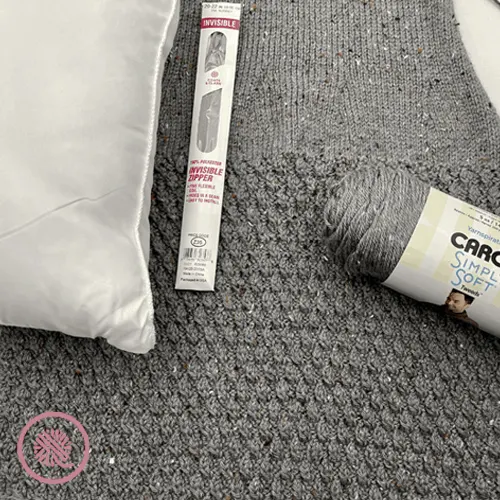
Medium (#4) worsted weight yarn
Caron Simply Soft Tweeds in Gray Heather used in sample. 2 balls.
Loom
⅜” small gauge (SG) loom with at least 104 pegs
.KB Flexee Loom Skinny (2 sets) used in sample.
Zipper: 20-22 in (50-55 cm) zipper (Coats & Clark Invisible zipper in color 23A Nugrey used in sample.)
Pillow form: 14” x 20” (36 cm x 51 cm) (Mainstays Travel Pillow used in sample.)
Tapestry needle
Sewing needle
Sewing thread to match yarn and zipper
Straight pins (optional)
ABBREVIATIONS
LT = Left Twist (see notes below)
RT = Right Twist (see notes below)
K = Uwrap Knit
P = Purl
Rep = Repeat
St(s) = Stitch(es)
For a refresher on loom knitting basics see the blog posts below to get started:
13 Questions for Beginner Loom Knitters
How to Loom Knit Basics (cast on, knit, purl, & bind off)
How to Loom Knit Basic Stitch Patterns (garter st, seed st and ribbing)
How to Loom Knit in the Round
GAUGE
22 sts x 35.5 rows in 4” in ripple twist stitch pattern
21.5 sts x 30 rows in 4” in stockinette
SKILL LEVEL Easy
MEASUREMENTS
18.5” x 25.75” (47 x 65.5 cm) finished pillow cover to fit over 20” x 14” (51 x 35.5 cm) pillow form
NOTES
Instructions are for a 14” x 20” travel pillow form however you can adapt this pattern for other sizes. The ripple twist stitch pattern will work with a multiple of 4+4 stitches if you want to change the pillow size. The front of the pillow has the stitch pattern for display on a bed or sofa while the back of the pillow uses stockinette for a smooth side to lay your head on.
There is ease in this pattern so the pillow cover is knit smaller than the finished pillow to allow for stretch and a closer fit.
Prep fiberfill pillow form by massaging it to pull some of the filling towards the corners before inserting into knit pillowcase. This will help shape the corners and stand up better with your knit cover.
Left Twist: Skip one stitch and Ewrap knit second stitch, place stitch to hold on peg before slipped. Knit the skipped stitch then place on empty peg. Move held stitch to empty peg. Pull snug any loose stitches.
Right Twist: Pick up stitch and place to hold on previous peg to skip. Knit next stitch and place on empty peg. Move held stitch to empty peg and knit. Pull snug any loose stitches.
INSTRUCTIONS
Patterned Side A (See Chart below.)
Cast on 104 sts.
Row 1: P1. *P2. LT. Rep from * to last 3 sts. P3.
Row 2: P3. *K2. P2. Rep from * to last st. P1.
Row 3: K1. *K2. RT. Rep from * to last 3 sts. K3.
Row 4: K3. *P2. K2. Rep from * to last st. K1.
Row 5: P1. *LT. P2. Rep from * to last 3 sts. LT. P1.
Row 6: P1. K2. *P2. K2. Rep from * to last st. P1.
Row 7: K1. *RT. K2. Rep from * to last 3 sts. RT. K1.
Row 8: P3. *K2. P2. Rep from * to last st. P1.
Repeat Rows 1-8 until piece measures 12.5”** ending on a Row 4 or 8. [13.5 repeats used in sample]. This will cover one side of the pillow.
**Best practice for measuring: With scrap yarn, take knitting off loom and tug downward or lightly block to relax stitches before measuring. Lie flat and measure from cast on edge to live stitches.
Stockinette Side B
Row 9: Knit all sts.
Repeat Row 9 ten times.
Row 10: K1. *K2tog. Knit 23. Repeat from * until 3 sts rem. K2tog. K1. (100 sts)
Repeat Row 9 three more times.
Row 11: K1. *K2tog. Knit 22. Repeat from * until 3 sts rem. K2tog. K1. (96 sts)
Repeat Row 9 until piece measures 25.75”**. Alternatively, wrap knitting around pillow form to make sure it is long enough. Adjust length if needed. **Best practice for measuring: With scrap yarn, take knitting off loom and tug downward or lightly block to relax stitches before measuring. Lie flat and measure from cast on edge to live stitches.
Bind off in pattern.
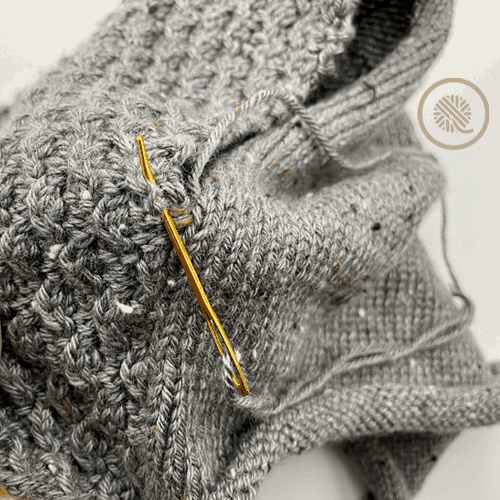
Fold in half with WS pattern & WS stockinette sides together and sew short edges together as follows:
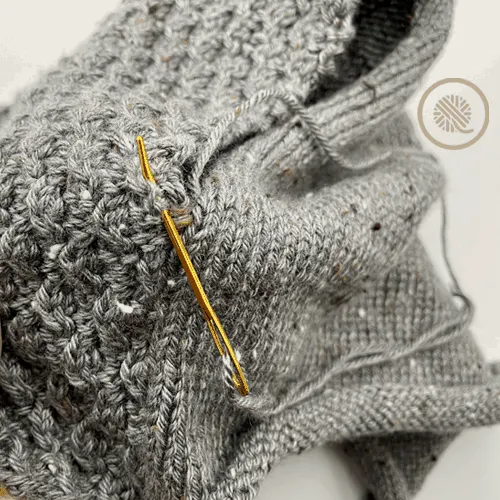
- Starting ¼” from cast on and bind off edges, sew along short side using the mattress stitch (see video).
- Repeat on other short side.
- Weave in tails.
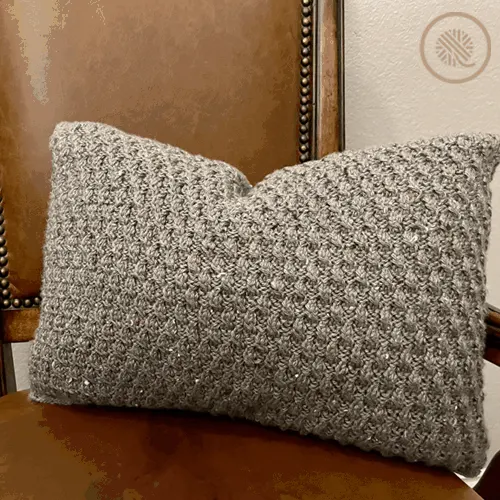
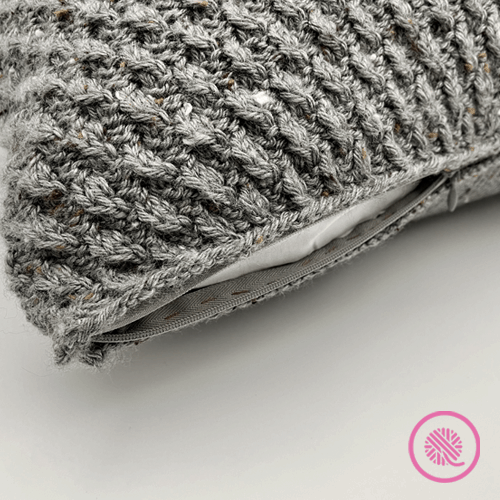
NOTE: The side with the stitch pattern is shorter than the stockinette side. This makes the top of the pillow a bit flatter to give a softer edge. Perfect for giving a karate chop in the middle for a designer look. (see photo)

Sew in an invisible 20-22” zipper with two strands of nylon sewing thread & needle (see video).
Insert pillow form and zip up pillow case.
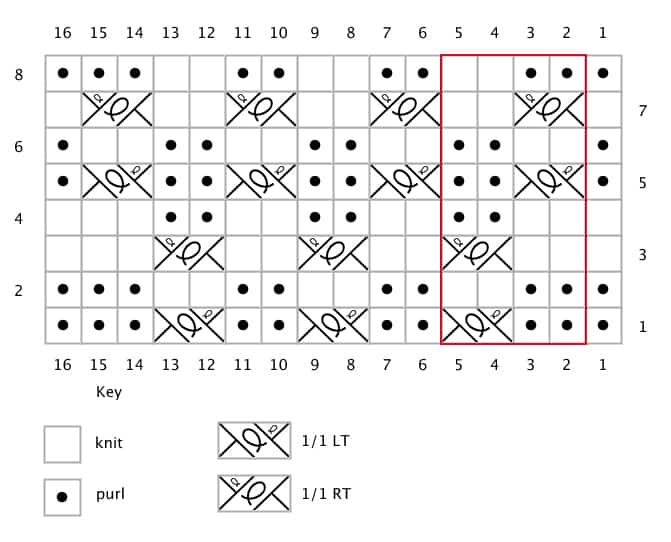
CHART
Ripple Twist Knitting Chart
The area in red shows one full repeat of the stitch pattern.

PIN IT!

Video Tutorials
Select videos are available to GoodKnit Kisses YouTube members only. To get exclusive access to GKK VIP-only content, free PDF patterns, weekly Zoom meetup and more, sign in to YouTube and join as a VIP Member today! Find out more about GKK Membership HERE!
The following tutorial videos teach you everything you need to loom knit this cozy Ripple Twist Pillow including right and left handed videos demonstrating the ripple twist stitch pattern, how to seam up the sides and how to sew the zipper in place.
Linda L Perry
Monday 11th of May 2026
I'm going to have someone show me How to download but Love ❤️ to make this pillow for my son ❤️ 🙏 💙
Victoria
Friday 26th of April 2024
I'm a member. Where do I find the videos showing how to make the projects? The written directions are very hard to follow.
Victoria
Friday 26th of April 2024
I'm a member, how do I find the videos so I can follow along? Written directions are very hard for me to follow.