
Inside: Free pattern for the loom knit Squiggle Cable Cowl including written instructions and tutorial videos teaching the 2 over 2 cables and how to seam the cowl.
I have so much fun with cables!
When I designed my loom knit Cabled Headbands, I knew it would be the perfect introduction to loom knit cables. These small projects are the perfect length for learning the twists and turns of cabling on a knitting loom.
What I didn’t count on was how many of you wanted MORE cables!
You asked and I’m ready to deliver!
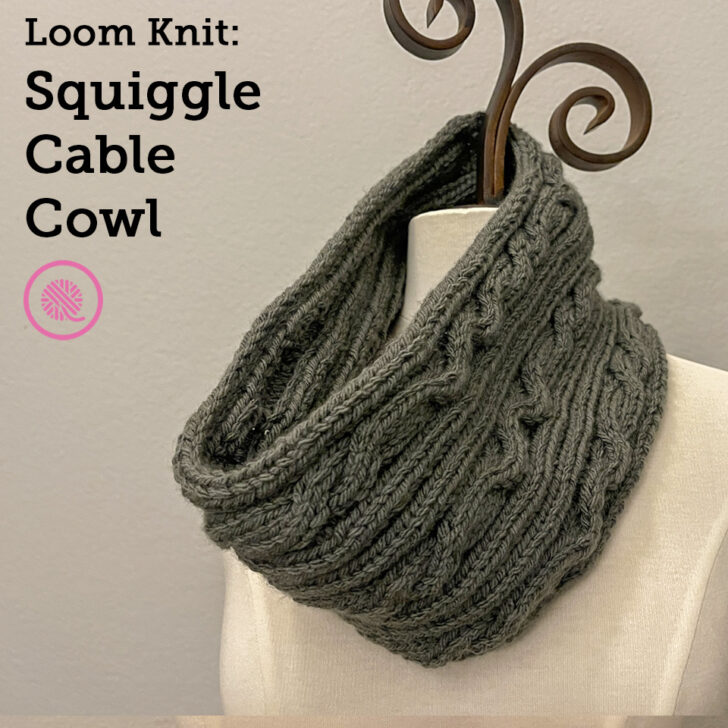
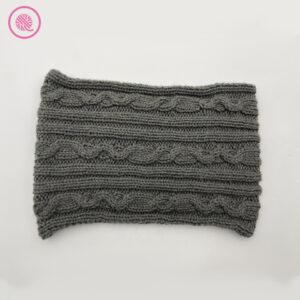
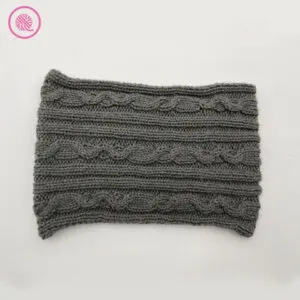
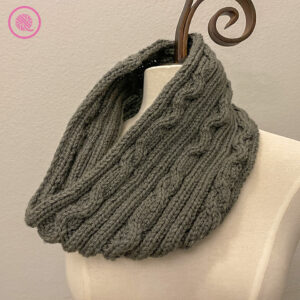
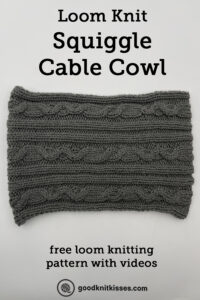
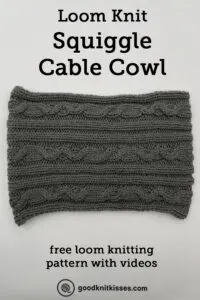
The chunky Squiggle Cable Cowl is sure to keep you cozy and warm. It features three cables that twist left and right meandering in a playful design. This lovely cowl is loom knit as a flat panel then seamed.
Pattern includes written instructions and links to fully captioned tutorial videos demonstrating the cables and seaming.
Loom Knit Squiggle Cable Cowl
By Kristen Mangus
A downloadable PDF of this pattern is available in my Etsy store or from Ravelry at the links below:


MATERIALS
(Materials list may contain affiliate links to products I used to make this project. Using these links costs you nothing, but helps support GKK.)
Yarn
Bulky (#5) weight yarn
Yarn Bee Soft & Sleek Chunky (211 yds/5 oz., 193 m/142 g) in color Dark Grey used in sample. 1 ball of yarn.
Loom
⅝” large gauge (LG) loom with at least 42-44 pegs (See NOTES.)
KB Flexee Loom Chunky* used in sample.
*Because of the cables, I recommend using the Flexee Loom for this pattern as it is flexible and makes cables without a cable needle. You can substitute another loom but WILL need a cable needle.
Notions
Tapestry needle
Stitch markers
GAUGE 4 sts x 5.5 rows = 1” (2.5 cm) in 2×2 ribbing
SKILL LEVEL Intermediate
MEASUREMENT Approx. 9.5” wide x 29” long (24.13 x 73.5 cm) after blocking
ABBREVIATIONS
2/2LC = 2 over 2 Left Cable
2/2RC = 2 over 2 Right Cable
K = U wrap knit
Rep = Repeat
Sl = Slip stitch
St(s) = Stitch(es)
For a refresher on loom knitting basics see the blog posts below to get started:
13 Questions for Beginner Loom Knitters
How to Loom Knit Basics (cast on, knit, purl, & bind off)
How to Loom Knit Basic Stitch Patterns (garter st, seed st and ribbing)
How to Loom Knit in the Round
NOTES
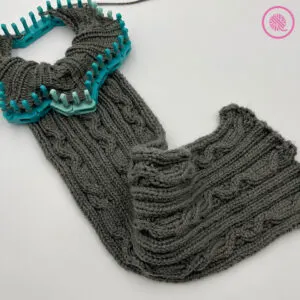
The loom knit Squiggle Cable Cowl is worked as a flat panel and seamed together when finished.
Flexee Loom setup: This pattern uses only 42 pegs (21 links), but you should add 1 extra link to allow the links to line up correctly for the cables. This setup will give you 44 pegs but you will not use the 2 end pegs.
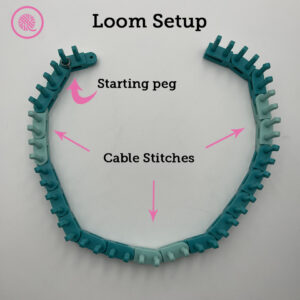
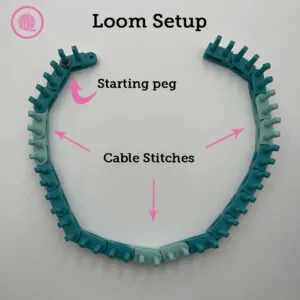
Start with 3 DARK rounded links and connect 2 LIGHT rounded links. Next 5 DARK followed by 2 LIGHT. Next add again 5 DARK followed by 2 LIGHT. Now connect 3 DARK rounded links. Place marker (shown in silver in photo) on the second peg of the 1st dark link to mark the beginning of the row. This is where you will end your cast on and begin Row 1. The LIGHT links will be used for the cable. Connect loom in the round and do not use the two extra pegs.
NOTE: I suggest using ONLY the rounded Flexee Loom links but if you don’t have enough you should be sure to use them for cable stitches and for a couple links before and after the cable. This will make it much easier to move the stitches when cabling. Feel free to add more links and connect in the round if it helps you to hold the loom easier while knitting.
Cast on: I recommend the chain cast on or E-wrap flat cast on.
U-Wrap knit: I recommend using the u-wrap knit stitch in this pattern. Using an E-wrap knit stitch does not create a smooth cable and will increase the size of the cowl.
Slip stitch: To slip a stitch, bring the working yarn behind the peg and move on the next peg.

Cable Instructions: Instructions are written specifically for the Flexee Loom Links, but additional notes are given in parentheses () for how to use a traditional loom and cable needle.
Right vs. Left Cables: Beginning the cable from the left side produces a LEFT leaning cable and an approach from the right side makes a RIGHT leaning cable. Since the cable stitches have a specific direction the instructions are the same for both right and left handed loom knitters.
2/2LC: 2 over 2 Left Cable*– Knitting from left to right, remove next 2 pegs (1 link) from loom and hold to back (or place first 2 sts on cable needle and hold back). Connect loom and knit next 2 sts (or work next 2 sts and move forward to empty pegs). Bring yarn to front, disconnect next link and connect held loom link back on loom (or place sts back on empty pegs). Knit next 2 sts. Using loom tool tug each cabled stitch to make sure the tension is even. This is a left leaning cable. TIP: Knit the first stitch on the held stitches before moving to ease tension as needed. Stitches will be tight on next row but will ease up by next cable row. [Left Cables are worked on ODD rows in this pattern].
2/2RC: 2 over 2 Right Cable*– Knitting from right to left, remove next 2 pegs (1 link) from loom and hold to back (or place first 2 sts on cable needle and hold back). Connect loom and knit next 2 sts (or work next 2 sts and move forward to empty pegs). Bring yarn to front, disconnect next link and connect held loom link back on loom (or place sts back on empty pegs). Knit next 2 sts. Using loom tool tug each cabled stitch to make sure the tension is even. This is a right leaning cable. TIP: Knit the first stitch on the held stitches before moving to ease tension as needed. Stitches will be tight on next row but will ease up for next cable row. [Right Cables are worked on EVEN rows in this pattern].
*Instructions in parentheses above are for using a traditional loom and cable needle instead of the Flexee Loom Links.
Ribbing: 2 x 2 ribbing (knit 2, purl 2) is used in this pattern as the border for the cable.
Bind off: I recommend the basic bind off in-pattern. “In pattern” means you knit the knits and purl the purls as you work your bind off.

INSTRUCTIONS
Cast on 42 stitches from right to left.
Set Up for Cables:
Rows 1-2: Sl. K2, P2. *K4. P2, K2 (twice). P2. Rep from * once til last 9 sts. K4, P2, K3.
Cable Pattern:
Row 3: Sl. K2, P2. *2/2LC. P2, K2 (twice). P2. Rep from * once til last 9 sts. 2/2LC, P2, K3.
Rows 4-8: Rep Row 1 five times.
Rows 9: Rep Row 3 once.
Rows 10-17: Rep Row 1 eight times.
[Serpentine Right]
Row 18: Sl. K2, P2. *2/2RC. P2, K2 (twice). P2. Rep from * once til last 9 sts. 2/2RC, P2, K3.
Rows 19-22: Rep Row 1 four times.
Row 23: Sl. K2, P2. *2/2LC. P2, K2 (twice). P2. Rep from * once til last 9 sts. 2/2LC, P2, K3.
Rows 24-27: Rep Row 1 four times.
Rows 28-37: Rep Rows 18-27 once.
Rows 38-42: Rep Row 1 five times.
Rows 43-122: Rep Cable Pattern Rows 3-42 twice. [80 rows]
Rows 123-157: Rep Cable Pattern Rows 3-37 only; once. [35 rows]
Rows 158-159: Rep Row 1 twice.
[Cowl should measure approximately 29” (73.5 cm).]
NOTE: Pull downward firmly to relax stitches then release before measuring.

Finishing:
Bind off in pattern leaving long tail for seaming. Block cowl, if desired. I recommend blocking to make sure the bind off and cast on edges line up evenly for seaming.
From right side, sew cast on edge to bind off edge, without twisting the cowl, using the mattress stitch for ribbing. This technique is shown in the video linked above.
Weave in ends.
PIN IT!
Loom Knit Squiggle Cable Cowl Tutorial Videos
Select videos are available to GoodKnit Kisses YouTube members only. To get exclusive access to GKK VIP-only content, free PDF patterns, weekly Zoom meetup and more, sign in to YouTube and join as a VIP Member today! Find out more about GKK Membership HERE!
Since this pattern is considered an intermediate level I’ve got standalone videos teaching the following techniques:
2/2 RC and 2/2 LC Cables*
Seaming ribbing with the matress stitch
*While most of my videos have both a right and left handed version, cables are the exception. Since the direction you work the cables determines the way it leans, the instructions are the same for both right and left handed loom knitters.
Cindy
Saturday 23rd of March 2024
Love what you are doing thanks