
Inside: Learn to loom knit the mock cable rib stitch pattern using my free Dreamy Cable Blanket Pattern. Includes instructions for 4 sizes and tutorial videos.
What’s better than cables?
JUMBO CABLES!
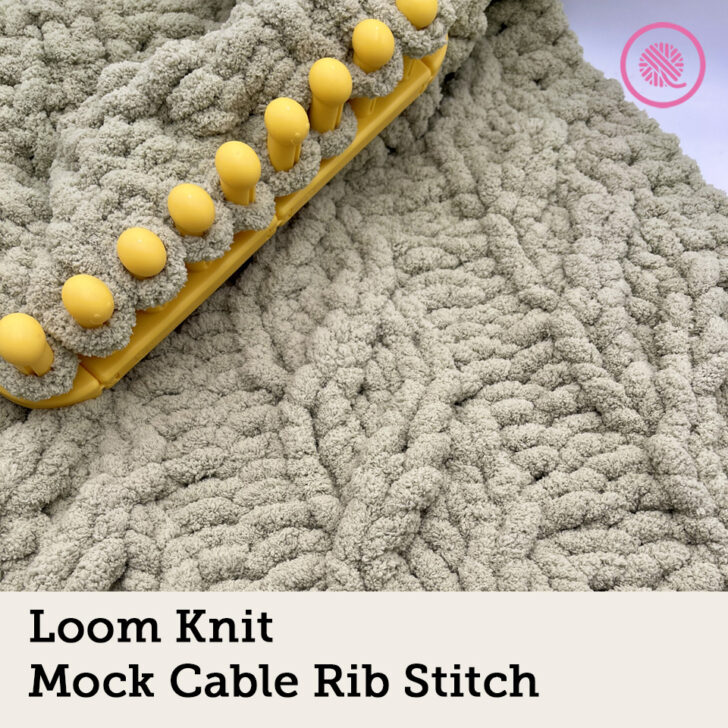
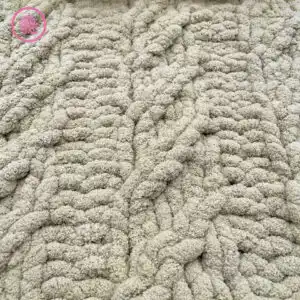
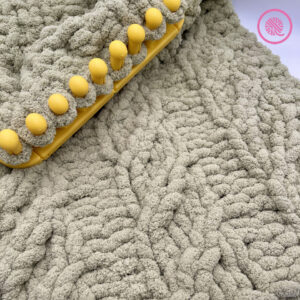
I love to loom knit the mock cable rib stitch and I decided it was the perfect stitch pattern to showcase using jumbo yarn and my jumbo gauge Zippy Looms.


Since these cables create a flattened twist they’re perfect for chunkier yarns. I think they resemble licorice twists, don’t you?
I created the Dreamy Cable Blanket to combine soft coziness with a bit of flair. Using jumbo weight yarn and the mock cable rib stitch, this pattern makes a thick, heavy blanket. Sizes range from a small lap blanket or playmat to a coverlet for your queen size bed. I’ve got all the details you need to make this chunky project.
Pattern includes written instructions for 4 sizes and links to fully captioned tutorial videos for both left and right handed loom knitters.
Dreamy Cable Blanket featuring the Mock Cable Rib Stitch
By Kristen Mangus
An ad-free downloadable PDF of this pattern is available for purchase in my GoodKnit Kisses online store, Etsy or Ravelry at the links below:


MATERIALS
(Materials list may contain affiliate links to products I used to make this project. Using these links costs you nothing, but helps support GKK.)
Yarn
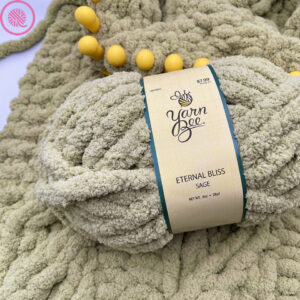
Jumbo (#7) weight yarn – 110 (300, 550, 990) yards
Yarn Bee Eternal Bliss in color Sage (8 oz / 226 g 28 yds/25.6 m) used in sample [4 (11, 20, 36) balls]
Loom
1 1/2” Jumbo gauge (JUMBO) long loom with at least 20 (42, 54, 80) pegs
KB Looms Zippy Loom used in sample. This pattern uses 4 Zippy Corners (with peg) plus 4 (10, 14*, 20*) straight Zippy Looms (aff. links) NOTE: You can also use Zippy Loom Master Sets (aff. link)
*See NOTES to make Twin and Queen sizes using two panels with 10 Zippy looms.
Notions
(Optional) Stitch markers (rubber bands, hair bands, scrap yarn) to mark purl pegs and repeats

ABBREVIATIONS
1/1RC = 1 over 1 Right Cross Cable
K = Knit (U-wrap)
P = Purl
Rep = Repeat
RS = Right side
St(s) = Stitch(es)
For a refresher on loom knitting basics see the blog posts below to get started:
13 Questions for Beginner Loom Knitters
How to Loom Knit Basics (cast on, knit, purl, & bind off)
How to Loom Knit Basic Stitch Patterns (garter st, seed st and ribbing)
How to Loom Knit in the Round
GAUGE 6 sts in 7.5” x 6 rows in 4.33” in one repeat of Mock Cable Rib stitch pattern
SKILL LEVEL Easy
SIZES Lap (Throw, Twin, Queen)
MEASUREMENTS
Lap: 25” x 48” (64 x 122 cm)
Throw: 52.5” x 60.5” (133 x 153 cm)
Twin: 65” x 91” (165 x 231 cm)
Queen: 97.5” x 108” (248 x 274 cm)
NOTES
In this pattern I used the chain cast on and basic bind off in pattern (knit the knit stitches and purl the purl stitches as you bind off). I also used a U-wrap for all knit stitches.
Loom setup: I suggest setting up the Zippy Looms in the round when working this pattern. This provides stability to handle the weight of the jumbo yarn.
Mock Cable Rib stitch: This stitch pattern uses a multiple of 6+2 stitches and a 6-row repeat. On Rows 2, 4 & 6, you will be cabling 2 stitches. The cable stitches are not in the same place on each of these rows so you need to pay close attention to which row you are on. The 2 stitches on each edge are in garter stitch.
1/1RC: 1 over 1 Right Cross Cable. Remove first st and let hang to back of work. Knit next stitch then move to previous empty peg. Gently tug the working yarn to tighten the st. Next, work st held in back by pushing a loop of the working yarn through the st with your finger then placing that new st on the empty peg. Gently tug yarn to tighten st. Using your finger to finish the cable st will prevent it from being too tight and breaking the yarn.

Stitch markers: You can use stitch markers to mark the 2 purl stitches between the cables. The 4 stitches between the marked pegs are where the cables will be. You can also use a single different colored stitch marker in the first group of four cable stitches. You can move this marker to remind you which row you are on. Place it on the 3rd peg of the repeat for Row 2, 2nd peg on Row 4 and 1st peg on Row 6.
Alternate instructions for Twin & Queen sizes: Loom knitting these two sizes in one piece can be done, but due to the size of the loom (54 or 80 pegs) and weight of the blanket it will be difficult. I suggest making two panels and seaming them in the middle. This will make the loom knitting more manageable. It also changes the stitch pattern multiple to a 6+1. Make the following panels using the Two Panel Instructions below.
Twin size: Left Panel – 25 sts, Right Panel – 31 sts
Queen size: Left Panel – 37 sts, Right Panel – 41 sts
Blanket care: Since this uses a chenille yarn, I suggest gentle use only. It is not recommended this blanket be machine washed. Spot clean as needed.
Using a different yarn and loom: You can use the stitch pattern with ANY loom gauge and appropriate yarn weight. Make sure to check your gauge and adjust the number of cast on stitches to get the width you want. Use our Cast on Calculator to help you calculate the number of stitches you need for your desired width. You will need a few extra steps after using the calculator. Take the number the calculator gives you and divide it my 6. If it doesn’t divide evenly by 6, round that number up to the next multiple of 6. Then add 2 to that number to get your cast on.
One Panel INSTRUCTIONS
All sizes
Chain cast on 20 (42, 54, 80) sts. Cast on right to left if you are right handed.
Row 1: P2. *K4, P2. Rep from * to end of row.
Row 2: K2. *K2, 1/1RC, P2. Rep from * to last 6 sts. K2, 1/1RC, K2.
Row 3: Rep Row 1.
Row 4: K2. *K1, 1/1RC K1, P2. Rep from * to last 6 sts. K1, 1/1RC, K3.
Row 5: Rep Row 1.
Row 6: K2. *1/1RC K2, P2. Rep from * to last 6 sts. 1/1RC, K4.
Rep Rows 1-6 until piece measures about 48” (60.5”, 91”, 108”); 11 (14, 21, 25) repeats total). Bind off in pattern on an odd row and weave in tails by hand.

Two Panel INSTRUCTIONS
Twin and Queen sizes only
LEFT Panel
Chain cast on 25 (37) sts.
Row 1: P2. *K4, P2. Rep from * to last 5 sts. K4, P1.
Row 2: K2. *K2, 1/1RC, P2. Rep from * to last 5 sts. K2, 1/1RC, P1.
Row 3: Rep Row 1.
Row 4: K2. *K1, 1/1RC K1, P2. Rep from * to last 5 sts. K1, 1/1RC, K1, P1.
Row 5: Rep Row 1.
Row 6: K2. *1/1RC K2, P2. Rep from * to last 5 sts. 1/1RC, K2, P1.
Rep Rows 1-6 until piece measures about 91” (108”); 21 (25) repeats total.
Bind off in pattern on an odd row and weave in tails by hand.
RIGHT Panel
Chain cast on 31 (41) sts.
Row 1: P1. *K4, P2. Rep from * end of row.
Row 2: P1. *K2, 1/1RC, P2. Rep from * to last 6 sts. K2, 1/1RC, K2.
Row 3: Rep Row 1.
Row 4: P1. *K1, 1/1RC K1, P2. Rep from * to last 6 sts. K1, 1/1RC, K3.
Row 5: Rep Row 1.
Row 6: P1. *1/1RC K2, P2. Rep from * to last 6 sts. 1/1RC, K4.
Rep Rows 1-6 until piece measures about 91” (108”); 21 (25) repeats total.
Bind off in pattern on an odd row and weave in tails by hand.
FINISHING
Position panels right side up with LEFT panel on the left. Seam panels together and weave in ends.
Loom Knit Mock Cable Rib Stitch Tutorial Videos
Select videos are available to GoodKnit Kisses YouTube members only. To get exclusive access to GKK VIP-only content, free PDF patterns, weekly Zoom meetup and more, sign in to YouTube and join as a VIP Member today! Find out more about GKK Membership HERE!