

2017 Bernat Blanket Stitch Along Clue 5
It’s here! After 4 weeks of mixing together stitch patterns and creating strips and panels we can finally start piecing the puzzle. Can I admit that I am little jealous of the Stitch Along crocheters? Crocheters get to build as they go and see their blankets change week by week. You’ve been flying blind this whole time; knitting pieces with no idea how they will go together. This is the week you’ve been waiting for. The 2017 Bernat Blanket Stitch Along Clue 5 brings all the clues together into one solution. Click on over to Joann.com to grab the next clue.

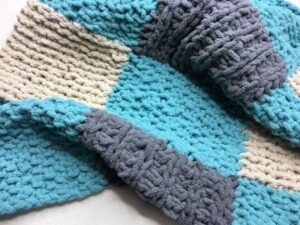
Checkerboard!
First, you put Clues 1 and 2 together to create a checkerboard of color and texture. All you need is a tapestry needle, a few removable stitch markers and some Contrast B yarn. Since Contrast B was used on every panel it will blend the best. The key to getting a smooth seam is to pick up the purl bumps on both sides. In order to join evenly across the whole panel use the removable stitch markers to pin your panels together at the corners of the squares. As long as your corners line up the rest of the panel will look great. Be careful not to pull too tightly as you join. That causes the working yarn to act as a drawstring and make the fabric bunch up.

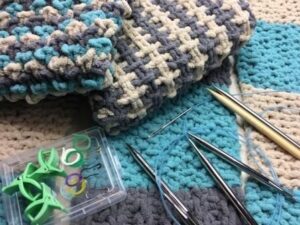
TWO circular needles?!?
I know many of you have been wondering about why you would need TWO long circular needles for the stitch along. You’re about to find out. The designers have come up with an ingenious method for joining two panels with a thin border between them. You pick up stitches along the edge of your panel from Clue 1. That’s easy since you have 8 blocks and you need 12 stitches per block. Once you pick those up you knit and purl a couple rows for you border. Now come the tricky part.
Pick up 96 stitches along the side edge of your Clue 3 piece using the second circular needle. This is where you need to mark the edge of your knitting so you pick up the stitches evenly. If you take the time to do this step your blanket will lay beautifully. Don’t be afraid to drop some stitches and pick them up again if they look uneven.
Once you have both circular needles lined up I recommend using the removable stitch markers to hold your two pieces together. This will help keep you knitting aligned while you work. Now use a third straight needle (or DPN) to knit a stitch from each needle and then bind off. I know when you read the pattern you’re thinking you need a third hand, but trust me, it can be done with just two.

Rinse and repeat.
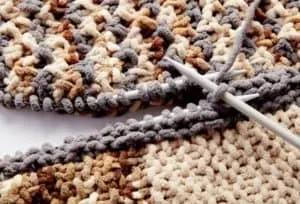
Once the first join is finished you join your panel from Clue 4 to the other edge of your checkerboard panel. Use the same method that you used above. I think the Shaker Tweed section is easier to see where to pick up your edge stitches because of the three different colors. Again, the key to having your blanket lay nicely is picking up stitches evenly across the panel.
Once you’ve finished that seam you’re done for the week. What are you going to do until next Monday? Go apple picking. Read a good book. Have your nails done. You’ve got the time and you have earned a break!
Check out the video below to see Clue 5 in action!
Thank you for joining me for the 2017 Bernat Blanket Stitch Along Clue 5!
Notes for Loom Knitters:
Well, loomers. The week has finally arrived. Using the tools we have we can’t follow exactly what the needle knitters are doing. While Clue 5 is possible on a loom it is not practical. To pick up 96 stitches you need to have 96 pegs. If you haven’t noticed yet a 48-peg loom doesn’t have that many.
But, this is NOT a problem. I don’t mind venturing off into uncharted territory with just me and my loom to find a way to get the job done. With a little creativity we can join these panels and make it beautiful.
Join my live broadcast each Monday at 9 am central time on the GoodKnit Kisses Facebook Page for a loom knitting demo of the clue. If you miss it, I’ll be linking the video of the broadcast below.
2017 Bernat Blanket Stitch Along Clue 5:
Join Clues 1 and 2:
This is easy since it is just seaming with yarn and tapestry needle. You follow the pattern exactly and watch the video above.
Join Clues 3 and 4 to checkerboad panel:
Notice that this is a unique joining method and no longer follows the needle pattern. This join is very similar to that used on the 10 stitch blanket. We will be joining on BOTH ends of the row: the checkerboard panel (Clues 1 and 2) will be on one side and one of the tweed panels (Clue 3 or 4) will be on the other.
Because we are not knitting across the edge, but up the side our counts will be different than that of the needle knitters. On the needle knitting video at minute 17:46 Kristen starts talking about using stitch markers along the edge of your work to divide it into sections. You need to do this so you can make the join even across the entire blanket. I suggest marking the edge of your tweed sections into 4 or 8 equal lengths. The edge of the other section is already divided by the color changes of each square. You will be picking up the purl bumps along the edges to join the panels and will need to pick up same number from each panel.
Abbreviations:
K – U-knit stitch
P – purl stitch
S – slip stitch (skip peg)
Join 1 – (When working this join Peg 3 refers to the last peg in the row.
- Pick up purl bump from edge of panel to be joined and place it on the empty peg next to the Peg 3.
- Wrap and knit over the peg.
- Move this loop to Peg 3. (2 loops on Peg 3)
- Purl both loops together on Peg 3.
Using Contrast A cast on 3 stitches.
Row 1: P1, K1, Join 1.
Row 2: S1, K1, Join 1.
Repeat Row 2 to the end of the panels.
Clue 5 loom knitting demo:
If you’re just joining the Stitch Along you can find the previous clues below.
Clue 1 – Clue 2 – Clue 3 – Clue 4
Be sure to share your progress pictures and color schemes on Joann’s Bernat Blanket Stitch Along Facebook page and share on social media with the tags #handmadewithjoann and #goodknitkisses
I can’t wait to see all the beautiful blankets!