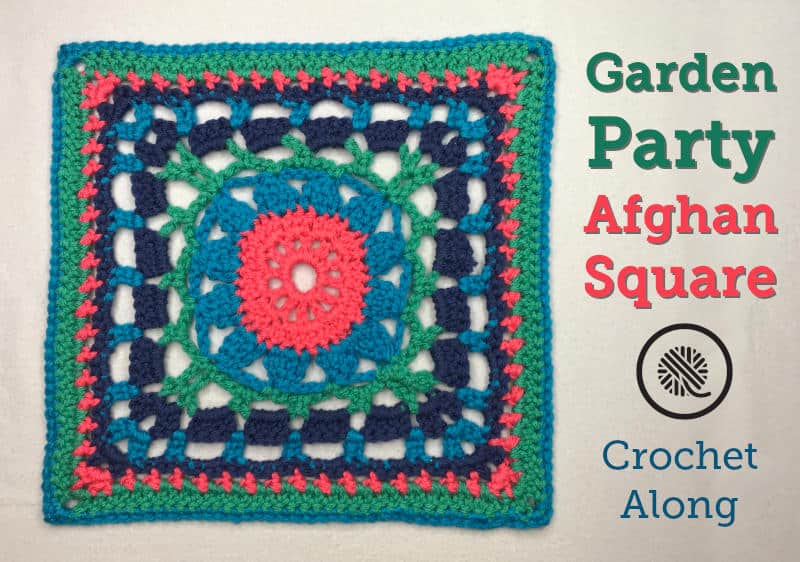
Inside: Colorful crochet afghan square pattern with free tutorial videos.
Lush green bushes swaying in the breeze create the perfect backdrop for the vibrant colors of snapdragons, dahlias and roses. Nothing says summer like a lush garden spilling over with blooms. Then there’s my house.
I’m like the grim reaper of the garden world. I feel a little bit bad for the plants because they can’t run away.
So what’s a girl to do?

Flowers may shrivel up in my presence, but yarn turns into living art in my hands. I can’t grow a garden, but I sure can crochet one!
Come on over and join my Garden Party Crochet Along. Over the next 4 weeks you’ll get a new part of the pattern with a tutorial video.
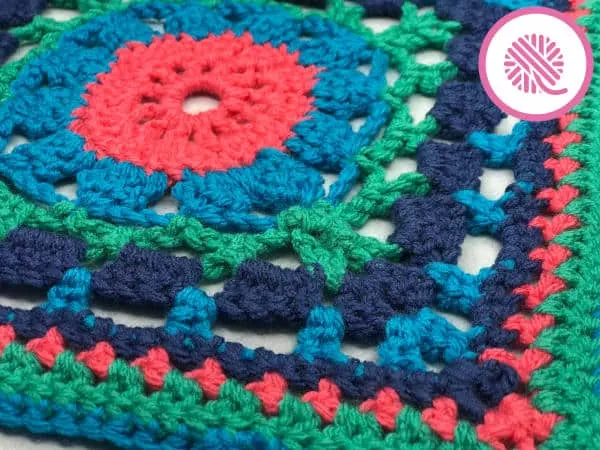
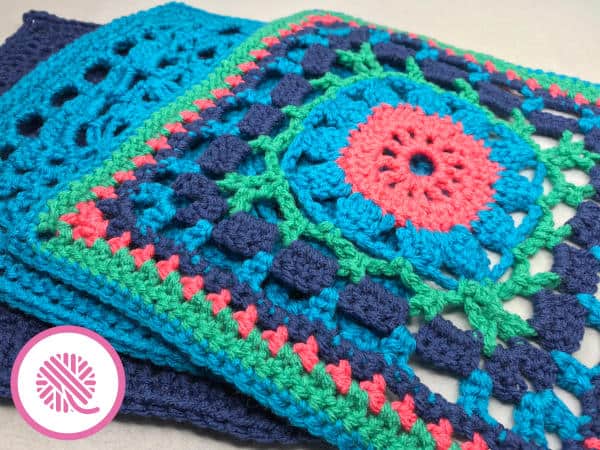
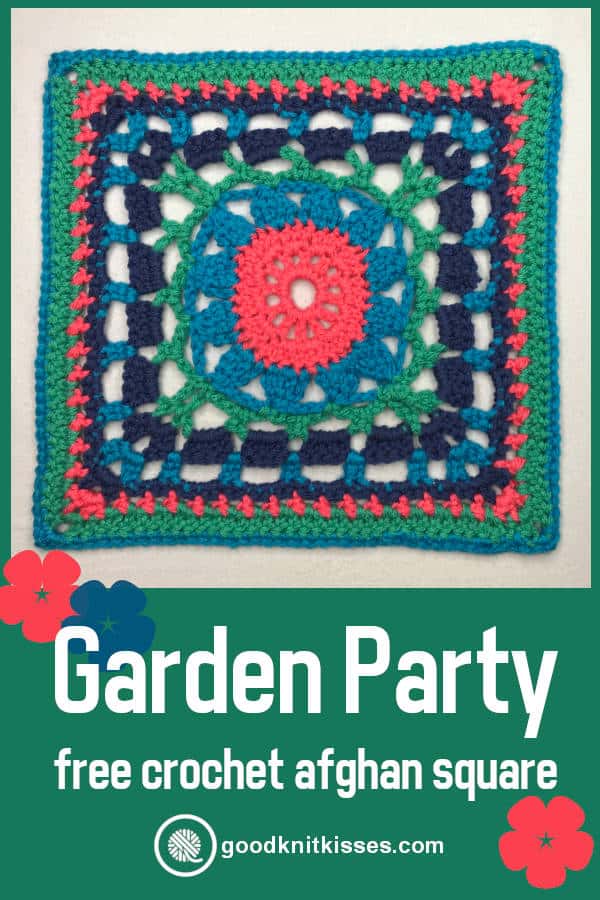
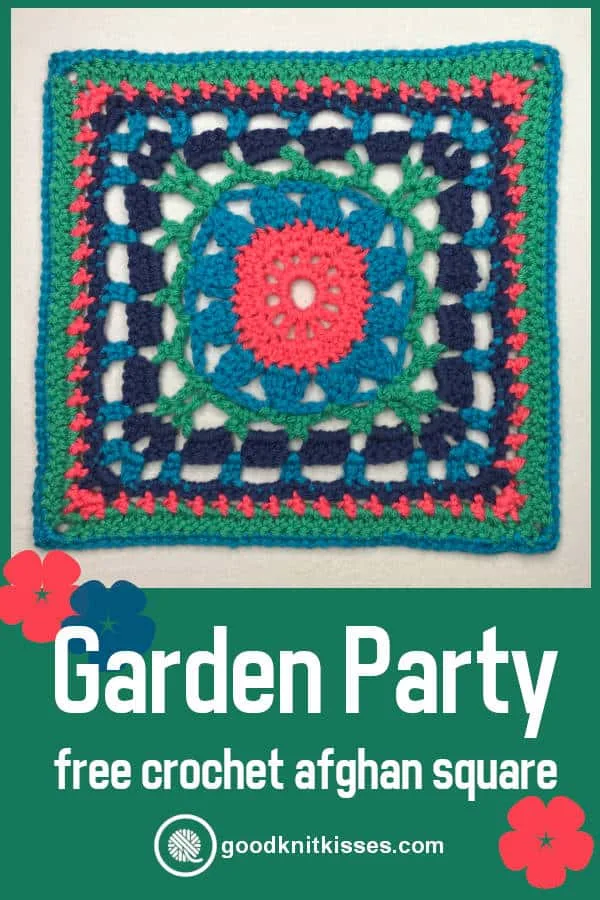
This free colorful crochet afghan square begins with a burst of bloom in the center, followed by paths of trailing vines and finishing up with neat, flower beds as an edging. It’s a crocheter’s dream garden!
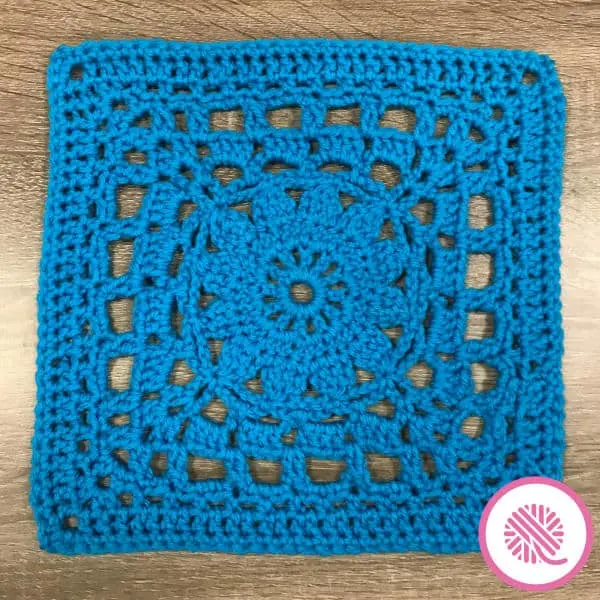
The pattern makes one 12″ square. Combine several to make a beautiful afghan. As an alternative to the four-color design above I included instructions to make the entire square in a single color. Mix and match them to create a colorblock garden that will be the envy of your neighborhood.
The Garden Party afghan square incorporates many basic stitches, like single, double and half-double crochet stitches. It also introduces some clusters that combine these stitches to create a beautiful stitch pattern.
Join the crochet along and grow your own colorful garden. This garden blooms year-round, last for years and is 100% drought-resistant.

Garden Party Afghan Square Pattern
A downloadable PDF of this pattern is available in my Etsy store or from Ravelry at the links below:


MATERIALS
Materials listed below may contain affiliate links.
Yarn: Red Heart With Love Solids (198g / 7oz, 338 m / 370 yards)
Contrast A Papaya [coral] 15 yds./14 m
Contrast B Blue Hawaii [blue] 23 yds./21 m
Contrast C Jadeite [green] 23 yds./21 m
Contrast D True Blue [dk blue] 19 yds./17 m
Hook: US J/6mm or size needed to obtain finished size.
Tapestry needle
Scissors
ABBREVIATIONS
Beg = Beginning
Ch = Chain
CL = Cluster (see Notes; 2 different clusters used)
dc = double crochet
hdc = half-double crochet
Rem = Remaining
Rep = Repeat
Rnd = Round
sc = single crochet
Sk =skip
Sl = slip stitch
Sp = space
St(s) = Stitch(es)
tr = treble crochet
YO = Yarnover
Need a crochet refresher? Check out the links below:
SKILL LEVEL Easy+
SIZE 12”x12” (30.5cm x 30.5cm)
NOTES
When working square in a single color do not cut yarn and begin in different spot {unless noted in brackets like this on select rounds}. However, the instructions are written for best placement to begin rounds.
Double Cluster (Double-CL) – Makes 2 dc in ch-sp from prev round. *(YO, insert hook in ch-sp from prev rnd and draw up a loop, YO and draw through 2 loops on hook) rep from * once more in same ch-sp; YO and draw through all 3 loops on hook; 1 Double-CL made.
Petal Cluster (Petal-CL) – Makes 4 tr in 3 dc from prev round and joins petal tip together. *(YO twice, insert hook in dc of prev rnd and draw up a loop, YO and draw through 2 loops on hook, YO and draw through 2 loops on hook, 2 loops remain on hook)**; rep from * across in next dc, ending rep at ** twice, 4 loops rem on hook; rep from * across in next dc, ending final rep at ** once, 5 loops rem on hook; YO and draw through all 5 loops on hook; 1 Petal-CL made. [Cluster of 4 trebles over 3 stitches = 1 treble in 1st dc, 2 trebles in 2nd dc and 1 treble in 3rd dc]

CAL Part 1: Center Flower
Center
In contrast A, chain 7. Sl st in first ch st to form center ring.
Rnd 1 – Flower center
Ch 3 (will count as first dc plus 1 ch).
*Dc in center of ring. Ch 1.
Repeat from * 10 times. [12 dc total].
Sl st to join round into the 2nd ch at beginning.
Rnd 2 – Outer flower center
Ch 2 (will count as first dc).
Dc twice in 1st ch-sp of the previous rnd.
*Dc in next dc. Dc twice in next ch-sp.
Repeat from * until 36 dc total.
Sl st to join round into the 2nd ch at beginning.
Cut contrast A and fasten off. Attach contrast B in dc from prev rnd.
Rnd 3 – Petals
This round works a Cluster of 4 tr into 3 dc from prev rnd (this is 1 Petal-Cluster); see Notes. [The first Petal-CL starts with 4 ch sts so there are fewer sets of 2 loops to pull through.]
With contrast B ch 4.
Make 1 Petal-CL in next 3 dc (1st ch-4 counts as 1st tr in Petal-CL) and ch 4.
*Make 1 Petal-CL in next 3 dc and ch 4.
Repeat from * until 12 petals made; ending in a ch-4.
Sl st to join rnd into the join at the 1st petal.
Cut contrast B and fasten off. Attach contrast C in tr join (top of petal) from prev rnd; join yarn at different petal from prev rnd ending.
CAL Part 2: Trailing Vines
Rnd 4 – Square Setup & Vines
With contrast C, Ch 5 and sl st in base of the ch-5. This forms the 1st corner loop to make a square.
*Ch 5 and sl st into the top of the next petal of prev rnd; this forms a vine. Rep from * twice.
In the current petal ch 5 and sl st into top of same petal to form next corner loop.
Rep from * until 4 corners made. (4 corner loops and 3 vines of ch-5 between each corner loop made).
Sl st to join rnd at the base of the 1st corner loop (The first ch-5 from the rnd).
Rnd 5 – More Vines
Prev rnd ended at base of corner loop; you’ll need to get to the middle part of that loop.
Sl st in the 1st 3 ch sts of loop to get to corner top.
Ch 5 and sl st at the top of the prev rnd corner loop; This forms the 1st corner loop of this rnd on top of the prev corner loop.
*Ch 5 and sc into the ch-5-sp (vine) of the prev rnd.
Rep from * 2 times.
Ch 5 and sl st at the top of the prev rnd corner loop ch-5-sp; Ch 5 and sl st in the ch-5-sp of the prev rnd corner loop. This forms the next corner loop.
Continue from * until loop in every corner loop/vine of the prev rnd; 4 corner loops and 4 new vines of ch-5 between each corner loop made this rnd ending at 1st corner.
Sl st to join rnd at the base of the 1st corner loop (The first ch-5 from the rnd).
Cut contrast C and fasten off. Attach contrast D in one of the vines, along the side, just after a corner loop. {Solid square: Cut yarn and start new round as noted}.
Rnd 6 – Dc Round
With contrast D, Ch 2 (counts as dc), 3 dc in 1st vine (ch-5-sp) after corner and Ch 1.
*In next vine 4 dc and ch 1.
Repeat from * twice.
**In corner loop 2 dc, ch 2, 2 dc and ch 1.
4 DC, ch 1 in each of next 4 vines.
Rep from ** continuing until you reach end of rnd. Ending with ch-1 after last corner made.
Sl st to join round into the 2nd ch at beginning.
Cut contrast D and fasten off. Attach contrast B in ch-sp from prev rnd, just after corner dc sts.
CAL Part 3: Inner Border
Rnd 7 – Double-CL round
The round works a Cluster of 2 dc into ch-1-sp from prev rnd together (this is 1 Double-Cluster); see Notes. [The first Double-CL starts with 2 ch sts so there is 1 less set of 2 loops to pull through.]
With contrast B ch 2.
Make 1 Double-CL in ch-sp (1st ch-2 counts as 1st dc in CL) and ch 5.
*Make 1 Double-CL in next ch-sp and ch 5.
Rep from * twice; ending in a ch-5.
**Make 1 Double-CL in next ch-sp and ch 3.
Make Corner; 1 Double-CL, ch 3, 1 Double-CL, Ch 3.
Make 1 Double-CL in each of next 4 vines.
Repeat from ** twice; ending in a ch-5.
Make 1 Double-CL in next ch-sp and ch 3.
Make Corner, 1 Double-CL, ch 3, 1 Double-CL, Ch 3.
Sl st to join round into the 2nd ch at beginning.
Cut contrast B and fasten off. Attach contrast D in ch-3-sp along any edge from prev rnd just after corner.
Rnd 8 – Sc Round
With contrast D Ch 1 (counts as sc in ch-3-sp or use a standing sc).
*Sc in next Double-CL join from prev rnd.
3 sc in next ch-5-sp and sc in next Double-CL join (4 times).
Sc in ch-3-sp and sc in next Double-CL join.
Make corner (Sc and dc in same ch-3-sp, ch 2, dc and sc in same ch-3-sp).
Sc in next Double-CL join ** and Sc in ch-3-sp.
Rep from * three times ending at ** on third rep.
Sl st to join round into the 1st ch at beginning.
Cut contrast D and fasten off. Attach contrast A in the middle of any 3 sc from prev rnd. {Solid square: Sl st 3 times to middle of 3 Sc from prev rnd and start new round as noted}.
Rnd 9 – Hdc Round
With contrast A Ch 2 (counts as hdc in sc or use a standing hdc) and ch 1.
*Sk next sc, hdc in next sc, ch 1. Rep from * until corner.
**Make corner (2 hdc in same ch-3-sp, ch 2, 2 hdc in same ch-3-sp, ch 1).
*Sk next sc, hdc in next sc, ch 1. Rep from * until next corner.
Rep from ** continuing until you reach end of rnd. Ending with ch-1.
Sl st to join round into the 2nd ch at beginning or 1st hdc.
Cut contrast A and fasten off. Attach contrast C in any ch-1-sp from prev rnd. {Solid square: Sl st 2 times to hdc-sp from prev rnd and start new round as noted}.
CAL Part 4: Outer Border
Rnd 10 – Dc Round
With contrast C Ch 2 (counts as dc in ch-sp or use a standing dc) and dc in next hdc.
*Dc in next ch-sp, dc in next hdc Rep from * until last st before corner.
Dc in next hdc.
Make corner (dc in ch-2-sp, ch 2, dc in same ch-3-sp, dc in next hdc).
Rep from * continuing until you reach end of rnd. Ending with dc in last hdc st.
Sl st to join round into the 2nd ch at beginning or 1st dc.
Cut contrast C and fasten off. Attach contrast B in any dc from prev rnd.
***Rnd 11 – Sc Round
With contrast B Ch 1 (counts as sc in dc from prev rnd or use a standing sc).
*Sc in next dc from prev rnd.
Rep from * continuing until you reach ch-3-sp at corner.
Make corner (sc, ch 2, 1 sc, sc in next st).
Rep from * continuing until you reach end of rnd. Ending with sc in last dc st.
Sl st to join round into the 1st ch at beginning.
Cut contrast B and fasten off.
Weave in all tails with tapestry needle.
Block square to 12”x12” (30.5cm x 30.5cm)
***After blocking, if your gauge is just shy of 12” measured, rep rnd 11 as needed.
Are you ready to make a colorful crochet afghan square?
I hope so and I want to see your garden as it flourishes. Put away your garden gloves, grab your hook and crochet along with me each week. Comment below and share a link with progress pics of your Garden Party squares.
I’ll be choosing several of YOUR progress photos to post here on the blog. So get ready to share your Garden Party pics on Instagram, Facebook, Pinterest and more.
How to Seam Granny Squares Video Tutorials
Select videos are available to GoodKnit Kisses YouTube members only. To get exclusive access to GKK VIP-only content, free PDF patterns, weekly Zoom meetup and more, sign in to YouTube and join as a VIP Member today! Find out more about GKK Membership HERE!
Kevin Green
Friday 28th of June 2019
"A downloadable PDF of this pattern is available in my Etsy store and from Ravelry at the links below:" is at the top in sort of small print :) has links to Ravelry and Etsy
Lkloomer
Friday 28th of June 2019
I find gauge the hardest thing for me in doing crochet squares. Do you have any suggestions? Also, will you be putting the pattern in a printable format? It is easier to refer back to it while following along crocheting. Thank you.