
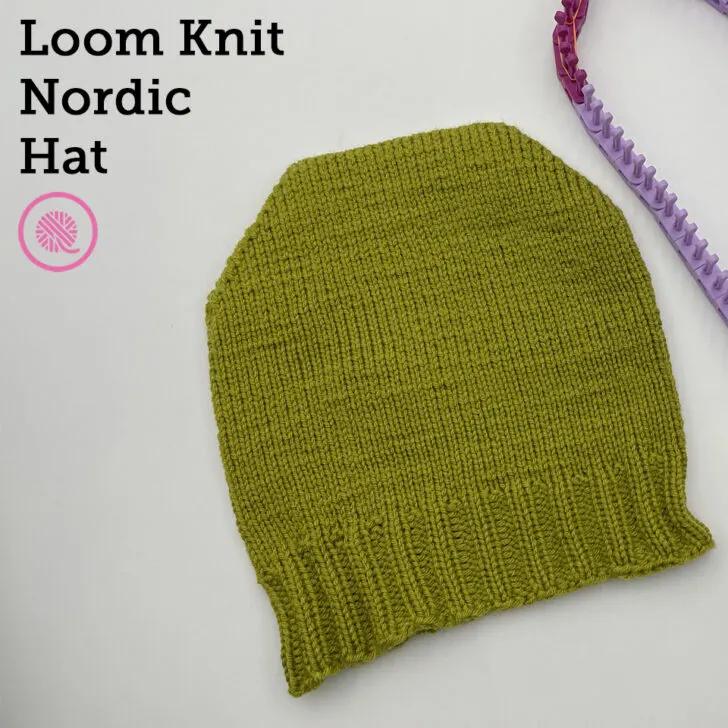
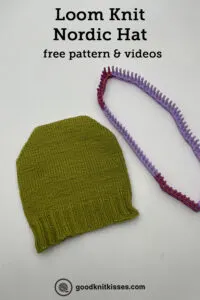
Inside: Free loom knit Nordic Style Hat pattern including instructions for 6 sizes from baby to adult large with tutorial videos.
I love it when one design project inspires another!
I recently published my Envelope Hat pattern. The unusual square top is seamless and uses some fun techniques.
But not everyone likes the quirky squared look. So, I started thinking about how to change the top and smooth out the corners. The answer was right in front of my face. Well, actually, it was on my foot.
The same short row technique used to create toe up socks would be perfect for shaping the crown of the hat.
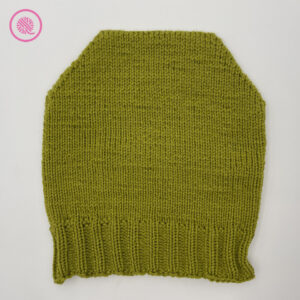
By working short rows back and forth after the Kitchener cast on you create a tapered crown. The best part is you can change how tapered the crown is. I chose to make the flat top about half the width of the hat, but you can adjust that. If you want a pointy crown, work your short rows all the way to the center. If you prefer the hat mostly flat but with smoothed out corners, work fewer short row pegs.
This pattern includes written instructions for 6 sizes from baby to adult large and fully captioned tutorial videos teaching the Kitchener cast on and short row techniques.
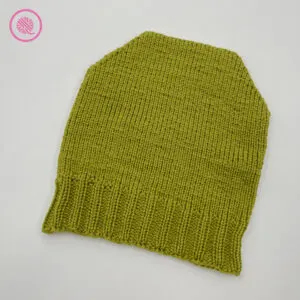
Loom Knit Nordic Style Hat
By Kristen Mangus
A downloadable PDF of this pattern is available in my Etsy store or from Ravelry at the links below:


MATERIALS
Links below are affiliate links that benefit GKK if you make a purchase.
Yarn
Medium (#4) weight yarn
Yarn Bee Soft & Sleek Worsted (5 oz./142 g, 232 yds./212 m) in color Kale used in sample.
Loom
Small Gauge (3/8”) loom with 56 (64, 72, 80, 88, 96) pegs set up to work in the round
KB Flexee Loom Links Skinny used in sample.
Notions
Tapestry needle to weave in ends
Scrap yarn (about 1 yd.) for anchor yarn
14-24 Stitch markers to mark short row pegs
ABBREVIATIONS
Approx = approximately
Beg = Beginning
Cont = Continue
EK = Ewrap Knit
K = Uwrap Knit
P = Purl
Pat = Pattern
Rep = Repeat
Rnd = Round
St(s) = Stitch(es)
For a refresher on loom knitting basics see the blog posts below to get started:
13 Questions for Beginner Loom Knitters
How to Loom Knit Basics (cast on, knit, purl, & bind off)
How to Loom Knit Basic Stitch Patterns (garter st, seed st and ribbing)
How to Loom Knit in the Round
GAUGE 17 sts x 25 rows in 4” (10 cm) in stockinette.
SKILL LEVEL Intermediate
SIZES
Baby (Toddler, Child, Small, Medium, Large)
MEASUREMENTS
Circumference 12.75 (15.5, 17.5, 19.5, 21.25, 23.25) inches by 6.75 (8, 8.5, 9, 9.5, 10) inches in height* [32.5 (39.5, 44.5, 49.5, 54, 59) cm by 17 (19, 20.5, 21.5, 23, 24, 25.5) cm]
*Height includes flat brim only. Total height will be 1.25-2” more for a folded brim.
NOTES
This hat is worked from the top down to the brim using the Kitchener cast on.
Since the brim is worked last, knit your hat to your desired length minus 1.25-2 inches for the brim. Be sure to bind off loosely.
Hat is worked in the round. For right handed knitters work from right to left (clockwise). Work in the opposite direction for left handed knitters (counter clockwise).
All knit stitches in the main body of the hat are Uwrap knit. Be sure to work loosely to achieve the correct gauge. You may use Ewrap knits, but your hat will be a bit larger than the listed size. Ewrap knit stitches are recommended for the brim.
Short Rows: A short row is a method of knitting used to shape your project. It involves working only part of the row, then wrapping the yarn around a stitch and working back in the opposite direction. The terms we use are wrap and turn. There are 3 ways to wrap and turn loom knit short rows. You can use any of them. I used Method 2.
Method 1: Traditional short row- Using loom hook, pick up stitch from peg. Place working yarn behind peg but in front of the stitch you are holding. Place stitch back on peg and bring working yarn around the outside to wrap the front of the peg.
Method 2: Traditional hack- Place working yarn below stitch as if to purl. Pull up a loop and move it over and behind the peg. Tug working yarn to remove slack and tighten wrapped stitch. Bring working yarn around outside of peg and wrap front of peg.
Method 3: German short row- Wrap and knit over the peg. Pull the working yarn from back to front around the outside edge of the peg. Tug until the stitch forms a < across the front of the peg.
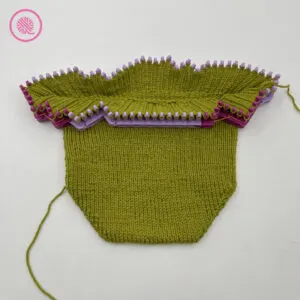
Loom Setup: The short rows are worked on one half of your loom, and you will need to mark your short row pegs. [NOTE: If you are using the Flexee Loom I suggest using darker links for the pegs you will short row. On some sizes you will not be working both pegs of the dark links in the center.]
- First, divide your loom into halves. You will only be placing markers on one half of the loom. We will call this the short row side. The other half will have no markers.
- Use the chart below to mark the pegs on the short row side of your loom. EX: Short Row Setup for size Medium 11-22-11 means you mark the first 11 pegs, leave the next 22 pegs unmarked and mark the last 11 pegs. (See image below showing size Medium.) The marked pegs are the ones you will wrap when working the short row section.
| Size | Cast On | Short Row Setup |
| Baby | 56 | 7-14-7 |
| Toddler | 64 | 8-16-8 |
| Child | 72 | 9-18-9 |
| Small | 80 | 10-20-10 |
| Medium | 88 | 11-22-11 |
| Large | 96 | 12-24-12 |
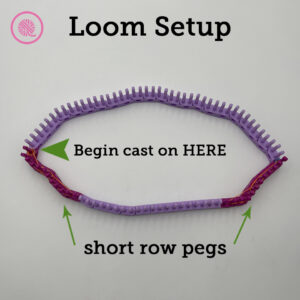
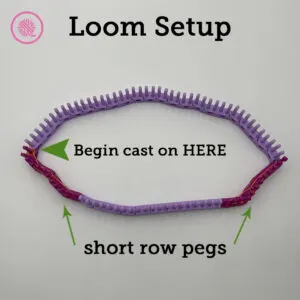
- Begin the Kitchener cast on at the first peg of the short row side.
Shaping the Top: You can change the shape of the top by using more or fewer short row pegs. If you want a pointier crown add more short row pegs. (You can go all the way to center if you want a sharp point.) If you want to create a flat top but smooth out the corners, use fewer short row pegs.
INSTRUCTIONS
Cast on 56 (64, 72, 80, 88, 96) sts using the Kitchener cast on.
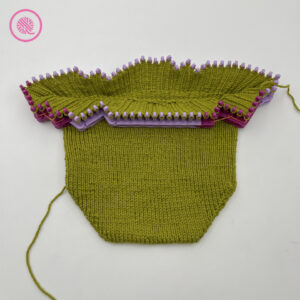
Short Row Crown
This section is worked back and forth using ONLY the marked side of the loom.
Short Row 1: Knit to 1 peg before last marked peg. Wrap last peg and turn.
Short Row 2: Knit to 1 peg before last marked peg. Wrap last peg and turn.
Short Row 3: Knit to 1 peg before last wrapped peg. (Wrapped pegs have 2 stitches on them.) Wrap next peg and turn.
Repeat Short Row 3 until all marked pegs are wrapped.
Short Row 4: Knit to first wrapped peg. Knit over both sts on wrapped peg.
Short Row 5: Knit to next wrapped peg. Knit over both sts.
Repeat Row 5 until all pegs have 1 st.
Short Row 6: Knit to next marker.
Hat Body
Rnd 1: K all.
Repeat Rnd 1 until hat measures 5.5 (6.5, 7, 7, 7.5, 8) inches or until desired length minus brim.
Ribbed Brim
Rnd 2: EK2, P2
Rep Rnd 2 until hat measures 6.75 (8, 8.5, 9, 9.5, 10) or until desired length.
Basic bind off loosely in pattern. Close Kitchener cast on. Weave in tails.
PIN IT!

Loom Knit Nordic Style Hat Tutorial Videos
Select videos are available to GoodKnit Kisses YouTube members only. To get exclusive access to GKK VIP-only content, free PDF patterns, weekly Zoom meetup and more, sign in to YouTube and join as a VIP Member today! Find out more about GKK Membership HERE!
These videos demonstrate both the Kitchener cast on and short row technique used in this pattern. NOTE: This tutorial is showing a toe up sock pattern, but the method is the same.
For other loom knitting skills used in this pattern see my How to Loom Knit for Beginners (knit, purl and basic bind off) and Loom Knit Easy Stitch Patterns (ribbing) blog posts.