

Have you ever tried to loom knit socks and been disappointed because they just didn’t fit right? It’s frustrating to put so much time into those little stitches and then end up with socks that you hate to wear. Let me show you how to customize a pattern so you can finally make loom knit socks that fit!
Typically, by the time you tackle socks on your loom you’ve had a good bit of experience with hats and scarves and want to try something new. Hats are easy to fit since they’re made to be super stretchy and you can just change your loom size to go up or down a size. And the worst that can happen with a scarf is it’s too short. Socks? Well, they’re a different story.

You guys have been asking me to make a loom knit sock tutorial for a while and I know I’ve put it off. But, honestly, I have a good reason. I knew that just making a tutorial on how to work up a sock would not be enough. It doesn’t matter if you know how to work perfect short rows (which I do show you in the video below, by the way) and can stitch a perfect toe closure if the sock doesn’t fit when you’re done. I knew that I needed to include a segment on how to custom fit a sock pattern.
Feet come in all shapes and sizes so even when you follow a pattern exactly sometimes they just don’t fit right in the toe or heel. We also have to take into account that even if you use the same loom and yarn listed in the pattern your personal gauge might be tighter or looser.
The GOAL: Loom Knit A Pair of Socks That You Want to Wear Every Day!
I want you to loom knit socks that fit so well that you hate to take them off. Even to wash them. I want you to have socks that feel like your feet are being gently hugged all day long with just enough room so you can wiggle your toes.
Follow my tips below and you’ll be able to stare down at your feet with that silly grin that only sock knitters exhibit. The grin that says, “Yes! I made these and they are perfect.”
Loom Knit Sock Challenges and Solutions:
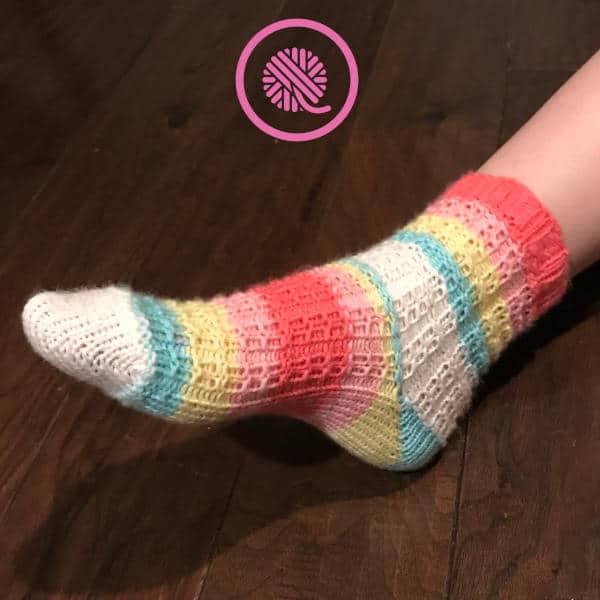
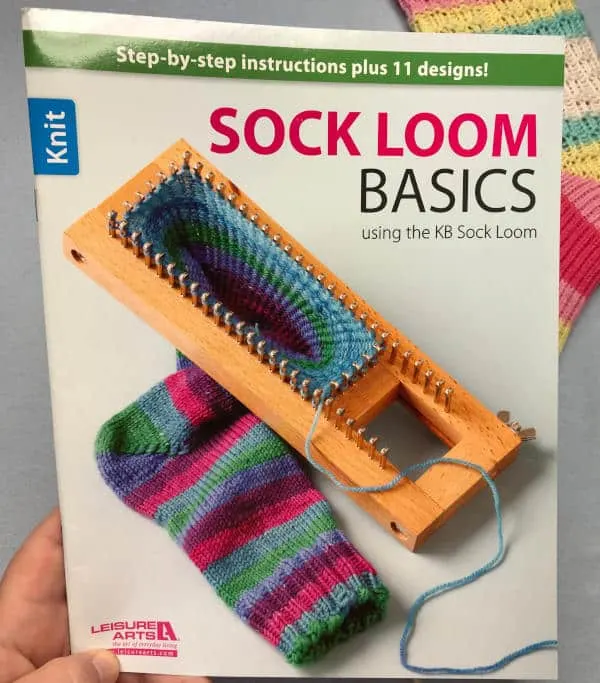
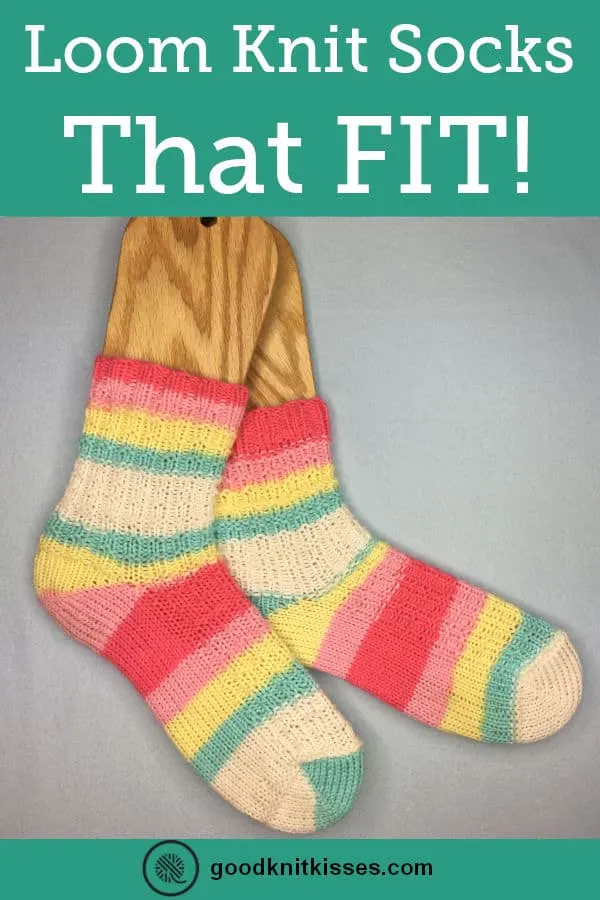
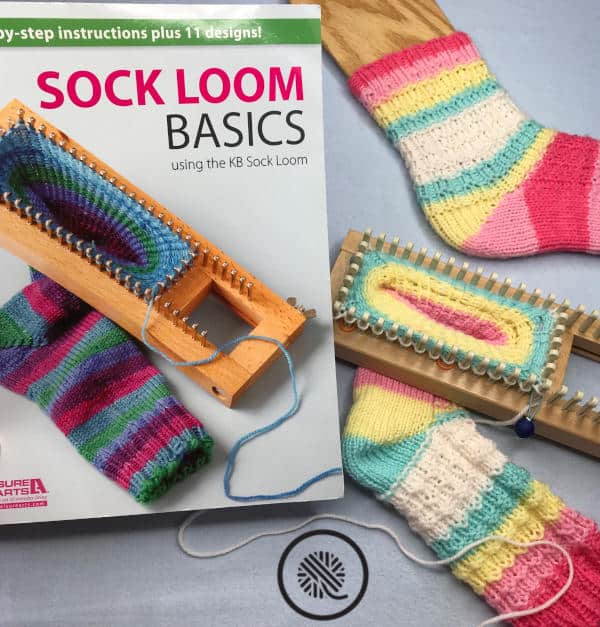
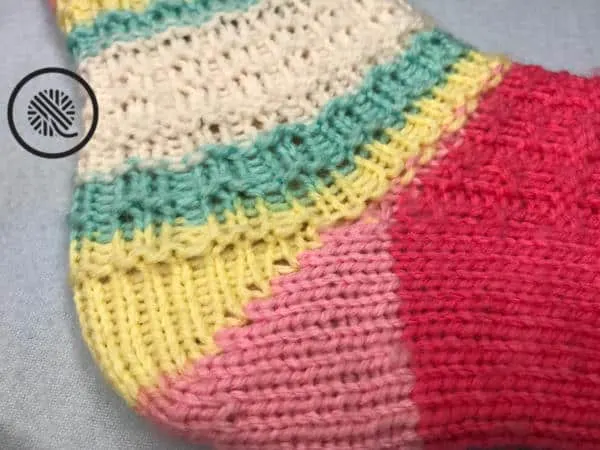
Today I’m using the Horizontal Rib Tippy Toes pattern out of the Sock Loom Basics book from Leisure Arts. (This is a great pattern book with several varieties of socks including yoga socks.) I took this pattern and customized it to fit my daughter. I even let her choose the yarn because socks should be fun.
This post contains affiliate links to products I like to use. Using these links to make purchases costs you nothing extra, but helps support GKK and everything we do.


Loom Knit Socks That Fit Challenge #1: Yarn Choice
My daughter chose Lion Brand Ice Cream yarn in the delicious Tutti Fruitti color. I love the colors, but right out of the gate we run into a problem. The pattern calls for a #1 fingering weight yarn and this one is a #2 weight. I know that I can’t match the gauge in the pattern if my yarn is thicker.
Loom Knit Socks That Fit Challenge #2: Loom Gauge
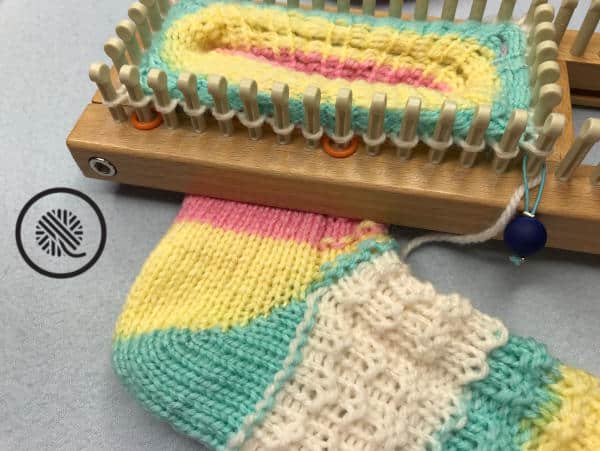
I check the pattern again to find that they used the KB Sock Loom. This is the original sock loom with the metal pegs. It’s a fine gauge (FG) loom and I know I could use a #2 weight yarn, but it will make a pretty dense fabric. I decided to use the KB Sock Loom 2 because I want to make sure the sock has enough stretch. This small gauge (SG) loom also has the nylon pegs that I find more comfortable to use.
Loom Knit Socks That Fit Challenge #3: Pattern Gauge
I probably should have mentioned this first. Every pattern lists the gauge in terms of how many stitches and rows the designer got when loom knitting this sock. Even if you use the same loom and yarn listed in the pattern your personal gauge could be different if you tend to knit a little tighter or looser.
Even if you are very careful you might be able to adjust your tension to loom a 2″ square that matches the gauge exactly. But you will never be able to do a full sock like that. In a design class I took recently the instructor said, “You knit how you knit.” It makes more sense to adjust the pattern to how you knit than to try to “correct” your tension while you’re loom knitting a full pattern.
The Horizontal Rib Tippy Toes patterns lists 7 stitches per inch as the stitch gauge. I know, from experience, that I absolutely can’t knit that using a small gauge loom and #2 weight yarn. Not possible!

Loom Knit Socks That Fit Solution #1: Measure Accurately
You will need:
- A flexible measuring tape
- Bare feet
- Notepad & Pen to write down your measurements
Measure while you’re standing with your foot flat on the floor. You may need help to get an accurate measurement. Here’s what you need to measure:
- Ball of foot – This is the wide part of your foot at the base of your toes.
- Length of foot – Measure from the tip of your big toe to the back of your heel.
- Length of leg – Measure from the bottom of your heel on the floor as far up your leg as you want your sock to reach. This can be 0″ if you want a no-show sock or 12″ or more for knee highs.
Example (my daughter’s foot measurements):
Ball of foot: 8.75″
Length of foot: 10.25″
Desired length of sock leg: 6-8″
Loom Knit Socks That Fit Solution #2: Check Your Gauge
Your gauge is very important when knitting socks. If you ignore this you’re going to put a lot of work into socks that may or may not fit. Even being off by 1/2 stitch per inch can change how your sock feels.
I’ve got a great blog post all about how to make and measure your gauge swatch.
One you have your swatch finished, I recommend washing it and laying it flat to dry. While this isn’t absolutely essential it does give you the most accurate measurements. You don’t need to pin it out like you would for blocking unless you typically pin your socks to a mat every time you wash them. If you do, more power to ya, girl!
Example (using the loom & yarn that I used for the socks):
My personal gauge: 5.5 stitches and 7.5 rows in 1″

Loom Knit Socks That Fit Solution #3: Trust the Math!
Math doesn’t lie. If you knit
1. Calculate Your Cast On Stitches:
In the video I show you how to work the calculations using my Interactive Sock Calculator and just using a manual calculator and paper. For more details on the specific calculations I’m doing to figure out the number of stitches to cast on and use to work the heel and toe see the Example below or see my Sock Math & Charts page.
Example – CAST ON (My Sock Calculator does all this for you!):
1. Multiply Ball of Foot measurement X Stitches/inch: 8.75″ x 5.5 = 48.125
2. Multiply that number by .90 to account for negative ease: 48.125 x .90 = 43.3125
3. Round this number to the nearest EVEN whole number: 44 cast on stitches
2. Adjust Your Cast On for Your Stitch Pattern & Ribbing
Socks that are all stockinette or have no repeatable stitch pattern do not need further calculations to find your cast on. If your socks have a repeatable stitch pattern or ribbing other than K1, P1 you may need to adjust the number of stitches you cast on.
In the Horizontal Rib Tippy Toes pattern the sock has a stitch pattern on the leg and instep (top of the foot). The pattern also calls for K2, P2 ribbing. Let’s see what that does to our cast on number.
Example:
1. The Horizontal Rib stitch pattern used in the books has a multiple of 3 +1. You need to be able to work a set number of repeats of the stitch pattern around the sock. That means you need to be able to subtract 1 from your cast on and still have a number you can evenly divide by 3. 44 does not work!
2. The closest number that fits that requirement is 40: 40 – 1 = 39 / 3 = 13 pattern repeats
3. Does 40 also work for a K2, P2 ribbing? Yes! K2, P2 ribbing has a 4 stitch repeat so it fits perfectly.
4. Is 40 pegs enough to still fit properly? While it is 4 pegs smaller than our 44 stitch optimal sock calculation that is a minor change (about 3/4″ smaller around the whole sock). Since socks are made to be stretchy this is acceptable.
3. Build Your Customized Sock Pattern
Since this pattern is a top down sock we will start with the cuff and work our way through the pattern to the toe. On a toe up sock you will build your pattern starting with the toe and working to the cuff.
So, what do I mean by build your pattern? I mean calculate how many rows or inches you need for each part of your sock. We start by reading the pattern so we know what the designer did. Then we adjust it if we need to. Let’s get started:
Remember, now that the cast on is set we will be using ROW gauge to make these calculations.
A. Cuff:
According to the pattern this is K2, P2 ribbing for 1″. Easy! Just look at your row gauge for 1″. (Round up to the nearest row.) For patterns that have longer cuffs just multiply the number of inches for the cuff x your row gauge.
Example:
My row gauge is 7.5 rows per inch so I need to round up to 8 rows to reach 1″ in length. My cuff will be 8 rows long.
B. Leg:
The total length of the leg portion of the sock is the combined total of the cuff, leg and half the length of the heel:
Total Leg Length = Cuff + Leg + 1/2 Heel
For a plain sock (no stitch pattern) this is easy. Multiply how long you want the sock leg (minus the cuff) x your row gauge. Some people prefer to just get started on their first sock and knit to their desired length. After you reach your desired leg length you count the number rows you knit from the cuff and write it down so you can knit the same number of rows for your second sock.
However, once again the Horizontal Rib is rearing its ugly head! Stitch patterns mean we need to be able to finish the sock leg at a specific row. Back to the old math so we can calculate how many row repeats we’ll need to do.
Example:
1. What does the pattern say? The pattern uses 4 stitch pattern repeats plus 4 extra rounds for 56 rounds total for the leg. Using my row gauge of 7.5 here’s how long the sock leg will be: 56 rounds / 7.5 rows per inch = 7.46″
2. This does not include the cuff! If I add 1″ for the cuff that gives me total length of 8.46″
3. Does this work? My daughter wanted a sock leg between 6″ and 8″ so if I follow the pattern exactly the sock will be too long.
4. Let’s check the length if I use 3 pattern repeats instead. With 13 rows in the stitch pattern plus the 4 extra round I need I get: 3 repeats x 13 roounds/repeat + 4 extra rounds = 43 total rounds
5. Now does it work? 43 rounds / 7.5 rows per inch = 5.73″
6. YES! Adding in 1″ for the cuff gives me a sock leg of 6.73″ and that still gives me room to add in the heel.

C. Heel
The heel and toe are hands down the part of the sock that makes most people run screaming from the room vowing to only loom knit hats and scarves for the rest of their lives. But really, when you see me working those German short rows without even slowing down to pick up a stitch you will change your mind!
Short rows means you will only be working on part of the stitches you cast on. You stop working in the round and start work short rows back and forth on the heel. Essentially you will stop knitting the top of your sock and only work on the bottom for a while. This creates a pocket for the heel and makes a comfortable bend at your ankle. The heel adds length to both the leg and the foot. Half the heel length is added to leg and the other half is part of the foot length.
So how you do you figure out how many stitches to knit for the heel? Easy Just use half your stitches.
Once you know how many stitches you will need for the heel you need to calculate how many pegs to short row on either side of the center. Again, the standard formula rarely steer your wrong. Take half your stitches and divide that number by 3. This is much easier to see in the example.
Example:
1. In my pattern I cast on 40 pegs.
2. Half of that is: 40 / 2 = 20 stitches
3. Divide that by 3: 20 / 3 = 6.7 stitches
4. Okay, still with me? Here’s where we need to adjust our numbers so they add up to 20 since that is how many stitches we have to work with. By using 7 stitches on the left, 6 in the middle and 7 on the right that gives us 20 stitches.
5. That means you will work back and forth across the heel working shorter and shorter rows each time until you have only 6 stitches left in the center of your heel. You will have 7 pegs on each side of the center that have a German short rowed stitch on them. (More about that in the video.)
6. The heel is worked over 28 rows (14 rows shortening down to the center stitches and 14 rows widening back up to our full width.) Using our row gauge we know the total heel will be 28 / 7.5 rows per inch = 3.73″
7. Half of that is 1.86″ so that gives me a total leg length of : 1″ (cuff) + 5.73″ (leg) + 1.86″ (1/2 heel) = 8.59″ leg length. (NOTE: This is .6″ longer than my daughter wanted, but I think it’s a good length so I decided to go with it!)
D. Foot (Sole and Instep)
Once you finish the heel you need to work on the foot. This is very similar to how you figured out the leg. The total foot length is made up of the foot portion of the heel, the foot of the sock and the toe.
Total Foot Length = 1/2 Heel + Foot (Sole) + 1/2 Toe
Ack! Now you need a toe measurement too! Rest easy, my friends, you’ve already done the work. It’s the same measurements as your heel. I know they do NOT look alike but the heel and toe are identical in a sock pattern. Don’t let the 1/2 Toe measurement scare you either. 1/2 of the short rowed toe is on the bottom of your foot and other half is on the top so we only need to count it once.
So basically your 1/2 Heel and 1/2 Toe measurements are the same number!
On a basic sock this is very straightforward. You typically knit for a set number of inches and then count the rows to make the second sock match.
But once again our stitch pattern is coming into play. On the foot portion of the sock you use two different stitch patterns: stockinette for the sole, or bottom of your foot, and the horizontal rib stitch pattern for the top of the foot.
Example:
1. Check the pattern! The pattern calls for 40 rounds.
2. Take the number of rounds in the pattern and divide by row gauge: 40 / 7.5 rows per inch = 5.3″
3. Add the 1/2 heel, sock length and 1/2 toe: 1.86″ + 5.3″ + 1.86″ = 9.02″
4. Does that match my daughter’s foot length? NO! I need 10.25″
5. I need to add another 1.25″ to the length of the sock so it will fit.
6. When we were calculating the leg we saw that one 13 round repeat added 1.73″ to the length. Let’s add one more round.
7. This will give a total foot length of 10.75″. It is about .5″ bigger, but that is withing a reasonable margin so it’s acceptable.
E. Toe
This is it! Only one part of the pattern left to calculate. Except you’re done. I’m not kidding. No more math for you! Here’s the secret to the perfect short rowed toe:
Repeat the same short rows you used for the heel!
Example:
1. There is no example. Weren’t you listening? Repeat the heel and it magically becomes a toe.
Now you can finally loom knit socks that actually fit!
The video includes all of the calculations listed above plus it walks you through:
- Reading the pattern instructions and comparing them to actually sock
- How to work a German short rowed heel or toe
- Reinforcing the corners of the heel/toe
- Binding off and closing the toe
Argenia L. McCray
Sunday 7th of January 2024
Hello I am confused on how to do the heel and the toe area on the socks. Are there any diagram to see and follow?
Angela
Tuesday 24th of October 2023
A little confusing to read the math without the measurements I need but I’m looking forward to getting my loom delivered to put the calculations into practice… Fingers crossed!
Beverly Quella
Sunday 9th of July 2023
Just learning how to make socks.
Robin Cannon
Sunday 25th of June 2023
I need help making socks.
Sherri
Sunday 2nd of April 2023
I would love this book! I found a company that sells hand dyed merino wool, and I want to use a loom to make socks