
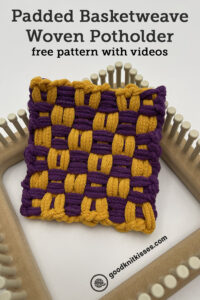
Inside: Free Padded Basketweave Potholder pattern including detailed written instructions, tutorial videos and link to weaving chart.
It’s time to bring back a childhood favorite of mine.
The potholder loom! Remember, weaving on the metal potholder loom as a kid? Didn’t all of our family members get at least one of these for a Christmas gift?
I worked on some potholder loom weaving designs a while back and decided to pick up my potholder loom again. I found a wonderful resource from Piglet’s Potholder Patterns that includes dozens of designs with weaving charts. I chose my favorites and am creating tutorial videos for them so we can all enjoy these fun designs.
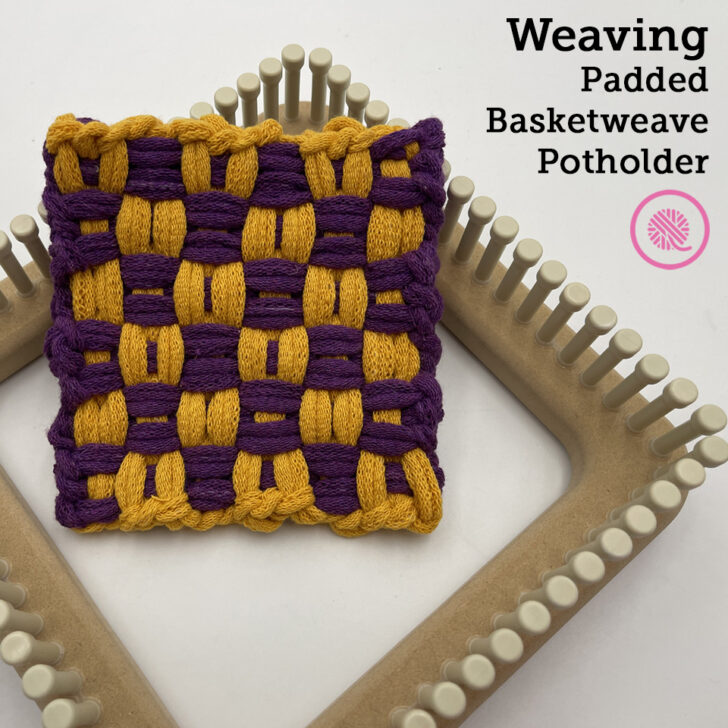
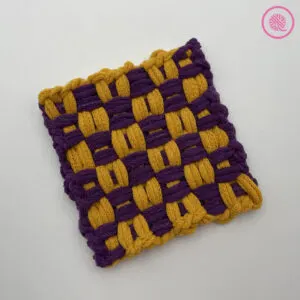
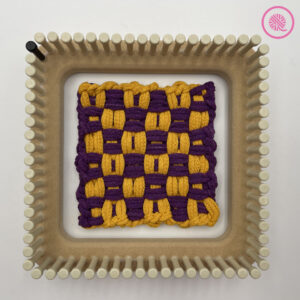
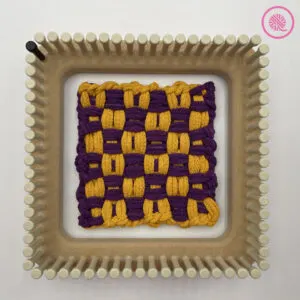
The Padded Basketweave Potholder design is fun twist on a checkerboard with a spot of color in the center of each square. This reversible potholder uses 2 colors and is an easy beginner project.
This pattern contains written instructions and links to fully-captioned tutorial videos showing the entire project for both right and left handed weavers.

Be sure to check out all my woven potholder tutorials:
Padded Basketweave Potholder
Woven Potholders: 9 Basic Patterns
Zig Zag Twill Potholder
Padded Basketweave Potholder
By Kristen Mangus
An ad-free downloadable PDF of this pattern is available for purchase in my GoodKnit Kisses online store or on Etsy at the links below:


MATERIALS
(Materials list may contain affiliate links to products I used to make this project. Using these links costs you nothing, but helps support GKK.)
Loom
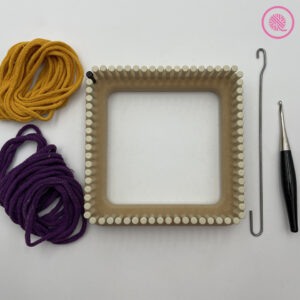
⅜” potholder loom with 72 pegs.
CinDWood ⅜” Small 7” Hot Pad/Potholder Loom used in sample. This loom is available alone or bundled with a bag of loops.
Loops
36 cotton potholder loops (for 7” loom)
Color A: 18 loops (yellow)
Color B: 18 loops (purple)
Weaving tool
Crochet hook to bind off
SKILL LEVEL Easy+
MEASUREMENTS About 5” x 5” (12 x 12 cm)
NOTES
The padded basketweave design uses two colors, one for the warp (vertical strands) and one for the weave (horizontal strands). You place all the warp loops on the potholder loom first. Then you weave the horizontal loops according to the row instructions from the top row down to the bottom.
You can find a detailed chart of this design at Piglets Potholders Patterns: Padded Basketweave (18-peg) (Shared with permission under Creative Commons license CC-by-SA)
INSTRUCTIONS
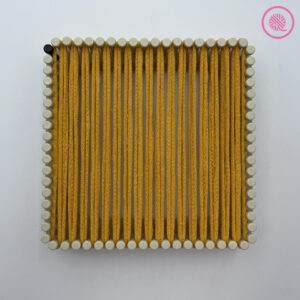
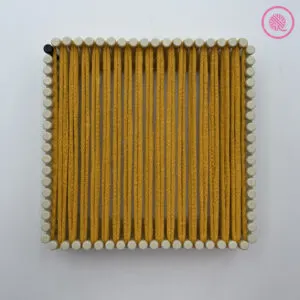
Warp:
Place all Color A loops vertically from top to bottom using all pegs. (See image below.)
Make sure to position the loom so black starting peg is in the upper corner. This marks Row 1.
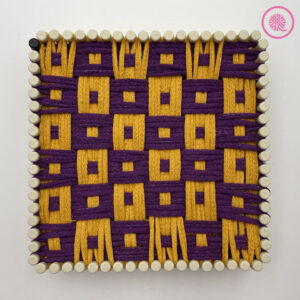
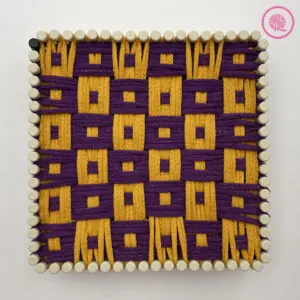
Weave:
All weaving loops use Color B
Row 1: Weave *under 3, over 3. Repeat from * to end of row.
Row 2: Weave *under 1, over 1. Repeat from * to end of row.
Row 3: Weave *under 3, over 3. Repeat from * to end of row.
Row 4: Weave *over 3, under 3. Repeat from * to end of row.
Row 5: Weave *over 1, under 1. Repeat from * to end of row.
Row 6: Weave *over 3, under 3. Repeat from * to end of row.
Repeat Rows 1-6 two more times. (See image below.)
Bind off using crochet hook.
PIN IT!

Padded Basketweave Potholder Weaving Tutorial Videos
Select videos are available to GoodKnit Kisses YouTube members only. To get exclusive access to GKK VIP-only content, free PDF patterns, weekly Zoom meetup and more, sign in to YouTube and join as a VIP Member today! Find out more about GKK Membership HERE!