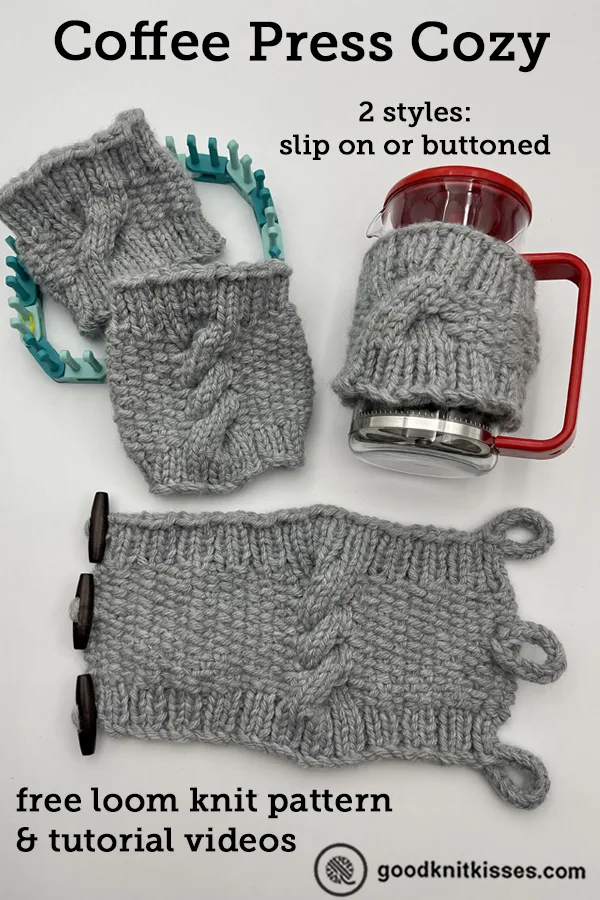
Inside: Free loom knit Coffee Press Cozy pattern includes written instructions for 2 sizes, short & tall, in 2 styles, slip on or buttoned, plus video tutorials teaching the techniques you need to make the pattern.
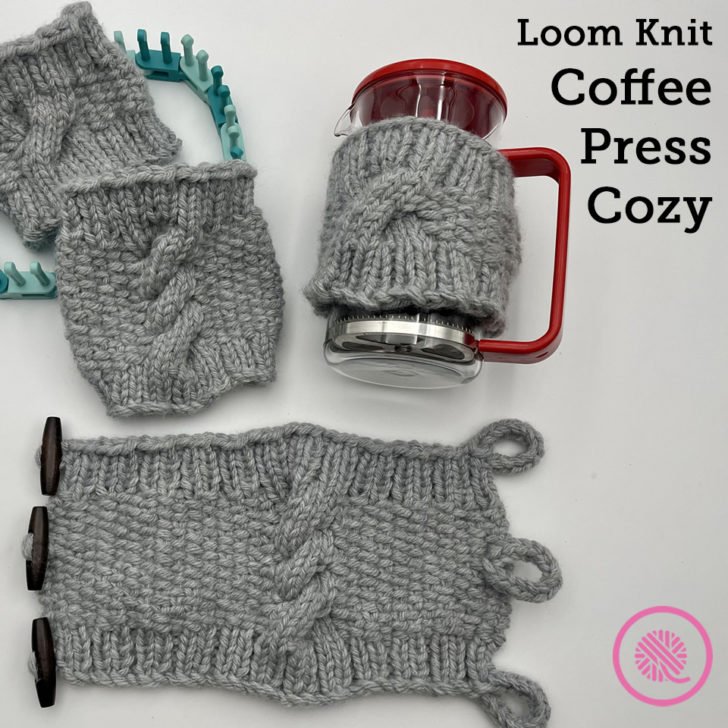
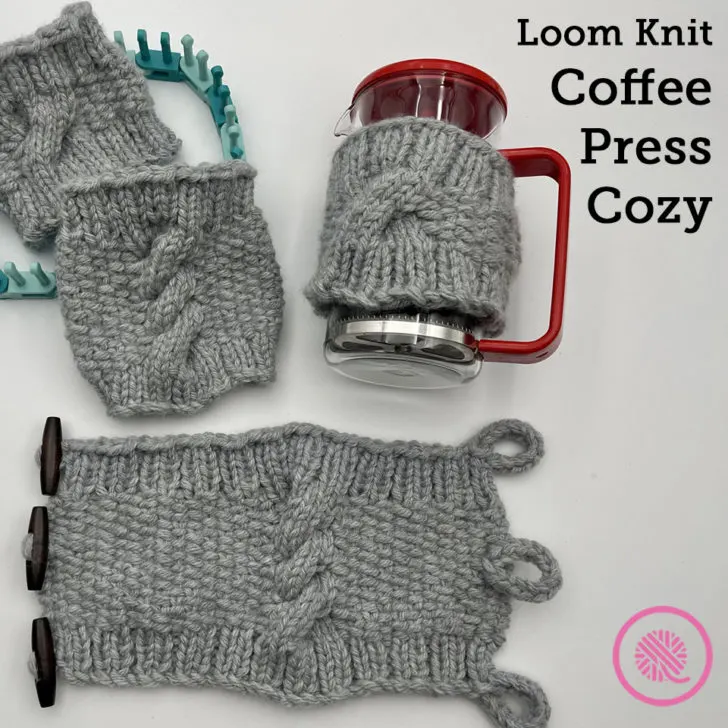
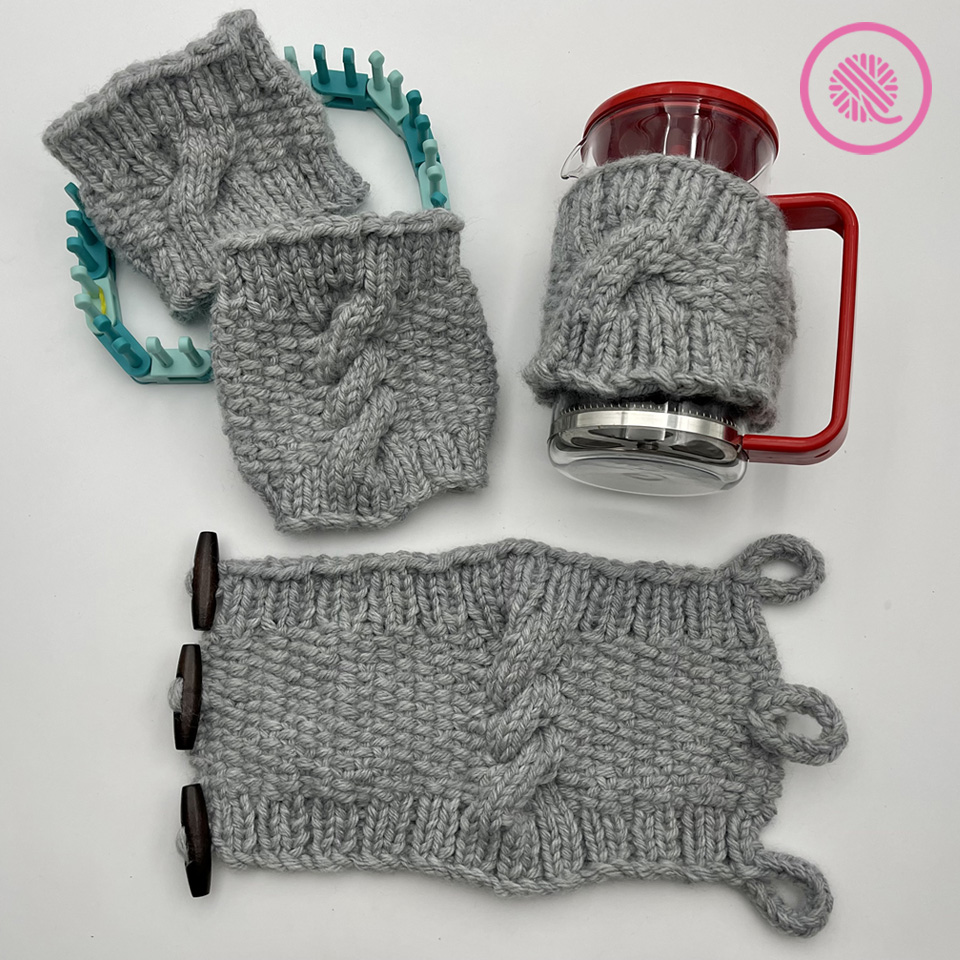
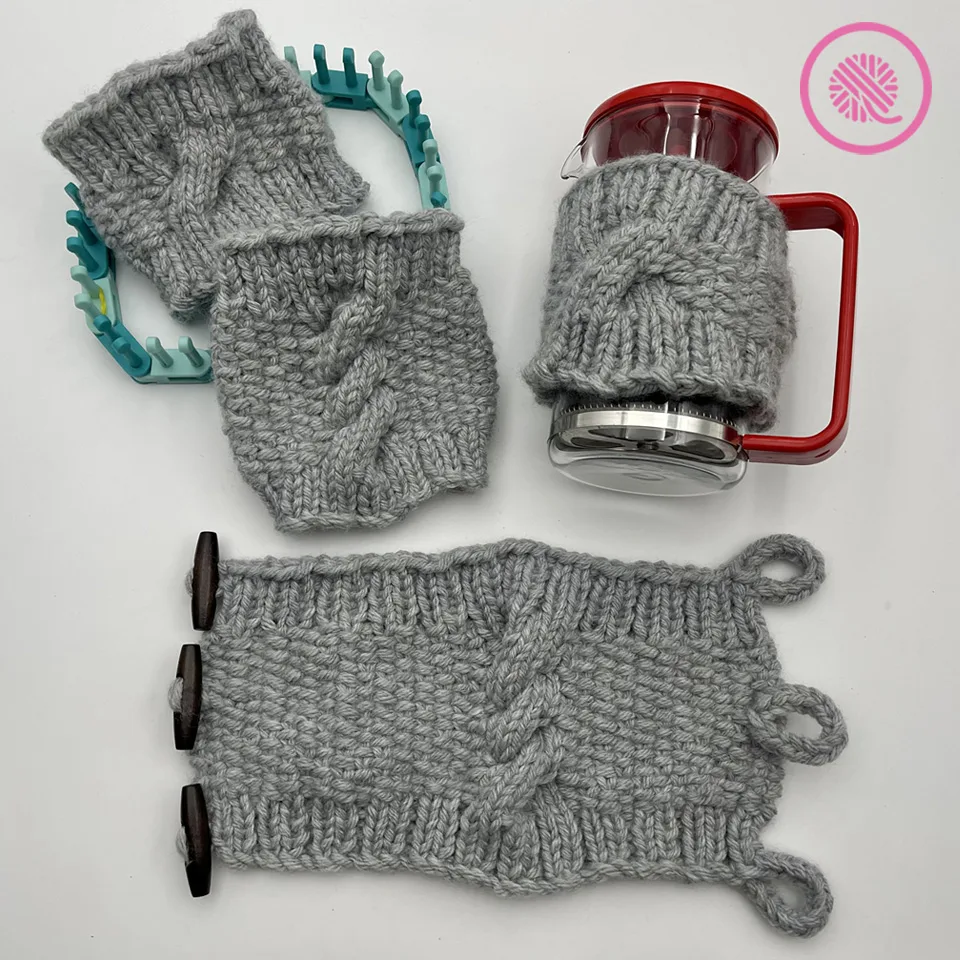
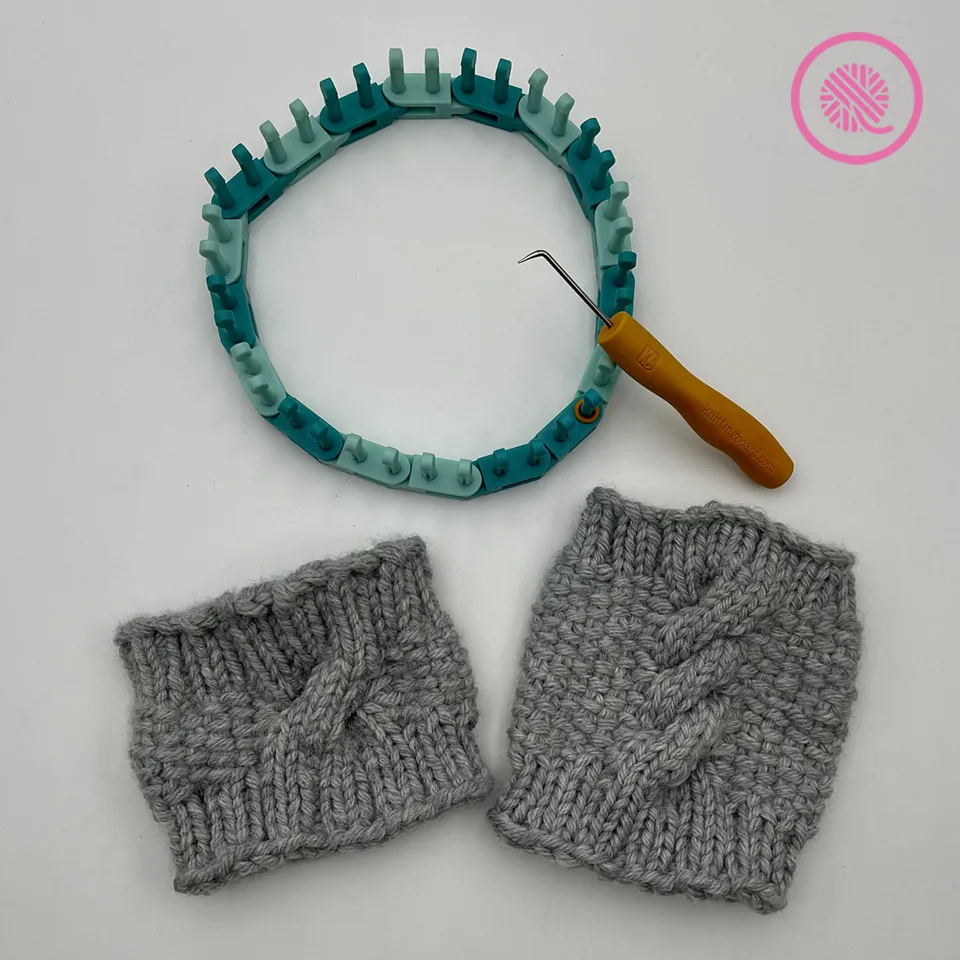
Keep your coffee warm while it brews! The Coffee Press Cozy features ribbing at the top and bottom, a linen stitch body and a cable twist design. Instructions are included to loom knit this pattern in the round as a slip on cozy or as a flat panel with toggles to fasten it around your coffee press. This design also works great on large insulated cups or bottles.
You’re going to find so much more than a single pattern in here!
I started this project because my parents wanted something to keep their coffee press warm while they were brewing their morning coffee. Their coffee press has a handle that is attached at the top but open at the bottom. The slip on cozy was perfect!
Bonus! While I was testing the pattern I found it fit my huge insulated cup that I use for my protein drinks. You can also add or remove pegs to adjust the size to fit your coffee press, tea press or thermos.
But as I was designing, I realized most coffee presses have a handle attached at both the top and bottom handle so the slip on cozy wouldn’t work. That’s why I added the buttoned version.
The technique I used was to incorporate the i-cord loops into the cast on and bind off so I would have less pieces to sew on when I finished. This method would be ideal for cowls, headbands, cup cozies and anything else you need to button up!
Pattern includes written instructions for 2 sizes, Short and Tall, and links to fully captioned tutorial videos detailing the linen stitch pattern, cable technique, and making the i-cord loops for the buttoned version.
Loom Knit Coffee Press Cozy
By Kristen Mangus
A downloadable PDF of this pattern is available in my Etsy store or from Ravelry at the links below:


MATERIALS
(Materials list may contain affiliate links to products I used to make this project. Using these links costs you nothing, but helps support GKK.)
Yarn
Bulky (#6) weight yarn
Mary Maxim Starlette Chunky (3.5oz/100g/60 yds/55m)
Color Light Grey used in samples. 1 ball makes 2 short or 1 tall sized cozy.
Loom
⅝” large gauge (LG) loom with 36 (36) pegs*.
KB Flexee Loom Chunky used in sample.
*Because of the wide cable, I recommend using the Flexee Loom for this pattern. Do not substitute another loom.
Notions
Tapestry needle to weave in ends and sewing on toggles/buttons
2 stitch markers of different colors to mark beginning of round and cable section
2-3 Toggles or buttons (buttoned cozy only)
GAUGE 11.5 sts x 26 rows in 4” in linen st pattern
SKILL LEVEL Intermediate
SIZES Short (Tall)
For a refresher on loom knitting basics see the blog posts below to get started:
13 Questions for Beginner Loom Knitters
How to Loom Knit Basics (cast on, knit, purl, & bind off)
How to Loom Knit Basic Stitch Patterns (garter st, seed st and ribbing)
How to Loom Knit in the Round

Slip on Cozy (knit in the round)
ABBREVIATIONS
4/4RC = 4 over 4 Right Cable
K = Uwrap knit
Rep = Repeat
Rnd = Round
Slwyif = Slip stitch with yarn in front
St(s) = Stitch(es)
MEASUREMENTS
Approx. size: Circumference 12.25” (12.25”) [31 (31) cm] x 4.5” (6.25”) [11.4 (15.8) cm] in height
NOTES
The slip on cozy is worked in the round. For right handed knitters work from right to left (clockwise). Left handed knitters should work in the opposite direction (counter clockwise).
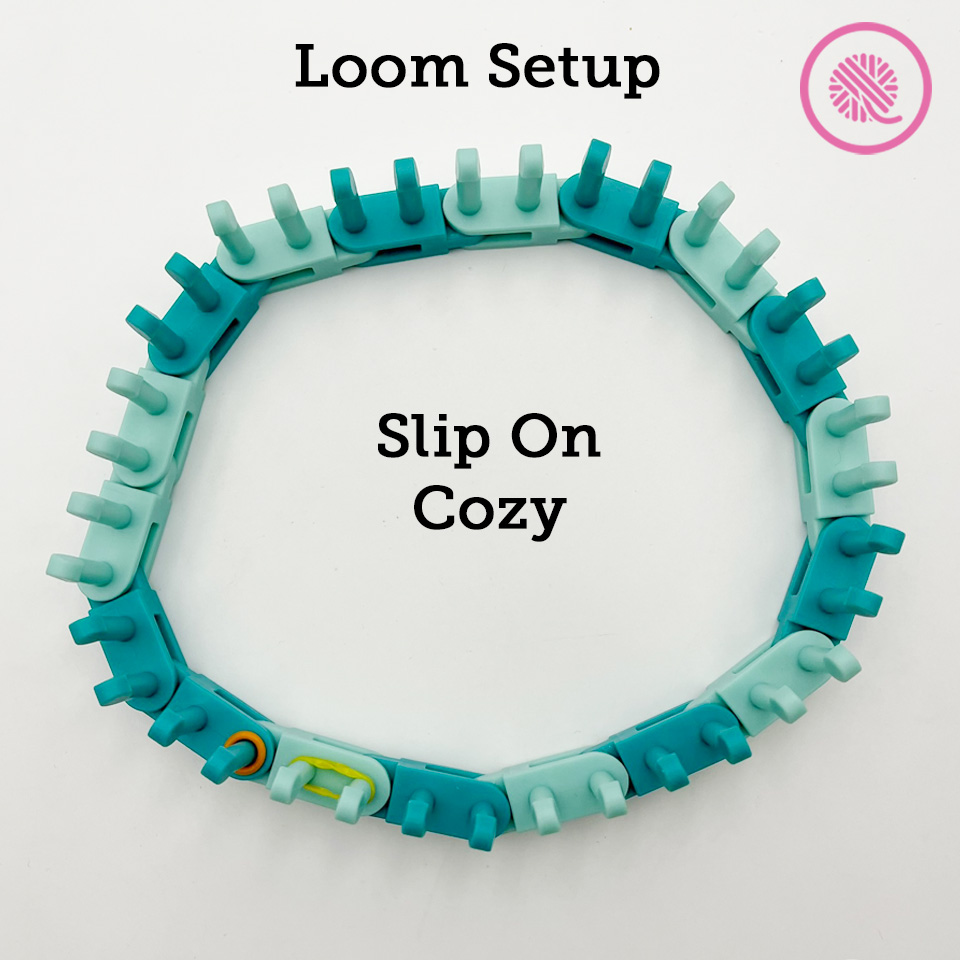
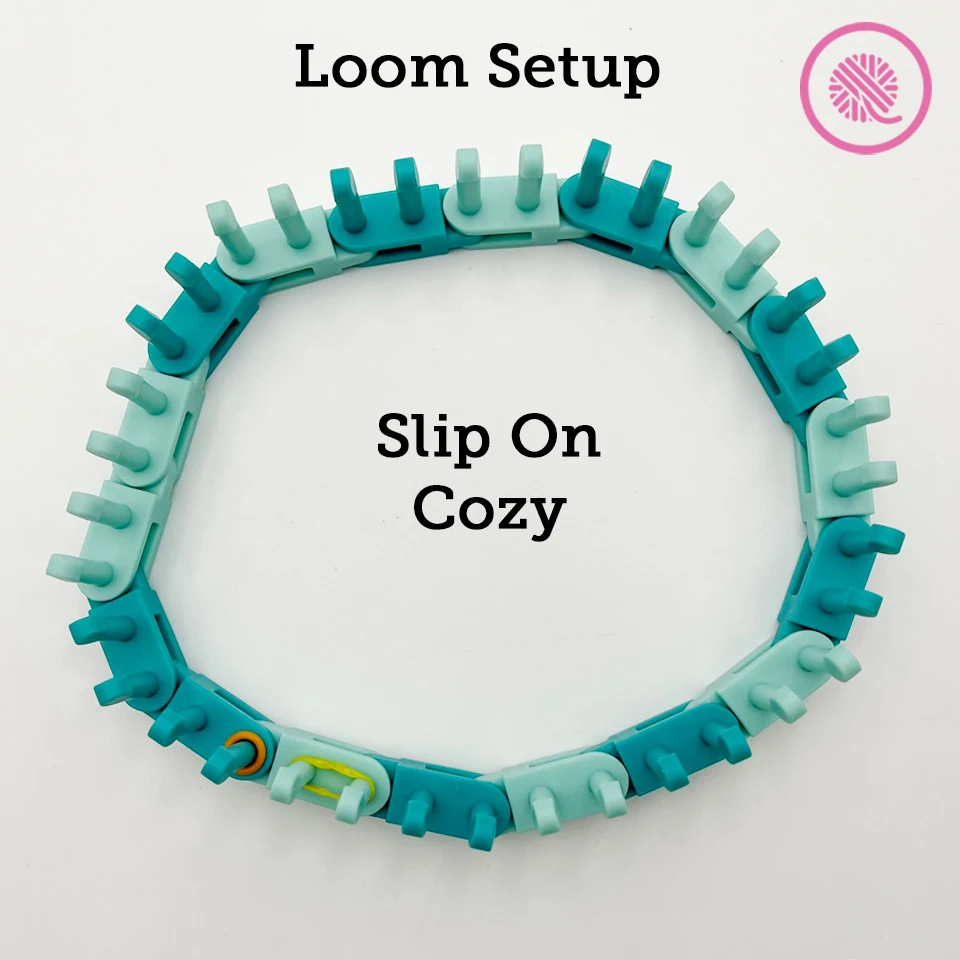
Loom setup: Working in the direction you intend to knit, start with a LIGHT link. Next add two DARK rounded links. Place marker (orange marker in picture) on the first peg of the first dark link. Next add 2 LIGHT rounded pegs. These 4 links will be the 8 stitches used in the 4×4 cable by crossing the stitches on the dark links with the ones on the light links.
Next alternate dark and light links until you have 36 pegs joined in the round. Wrap the last two pegs with a stitch marker to show the end of the round (yellow marker in diagram). NOTE: I suggest using ONLY the rounded Flexee Loom links but if you don’t have enough you should be sure to use them for the cable stitches and for a couple links before and after the cable. This will make it much easier to move the stitches when cabling.
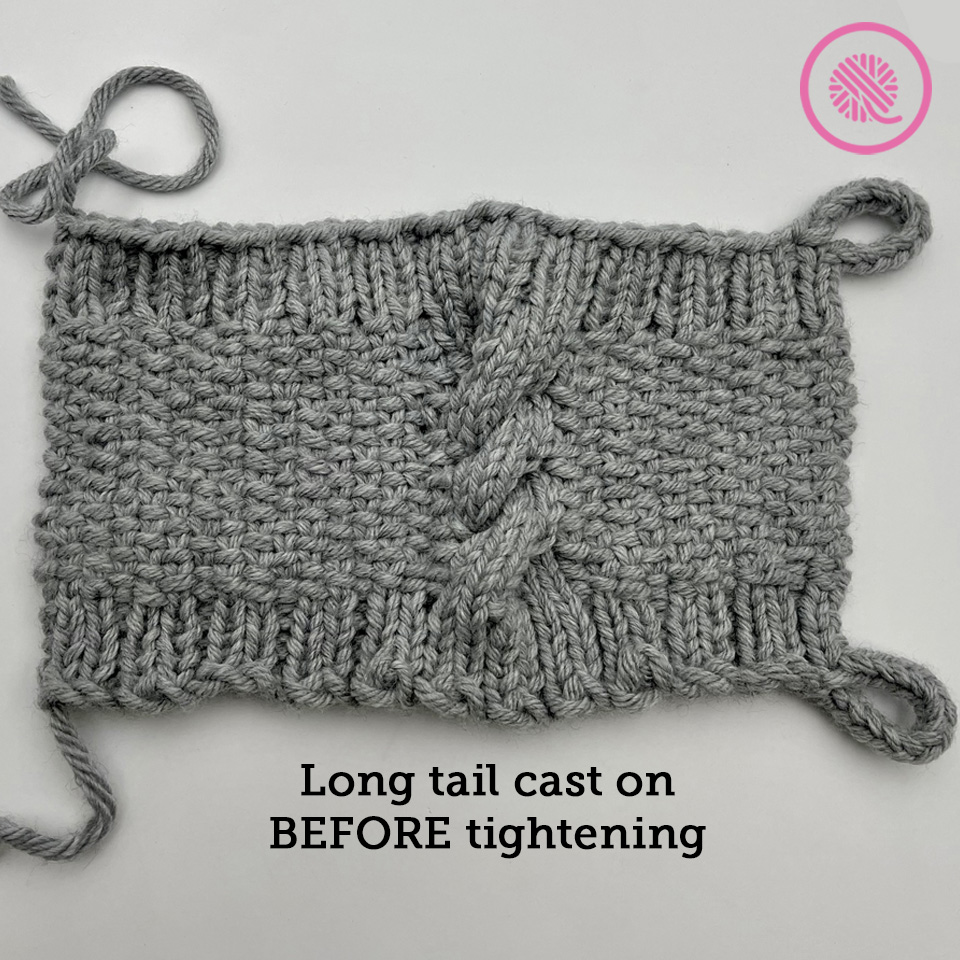
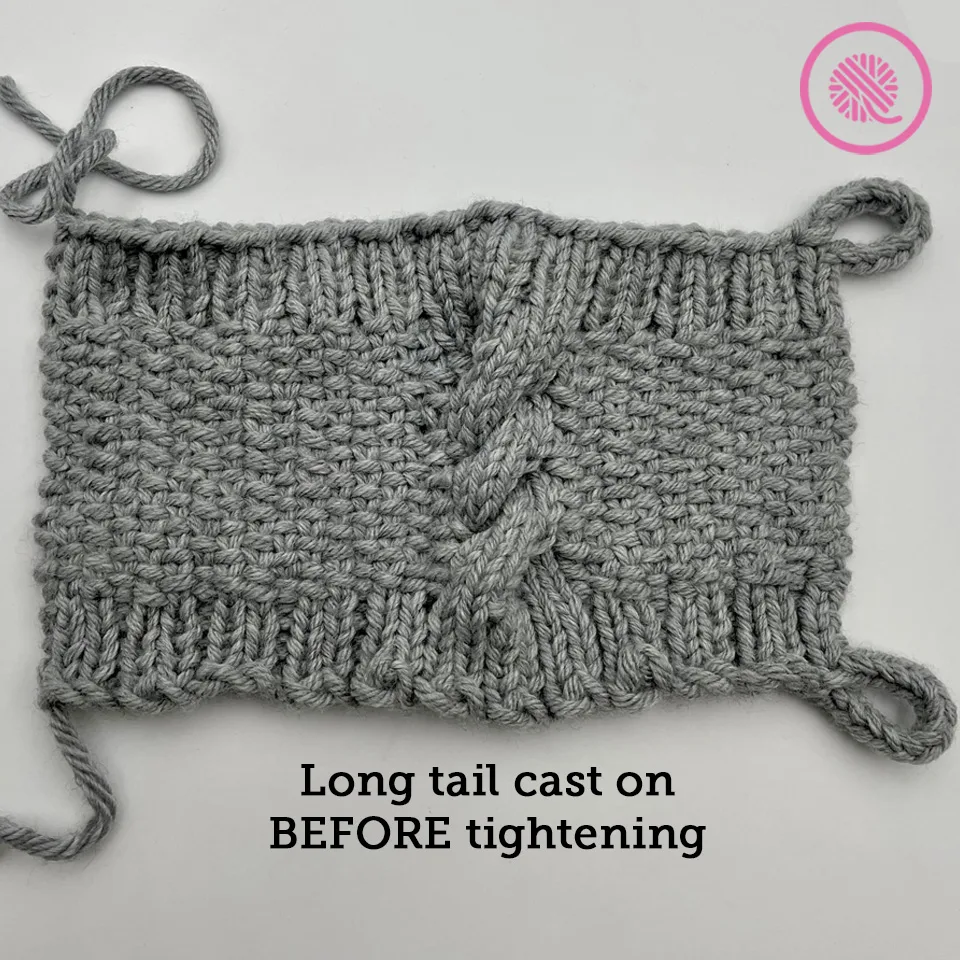
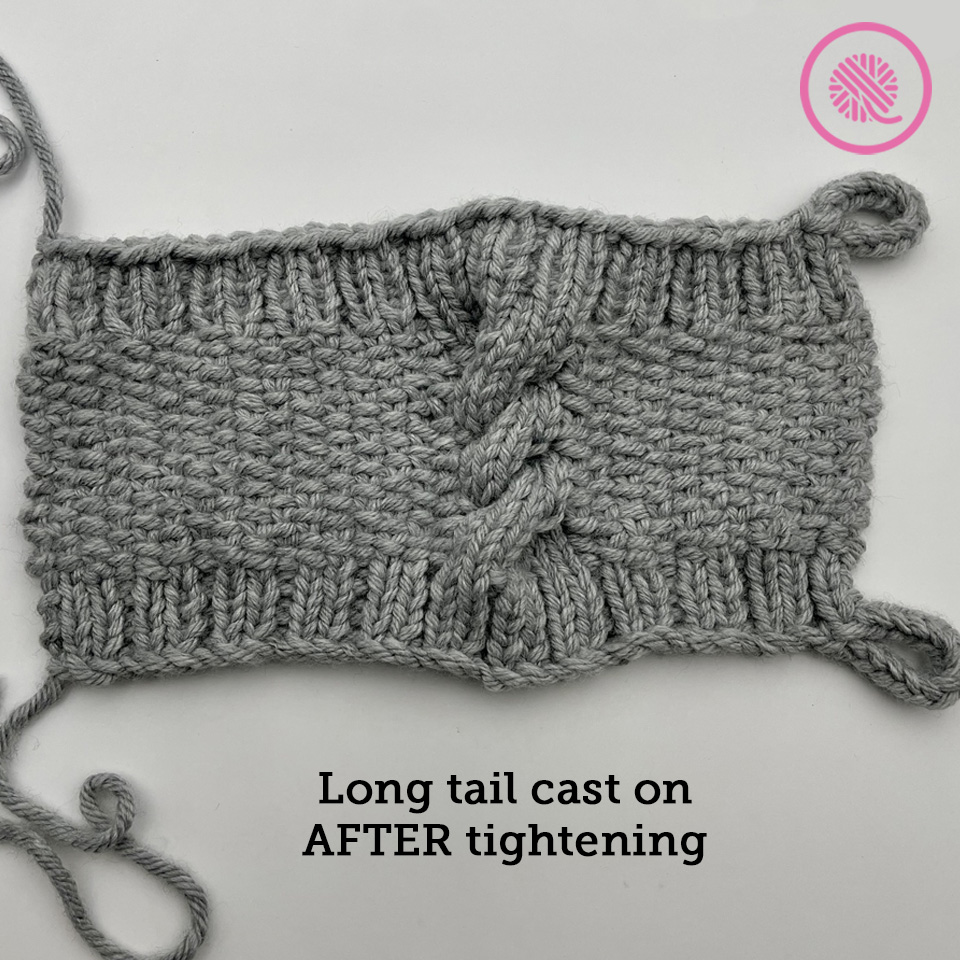
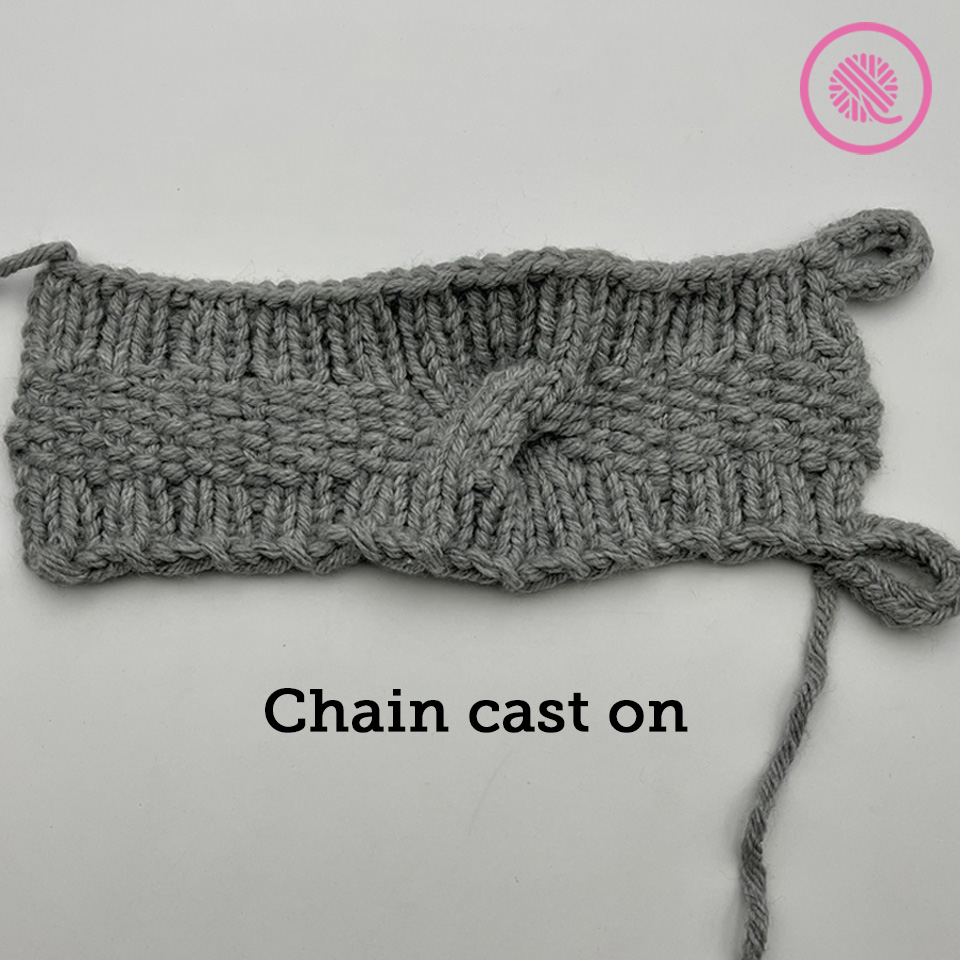
Cast on: I suggest using the long tail or chain cast on. If using long tail, you may need to tighten the cast on to clean up the edge. Both cast ons are shown in the i-cord video below.
Slwyif: To slip with the yarn in front, you want the working yarn in front of the fabric but behind the peg. See the video for the quick hack to work this without moving the stitch.
4/4RC: 4 over 4 Right Cable. Remove first two links from loom together and hold to back (or place 1st 4 sts on cable needle). Connect loom and knit next 4 sts. Bring yarn to front and place sts back on loom or place held loom links. TIP: knit the first stitch on the held stitches before moving to easy tension as needed. Loom will be tight for next few rounds but will easy up :for next cable round.
INSTRUCTIONS
Cast on 36 sts and connect in the round. Place stitch marker on Peg 1 to mark beginning of round.
Ribbing:
Rnd 1: *K2, P1. Rep from * to end of rnd.
All sizes:
Rep Rnd 1 until piece measures 1.5 (1.5) inch [2.5 (3.75) cm]; about 6 rounds.
Cozy Body (Large Cable Linen stitch pattern):
Rnd 2: K8. *Slwyif, K1. Rep from * to end of rnd.
Rnd 3: K8. *K1, Slwyif. Rep from * to end of rnd.
Rnd 4: K8. *Slwyif, K1. Rep from * to end of rnd.
Rnd 5: K8. *K1, Slwyif. Rep from * to end of rnd.
Rnd 6: K8. *Slwyif, K1. Rep from * to end of rnd.
Rnd 7: 4/4RC. *K1, Slwyif. Rep from * to end of rnd.
For SHORT: Rep Rnds 2-5.
For TALL: Rep Rnds 2-7 twice. Then rep Rnds 2-5.
Ribbing:
Rnd 8: *K2, P1. Rep from * to end of rnd.
Rep Rnd 8 four more times.
Finishing:
Bind off in pattern (to make stretchier bind off use E-wrap knit instead of U-wrap knits). Weave in tails.
Loom Knit Slip On Coffee Press Cozy Tutorial Videos
Select videos are available to GoodKnit Kisses YouTube members only. To get exclusive access to GKK VIP-only content, free PDF patterns, weekly Zoom meetup and more, sign in to YouTube and join as a VIP Member today! Find out more about GKK Membership HERE!
The following videos demonstrate how to loom knit the linen stitch pattern in the round and work the 4/4RC cable. NOTE: The stitch counts and placement of the stitch markers in the video are different than those listed in this pattern, but the method is the same.
Right handed
Left handed
PIN IT!

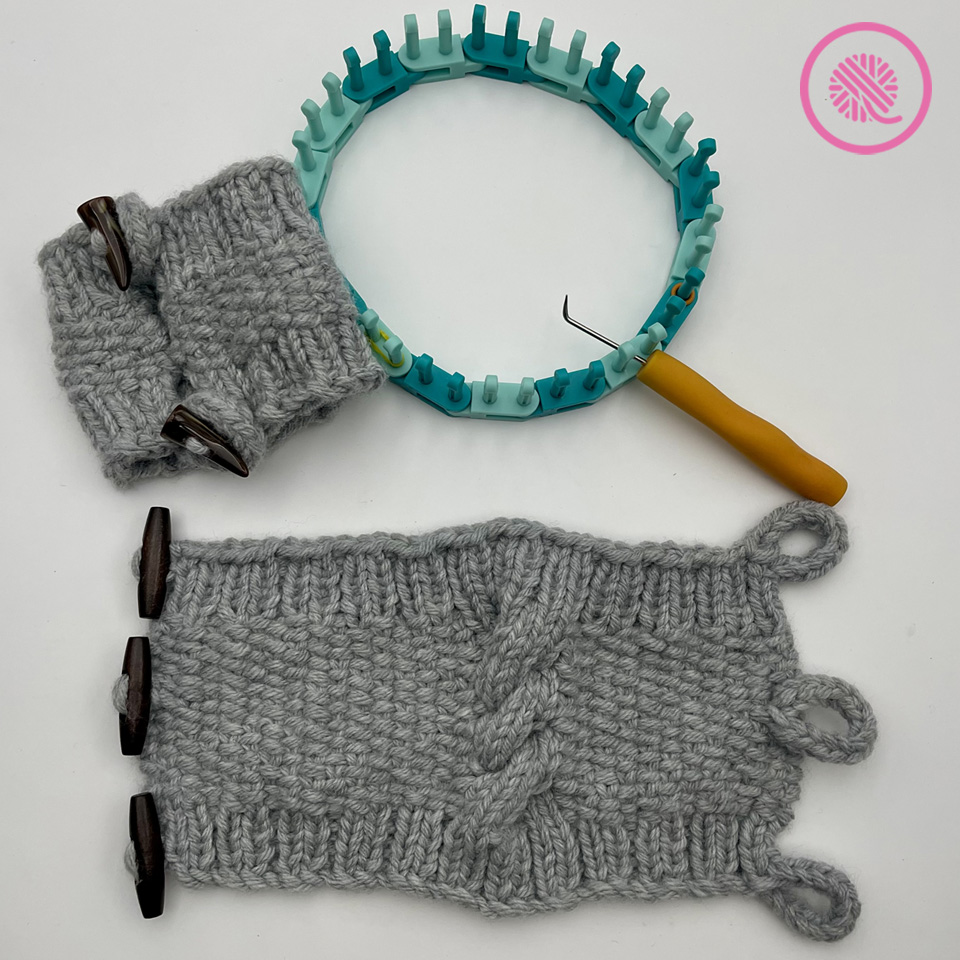
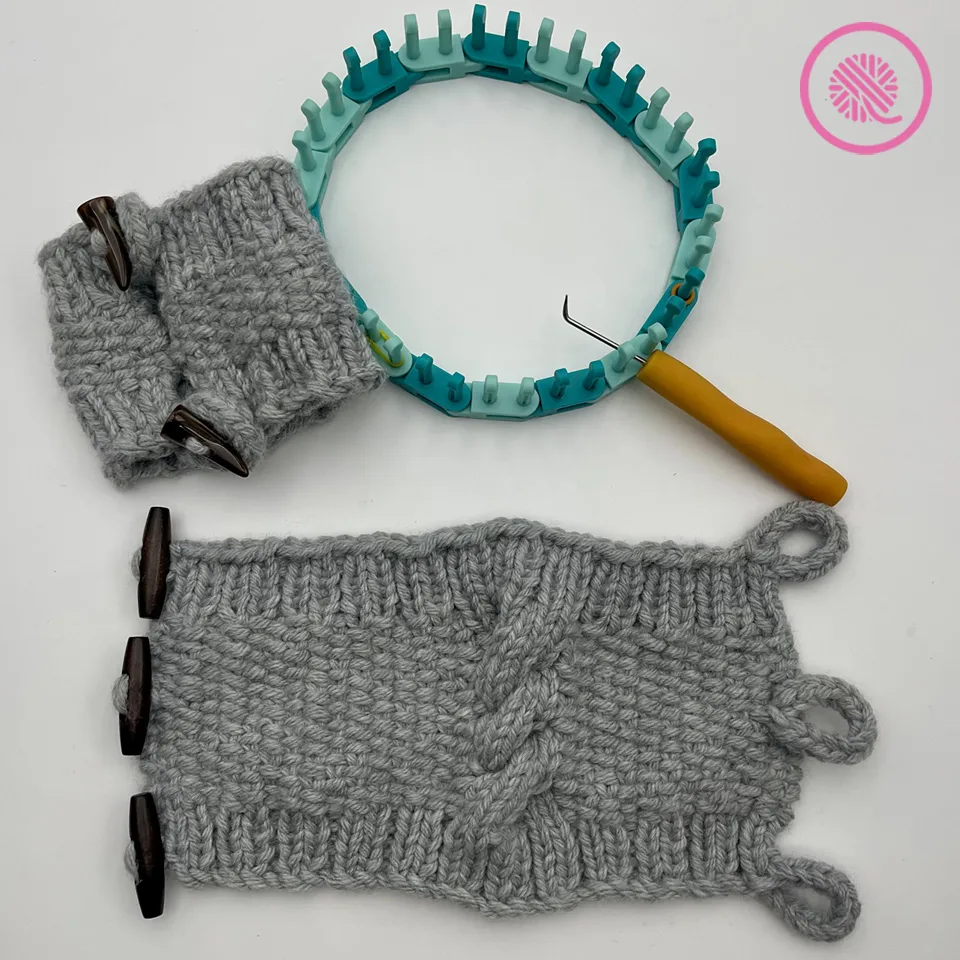
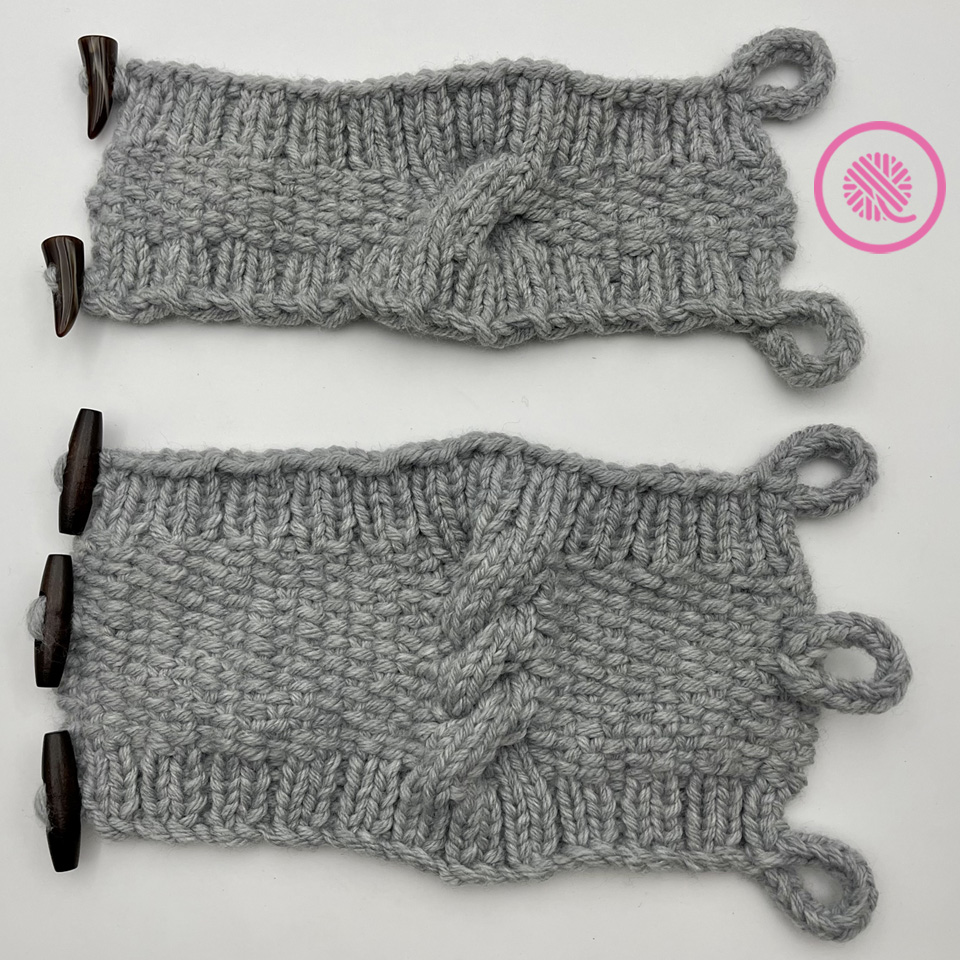
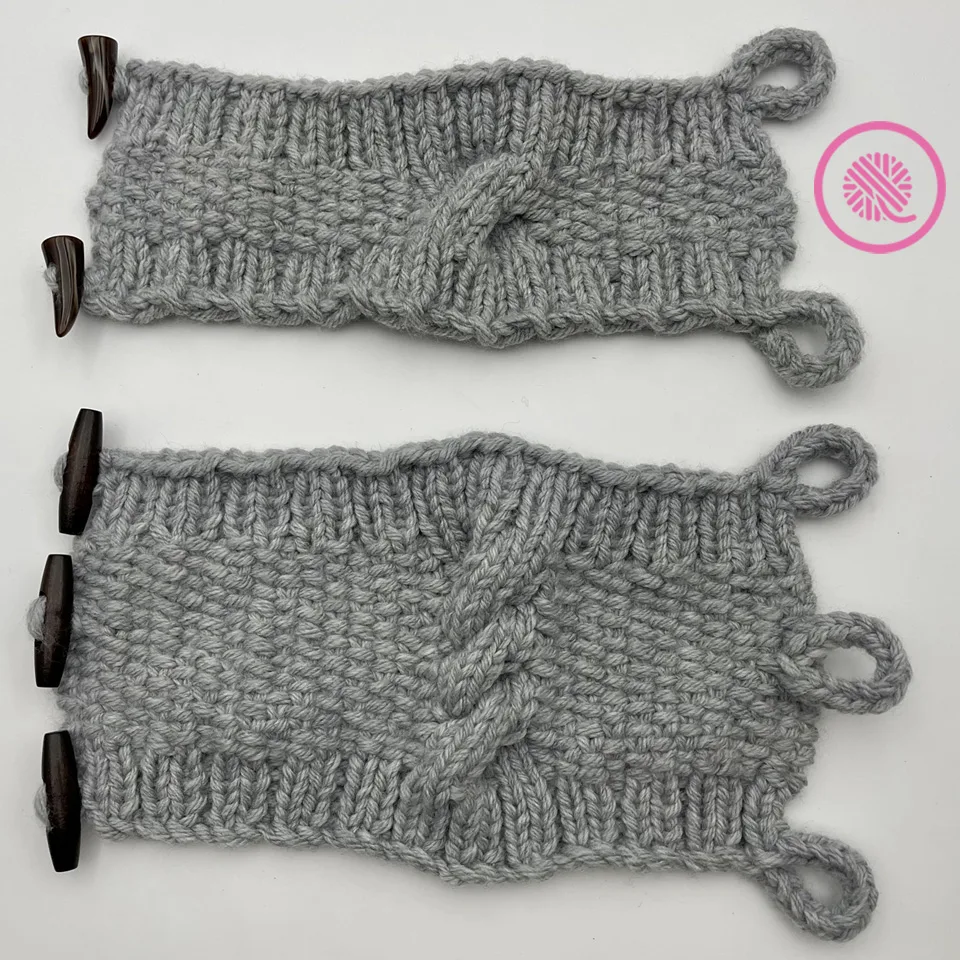
Buttoned Cozy (knit in a flat panel)
ABBREVIATIONS
4/4RC = 4 over 4 Right Cable
K = Uwrap knit
Rep = Repeat
Rnd = Round
Slwyif = Slip stitch with yarn in front
St(s) = Stitch(es)
MEASUREMENTS
*11.75” (11.75”) [29.8 (29.8) cm] width panel by 4.5” (6.25”) [11.4 (15.8) cm] in height
*Full width of panel including loops is 12.5” for both sizes.
NOTES
Cozy is worked in a flat panel. For right handed knitters start i-cord on right working even rows from from right to left. Left handed knitters should work in the opposite direction with i-cord on left.
Loom setup (right-handed setup shown): Working in the direction you intend to knit, start with a DARK rounded link and connect a LIGHT rounded link. Place marker (shown in orange in photo) on the first peg of the dark link to mark the beginning of the row. This is where you will make your i-cords. Continue connecting links alternating between dark and light until you have 6 links. Place stretchy stitch marker over both pegs of the last link to mark that the cable stitches will follow (yellow marker on the left in picture).
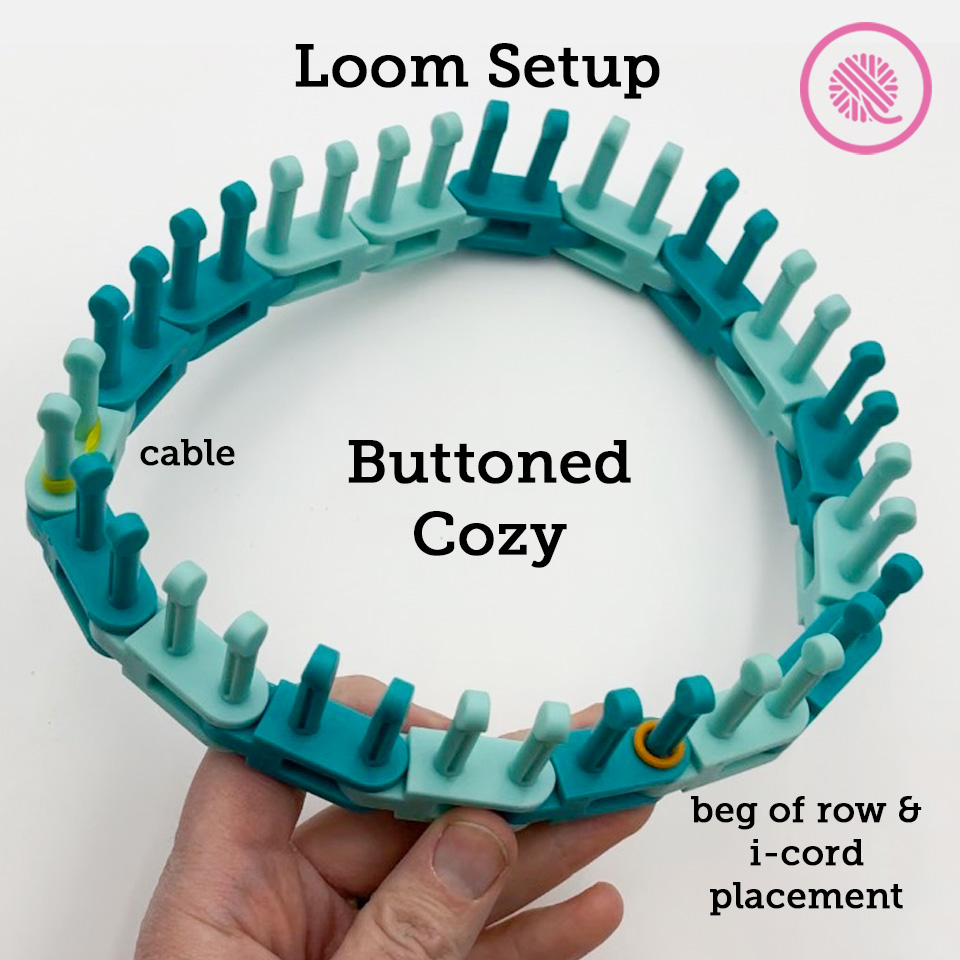
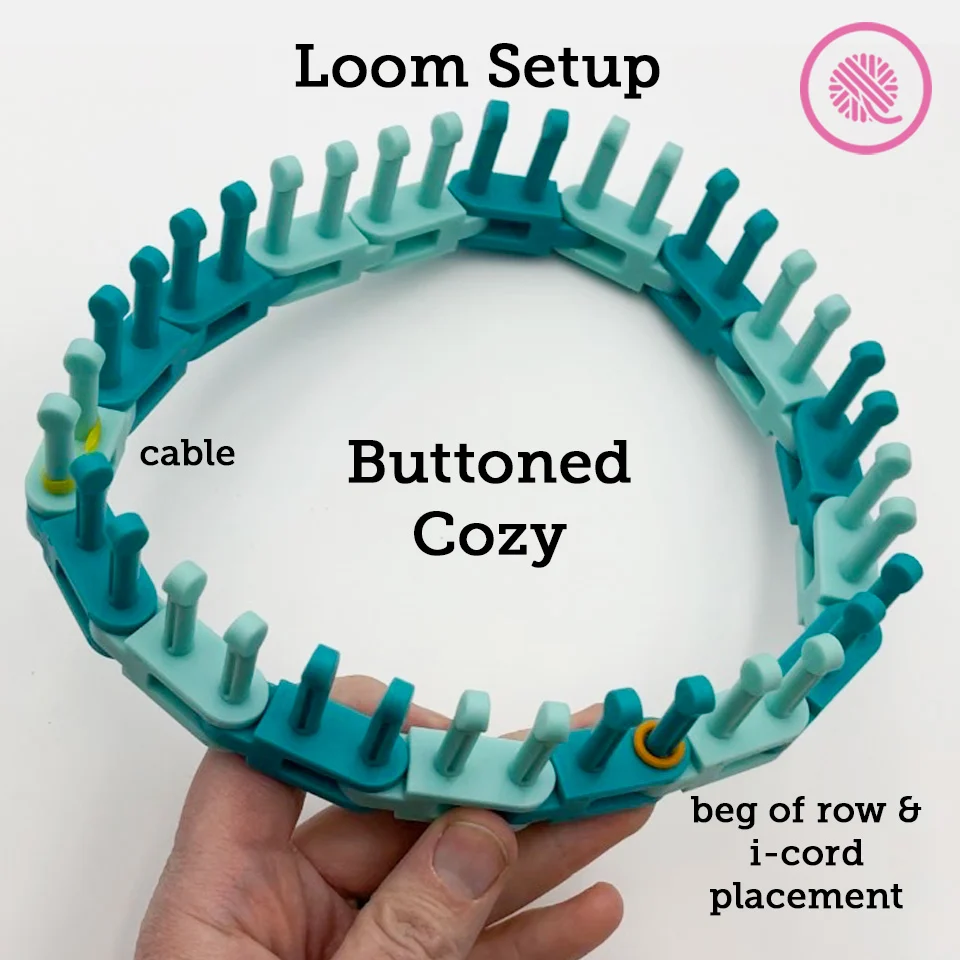
Now attach 2 DARK rounded links together followed by 2 LIGHT rounded ones. These 4 links will be the 8 stitches used in the 4×4 cable by crossing the stitches on the dark links with the ones on the light links. Next alternate dark and light links until you have 36 pegs (18 links) and connect in the round. NOTE: I suggest using ONLY the rounded Flexee Loom links but if you don’t have enough you should be sure to use them for cable stitches and for a couple links before and after the cable. This will make it much easier to move the stitches when cabling.
Cast on: I suggest using the long tail or chain cast on. If using long tail, you may need to tighten the cast on to clean up the edge. Both cast ons are shown in the i-cord video below.


I-cord Loops: When knitting this cozy in a flat panel, you make the i-cord loop before casting on the rest of the panel. At the end of the cozy, you make another i-cord loop before binding off. For the Tall size an additional i-cord loop is added along the edge after finishing the rest of the cozy. Sew toggles or buttons on the opposite edge to line up with the i-cord loops; tail from longtail cast on is used to sew in toggles. If using chain cast on your tail will be at the wrong end and another strand will need to be sewn in when adding toggle.
Toggle Placement: I sewed my toggles right along the edge for a perfect fit on my coffee press. If you need a tighter fit, feel free to sew them 1.5”-2” in from the edge. Or do both so your coffee press cozy fits multiple sizes.
Slwyif: To slip with the yarn in front, you want the working yarn in front of the fabric but behind the peg. See the video for the quick hack to work this without moving the stitch.
4/4RC: 4 over 4 Right Cable. Remove first two links from loom together and hold to back (or place 1st 4 sts on cable needle). Connect loom and knit next 4 sts. Bring yarn to front and place sts back on loom or place held loom links. TIP: knit the first stitch on the held stitches before moving to easy tension as needed. Loom will be tight for next few rounds but will easy up :for next cable round.
INSTRUCTIONS
Measure about 60” of yarn then make a slip knot leaving the long tail. Place the slipknot on Peg 1 and cast on 1 more stitch. Ignore the tail and use the working yarn to make the i-cord loop.
I-cord Loop:
Row 1: Wrap the working yarn around Peg 1 from the back and hold across the front of both pegs. Flat knit both pegs.
Repeat Row 1 for 13 rows. Approx 4 inches.
If using long tail cast on: Place bottom loop of i-cord onto Peg 2. Cast on remaining 34 sts.
If using chain cast on: cast on remaining 34 stitches. Place bottom loop of i-cord onto Peg 2.
Ribbing:
Row 1: *P1. K2. Rep from * to last 2 sts. Knit both sts over 1. K1.
Row 2: *K2, P1. Rep from * to end of row.
Row 3: *P1, K2. Rep from * to end of row.
Row 4: *K2, P1. Rep from * to end of row.
Row 5: *P1, K2. Rep from * to end of row.
Row 6: *K2, P1. Rep from * to end of row.
Cozy in Large Cable Linen Pattern:
Row 7: *Slwyif, K1. Rep from * seven times. K8. *Slwyif, K1. Rep from * to end of row.
Row 8: *Slwyif, K1. Rep from * five times. K8. *Slwyif, K1. Rep from * to end of row.
Row 9: Rep Row 7.
Row 10: Rep Row 8.
Row 11: Rep Row 7.
Row 12: *Slwyif, K1. Rep from * five times. 4/4RC. *Slwyif, K1. Rep from * to end of row.
For SHORT: Rep Rows 7-10.
For TALL: Rep Rows 7-12 twice. Then rep rows 7-10.
Ribbing:
Row 13: *P1, K2. Rep from * to end of row.
Row 14: *K2, P1. Rep from * to end of row.
Row 15: *P1, K2. Rep from * to end of row.
Row 16: *K2, P1. Rep from * to end of row.
Row 17: *P1, K2. Rep from * until 1 st rem. Start i-cord. **Sl 1, K2. Rep from ** for 13 rows. Sl1, K1. Pick up 1st st at bottom of i-cord, between peg 2 and 3 and place it on peg 2.
Row 18: Sl 1. K2tog. Bind off 1. P1, Bind off. Continue to bind off in pattern. Pull through last loop and cut 9” tail.
TALL size only:
Add an additional i-cord in between the ones on the ends.
Cast on 2 sts.
Row 1: Keep working yarn at back of loom bring yarn to end of row and around peg 1. Knit 2.
Repeat Row 1 for 14 rows; approx 4 inches. Place bottom loop of i-cord onto peg 1, move peg 2 onto 1 and knit 2 over 1 to bind off 1. Pull through last loop; cut 9” tail.
Sew i-cord along the edge centered between the other 2 i-cords.
Finishing:
Sew toggles or buttons along edge of cozy opposite the i-cord loops. You may use your yarn tails to attach the toggles or use extra yarn. Weave in all remaining tails.
Loom Knit Buttoned Coffee Press Cozy Tutorial Videos
Select videos are available to GoodKnit Kisses YouTube members only. To get exclusive access to GKK VIP-only content, free PDF patterns, weekly Zoom meetup and more, sign in to YouTube and join as a VIP Member today! Find out more about GKK Membership HERE!
The following tutorial videos demonstrate all the skills and techniques you need to make this pattern.
How to Knit I-cord Loops including cast on(s): This video demonstrates how to make the i-cord loops at the cast on edge using the long tail and cable cast ons and at the bind off edge.
Loom Knit Linen Stitch (flat panel): This video shows the linen stitch pattern used for the body of the cozy.
Loom Knit 4 over 4 Cable: This video demonstrates how to work the 4/4 RC cable. It was created for a different project so the row numbers mentioned in the video do not apply to this pattern. However, the technique is the same.
Right handed
Left handed
If you liked the loom knit Coffee Press Cozy, you may like some of these other loom knitting patterns: