Inside: Learn how to crochet the linen stitch (flat and in the round) with written instructions, video tutorials and free patterns.
When deciding which stitches to work on for my series this year, I knew I had to include the linen stitch.
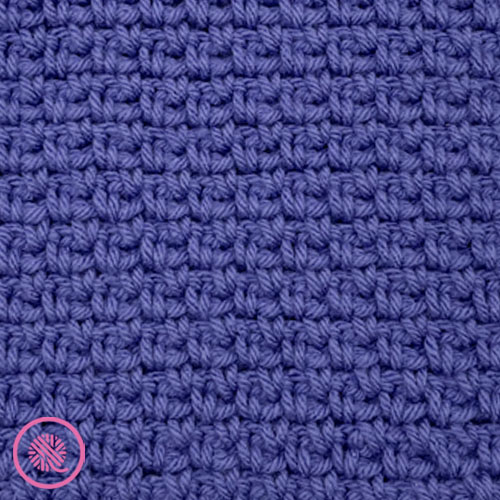
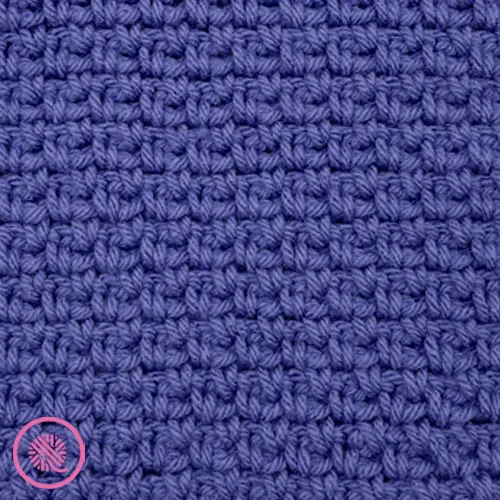
It’s a favorite of mine because it’s beautiful and easy enough for a beginner to learn. It only uses 2 basic stitches: the chain and single crochet. It’s a common stitch pattern and you may have heard it called the granite stitch or moss stitch as well.

During my How to Crochet series I taught how to crochet the linen stitch as a flat panel, but I’m including how to work this stitch in the round this time. I want to give you as much information about the stitches as possible so you can use that information in other projects not just the patterns I designed.
The linen stitch uses a checkerboard of single crochet and chain stitches to make a dense fabric. It crochets up very quickly making it a great choice for almost any project from washcloths and blankets to hats and sweaters.
Below I’ve got a blanket square pattern in 2 common sizes to show you how to crochet the linen stitch as a flat panel and a hat pattern to show how great this stitch looks in the round. As always I have tutorial videos showing how to work the stitch plus loads of tips. The videos are available for both right and left handed crocheters because it’s important to see how the stitch is worked from the proper perspective.
Enjoy learning how to crochet the linen stitch in the lessons below. Part 1 teaches the linen stitch as a flat panel and Part 2 covers working the stitch in the round.
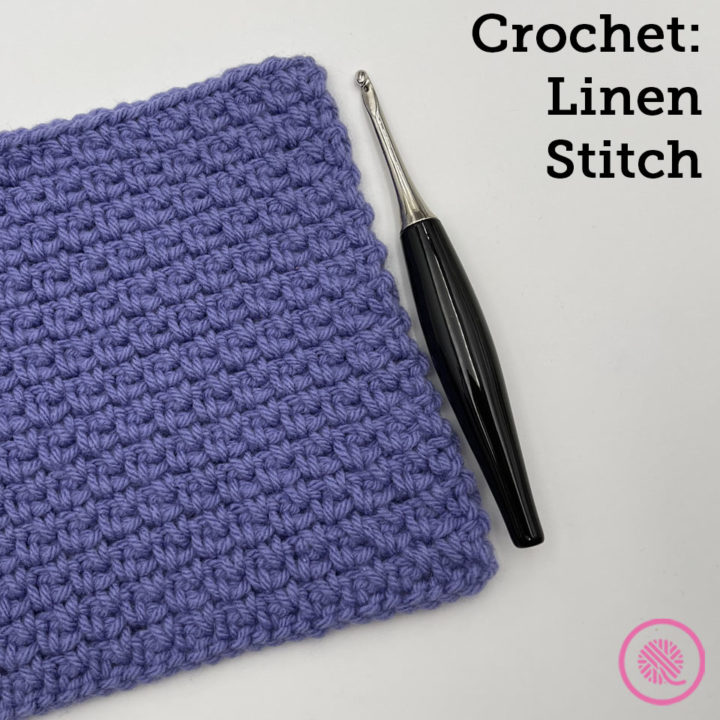
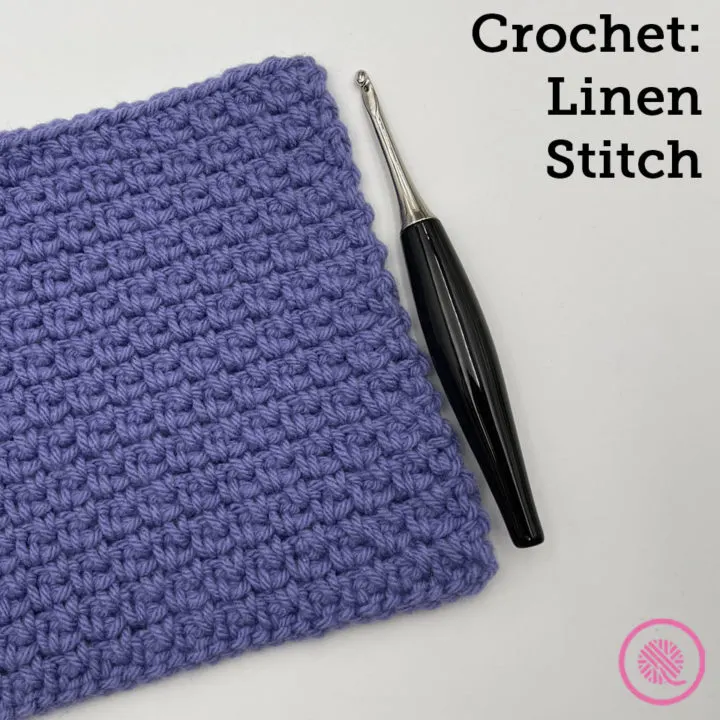
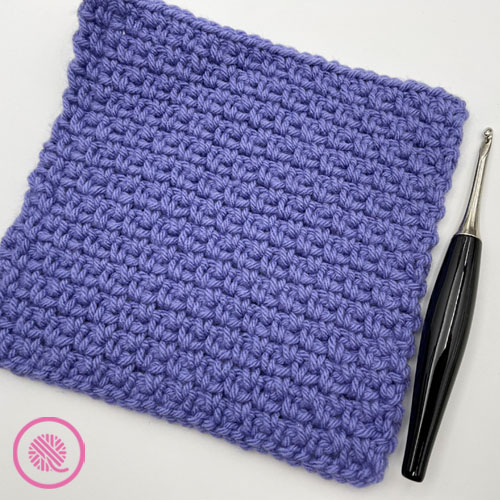
1. Linen Stitch: Flat Panel
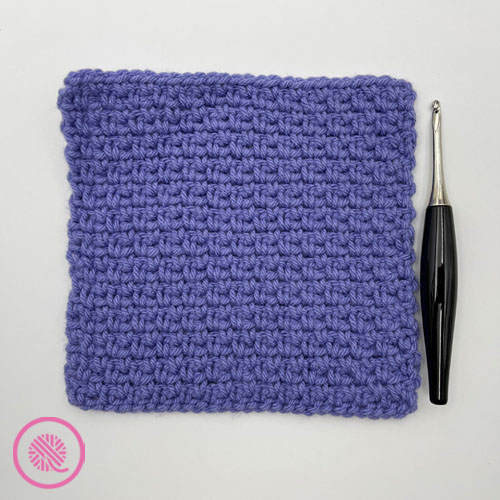
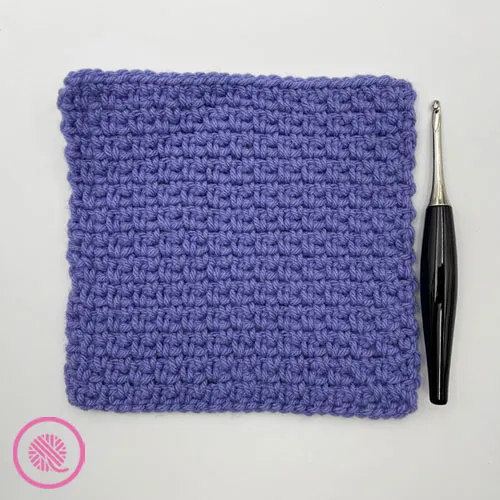
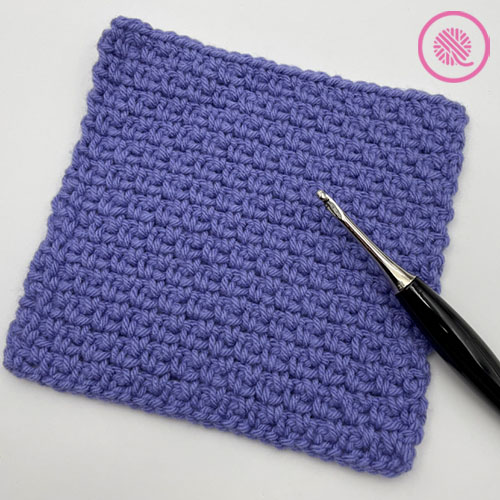
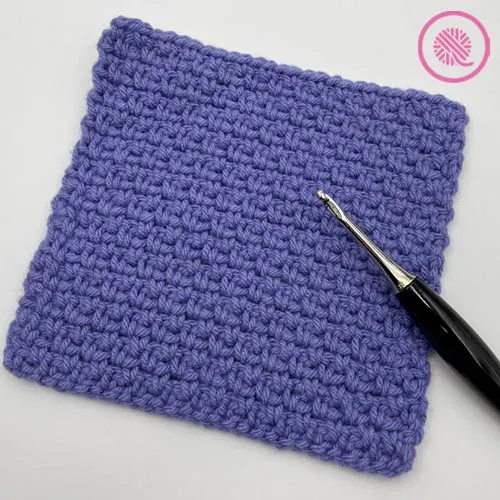
Linen Stitch Square
By Kristen Mangus
The linen stitch is one of my favorites because it’s easy and fast to work up. This Linen Stitch Square will add a classic touch to your next blanket project.
Pattern includes written instructions for 2 square sizes and links to fully captioned tutorial videos for both left and right handed crocheters.
A downloadable PDF of this pattern is available in my Etsy store and from Ravelry at the links below:


MATERIALS
(Materials list may contain affiliate links to products I used to make this project. Using these links cost you nothing, but helps support GKK.)
Yarn
Medium (#4) weight yarn
Caron One Pound (120g/ 4.2 oz, 73 meters/ 80 yd.) in color Lavender Blue used in sample.
Hook
US Size H-8 (5 mm) hook
Furls Crochet Odyssey (5 mm size H) in Black & Nickel used in sample.
Tapestry needle
ABBREVIATIONS
ch = chain
ch-1 space = chain 1 space
ch-2 space = chain 2 space
rep = repeat
sc = single crochet
sk = skip
st(s) = stitch(es)
If you need a refresher, be sure to check out my How to Crochet series!
GAUGE
17 sts x 16.5 rows in 4” (10 cm) in linen stitch
SKILL LEVEL Easy
MEASUREMENTS
Option 1: 7” x 9” (18 cm x 23 cm)
Option 2: 12” x 12” (30.5 cm x 30.5 cm)
NOTES
The linen stitch pattern is a multiple of 2+1 with a 1 row repeat.
INSTRUCTIONS
Chain 29 (49).
Foundation Row: Sc into 3rd chain from the hook, *ch 1, skip 1, sc in next chain, rep from * to end of row.
Row 1: Turn, ch2, *sc into ch-1 space, ch 1, repeat from * to last stitch, sc in ch-2 space.
Repeat Row 1 until piece measures 9” (12”) [23 (30.5) cm] or until desired length. Cut yarn, pull loop through and weave in ends.
Crochet Linen Stitch (Flat Panel) Video Tutorials
Select videos are available to GoodKnit Kisses YouTube members only. To get exclusive access to GKK VIP-only content, free PDF patterns, weekly Zoom meetup and more, sign in to YouTube and join as a VIP Member today! Find out more about GKK Membership HERE!
Right handed
Left handed
PIN IT!

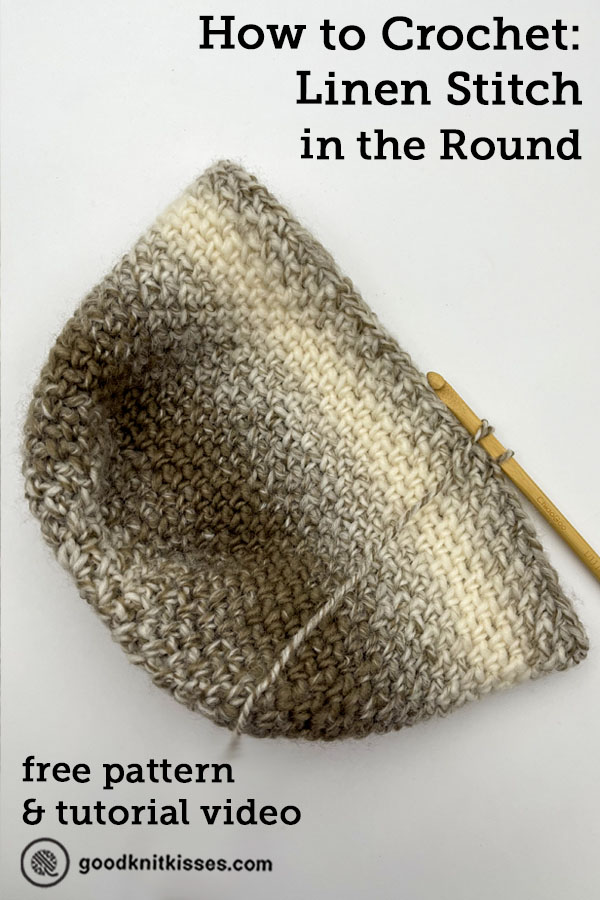
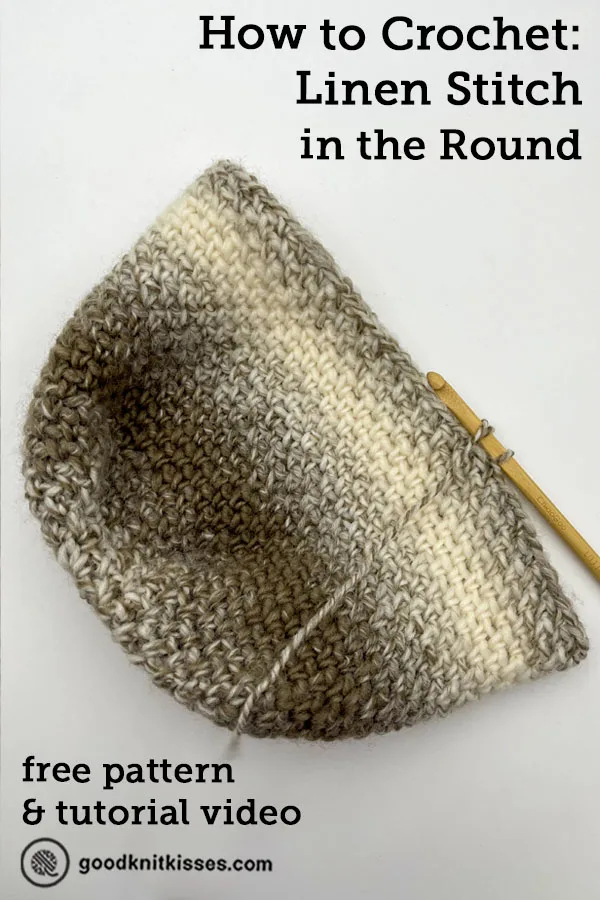
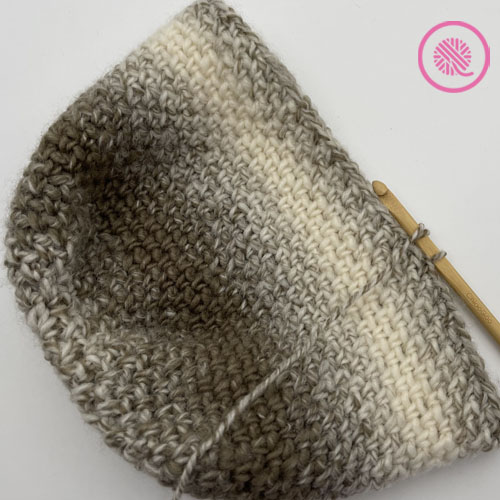
2. Linen Stitch: In the Round
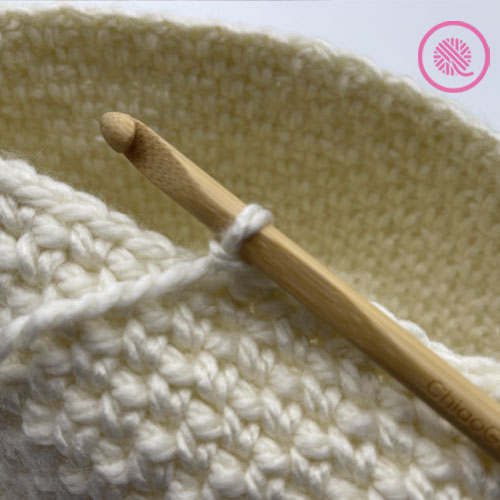
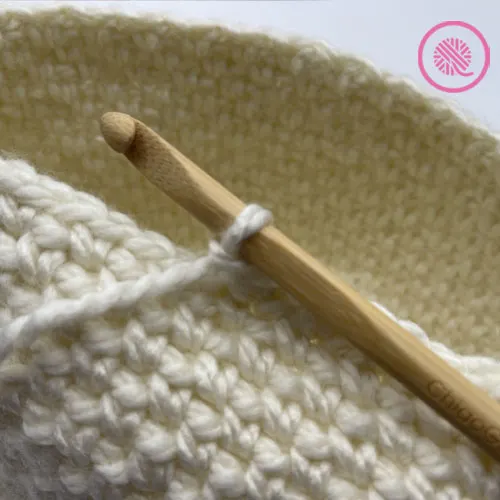
The linen stitch is just as easy to work in the round as it is for a panel. One of the big topics I want to show you is how to start and work the linen stitch from a foundation chain like we did in the flat panel, but also how to start this stitch using a magic ring.
Linen Stitch Pattern Details
- Uses single crochet and chain stitches
- In the round: Multiple of 2
- 1 round repeat with foundation round
- Crochet level: Easy
- Reversible
Since I have a lot to cover I’m breaking this up into two sets of videos.
a. Starting with a Foundation Chain
This is the method you would use for working a cowl or cup cozy that is open on both ends.
ABBREVIATIONS
Beg = Beginning
Ch = Chain
Ch-sp = chain space (space created from chain 1 from previous round)
Patt = Pattern
Prev = previous
Rep = Repeat
Rem = Remains
Rnd = round
Sc = single crochet
Sl = slipped stitch
St(s) = Stitch(es)
INSTRUCTIONS
Chain an even number and join with a slip stitch in the round.
NOTE: Make sure your starting chain is not twisted before joining. Do this by laying it flat on your workspace and gently curve the beginning of the chain around to your hook. (See video.)
Rnd 1: Ch2 (counts as first sc & ch). *Skip next ch. *In next ch, Sc, ch1. Rep from * until 1 ch rem. Sc in last ch. Sl into beg ch.
Rnd 2: Ch1. Sc into same st below ch (or alternatively into sl st), ch1. *In next ch-sp, Sc, ch1. Rep from * until 1 ch-sp rem. In last ch-sp Sc. Sl to join into ch. (Slipping into first chain counts as final chain for round.)
Rep Rnd 2 until you reach desired length. Fasten off. Weave in tails.
Crochet Linen Stitch (In the Round) Video Tutorial
Select videos are available to GoodKnit Kisses YouTube members only. To get exclusive access to GKK VIP-only content, free PDF patterns, weekly Zoom meetup and more, sign in to YouTube and join as a VIP Member today! Find out more about GKK Membership HERE!
Right handed
Left handed
PIN IT!
b. Starting with a Magic Ring in the Round
Because the linen stitch in the round uses a 2 stitch repeat its an ideal stitch pattern when working increases (or decreases). You can gradually add your increases without interrupting the stitch pattern. This makes it ideal for shaped projects in the round. It uses the same stitch pattern throughout giving it a smoother look.
I designed the Easy Linen Stitch Hat just to show you how simple it is to work these increases. While I’m showing this method in a hat pattern you could also use this technique to shape a basket or any other round project.

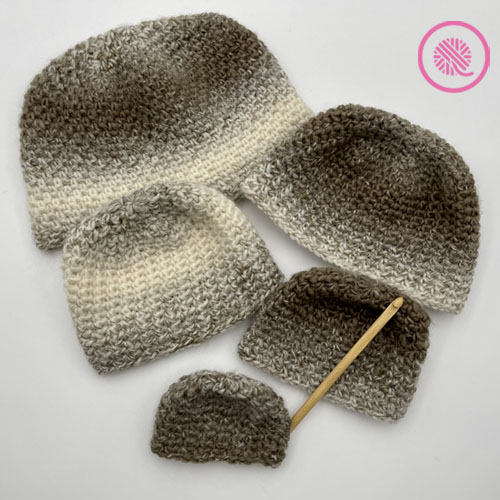
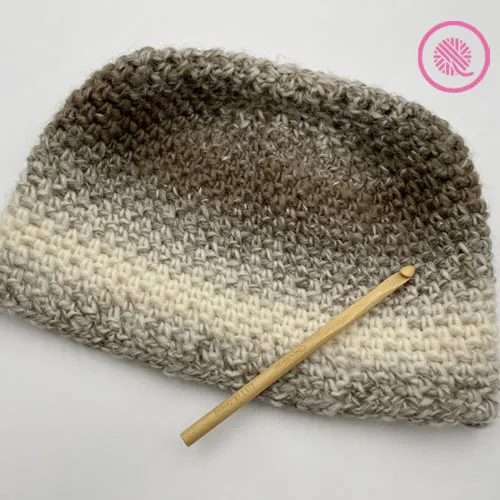
Easy Linen Stitch Hat
By Kristen Mangus
The Easy Linen Stitch Hat keeps you cozy on even the coldest days. This bulky weight beanie is worked from the crown to the brim all in linen stitch. This makes it a quick project, even for beginners.
The pattern includes written instructions for 5 sizes from Preemie to Adult plus fully-captioned tutorial videos.
A downloadable PDF of this pattern is available in my Etsy store and from Ravelry at the links below:


MATERIALS
(Materials list may contain affiliate links to products I used to make this project. Using these links cost you nothing, but helps support GKK.)
Yarn
Bulky (#5) weight yarn
Lion Brand Scarfie (150g/ 5.3 oz, 285 meters/ 312 yd.) in color Cream/Taupe used in sample.
Hook
US Size L-11 (8 mm) hook
ChiaoGoo Bamboo hook used in sample.
Tapestry needle
Stitch marker
ABBREVIATIONS
Beg = Beginning
Ch = Chain
Ch-sp = chain space (space created from chain 1 in previous round)
INC = Increase (Sc, ch1, Sc, ch1 in same ch-sp)
Patt = Pattern
Prev = previous
Rep = Repeat
Rem = Remains
Rnd = round
Sc = single crochet
Sl = slipped stitch
St(s) = Stitch(es)
If you need a refresher, be sure to check out my How to Crochet series!
GAUGE
14 sts x 16 rows in 4” (10 cm) in linen stitch
SKILL LEVEL Easy
SIZES
Preemie (Newborn, Baby, Child, Adult)
MEASUREMENTS
Preemie: 9.5″ (24 cm) circumference x 3.25″ (8 cm) in height
Newborn: 12.5″ ( cm) circumference x 5″ (13 cm) in height
Baby: 15″ (38 cm) circumference x 5.5″ (14 cm) in height
Child: 18″ (45.5 cm) circumference x 6.5″ (16.5 cm) in height
Adult 22.5″ (57 cm) circumference x 8.25″ (21 cm) in height
NOTES
This hat is worked from the crown down to the brim. Pay close attention to the instructions as smaller sizes do not work all rounds of the hat crown.
The linen stitch hat has no separate brim. If you want to fold up the brim, simply add additional length.

INSTRUCTIONS
Hat Crown
Make magic circle.
Rnd. 1: Sc, ch1 (5 times) in magic circle. Sc. Sl to join into beg ch. (6 sc)
Gently tug beginning yarn tail to close magic circle.
NOTE: Slipping into beg chain counts as final chain in all rounds.
Rnd. 2: Ch1. Sc into same st below ch (or alternatively into sl st.), ch1 (twice in same st). In next ch-sp Sc, ch1 (twice); this creates an INC. Rep from until 1 ch-sp rem. In last ch-sp Sc, ch1, sc. Sl to join. (12 sc)
Rnd. 3: Ch1. Sc into st below, ch1. *INC In next ch-sp. In next ch-sp Sc, ch1. Rep from * until 1 ch-sp rem. Sc, ch1, sc. Sl to join. (18 sc)
[For Preemie size skip to Hat Body. All other sizes cont to Rnd. 4.]
Rnd. 4: Ch1. Sc into st below, ch1. In next ch-sp Sc, ch1 . * INC in next ch-sp. In next ch-sp Sc, ch1 (2 times). Rep from * until 1 ch-sp rem. Sc, ch1, sc. Sl to join. (24 sc)
[For Newborn size skip to Hat Body. All other sizes cont to Rnd. 5.]
Rnd 5: Ch1. Sc into st below, ch1. In next ch-sp Sc, ch1 . INC in next ch-sp. In next ch-sp Sc, ch1 (3 times). Rep from * until 1 ch-sp rem. Sc, ch1, sc. Sl to join. (30 sc)
[For Baby size skip to Hat Body. All other sizes cont to Rnd. 6.]
Rnd 6: Ch1. Sc into st below, ch1. In next ch-sp Sc, ch1 . *INC in next ch-sp. In next ch-sp Sc, ch1 (4 times). Rep from * until 1 ch-sp rem. Sc, ch1, sc. Sl to join. (36 sc)
[For Child size skip to Hat Body. All other sizes cont to Rnd. 7.]
Rnd 7: Ch1. Sc into st below, ch1. In next ch-sp Sc, ch1 .* INC in next ch-sp. In next ch-sp Sc, ch1 (5 times). Rep from * until 1 ch-sp rem. Sc, ch1, sc. Sl to join. (42 sc)
Hat Body
Rnd 1: Ch1. Sc into st below. Ch1. *In next ch-sp Sc, ch1. Rep from * until 1 ch-sp rem. Sc. Sl to join.
Rep Rnd 1 until piece measures 3.25” (5”, 5.5”, 6.5”, 8.25”) [8 (13, 14, 16.5, 21) cm] desired height.
Fasten off. Weave in tail. At magic circle, pull tail to tighten, and weave tail into center.


Easy Crochet Linen Stitch Hat Video Tutorial
Select videos are available to GoodKnit Kisses YouTube members only. To get exclusive access to GKK VIP-only content, free PDF patterns, weekly Zoom meetup and more, sign in to YouTube and join as a VIP Member today! Find out more about GKK Membership HERE!
Right handed
Left handed
If you enjoyed learning how to crochet the linen stitch flat panel and in the round, you may like these other crochet stitch patterns:
Corner to Corner (C2C)
Crab Stitch (Border)
Crossed Cluster Stitch
Faux Mistake Rib Stitch
Feather Stitch
Granny Squares
Herringbone Stitch
Houndstooth (2 color)
Linen Stitch
Marshmallow Stitch
Mock Garter Stitch
Ribbed Stitches
Laura
Thursday 11th of January 2024
These are seriously the MOST confusing crochet instructions for a beanie I have ever read. Starting the second round is a mess!!
Cassie
Monday 6th of February 2023
How do you decrease the linen stitch?
Mary Baker
Sunday 23rd of January 2022
I'm eager to try your linen stitch.