
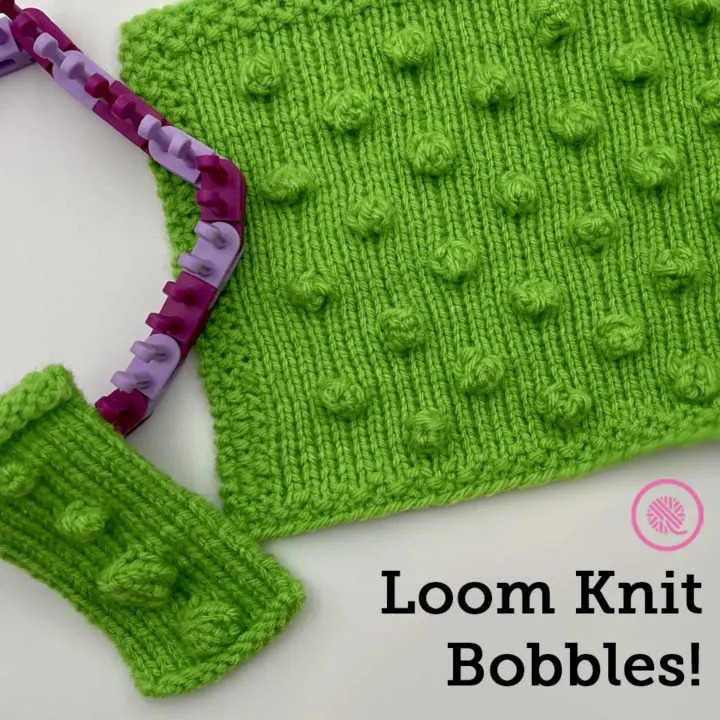
Inside: Learn how to loom knit bobbles 4 different ways. From small bumps to large puffy bobbles this tutorial covers it all. Include free blanket square pattern in 2 common sizes.
Bobbles!
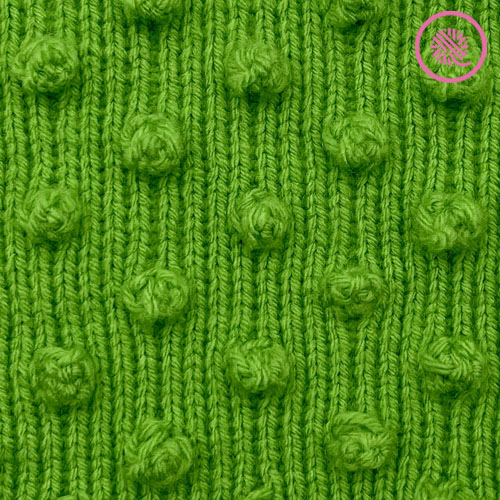
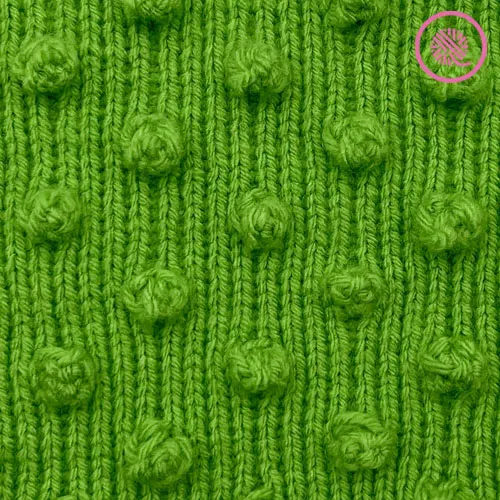
They are those round knit balls that stand up on top of your knit fabric. They can be small dots or large puffy balls depending on the method you use to knit them.
Most often you see bobble on a background of stockinette, but they can also be incorporated into other stitch patterns like lace or cables.
If you’ve been following me for a while, you’ve already seen my Bobble Button Newsboy Hat. This hat uses the simplest of the bobbles. The Basic Loom Bobble is just a single stitch that you knit over several times. Then you bring the first stitch back up to the peg and knit it over again. It’s actually more of a loop than a round bobble.
I’ve learned so much more about bobbles since then. I’m going to show you how to loom knit bobbles 4 different ways so you can decide which bobble method you like best.
What’s in a bobble?
You can loom knit bobbles in many ways, but there are some common components that most bobbles have. They all start with a single stitch. But what you do with that single stitch will depend on then bobble you want.
- INCREASE: First, you typically work one or more increases to widen the bobble. I’m going to show you bobbles that are 4, 5 and even 6 stitches wide. The Basic Loom Bobble I talked about above is the exception since it doesn’t increase at all.
- FLAT PANEL: Next, you work back and forth in rows, usually in stockinette stitch, to lengthen your bobble. How many rows you work will determine how full your bobble is.
- DECREASE: Last you will decrease back down to 1 stitch. Again there are a few ways to do this. The two main methods are a leaning decrease or a centered decrease. I’ll be showing you both of these so you can see which one you prefer. The leaning decrease gives your bobble more of teardrop shape while the centered decrease creates a rounder bobble.
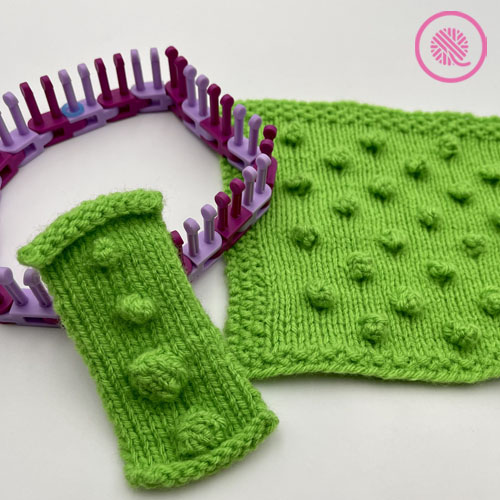
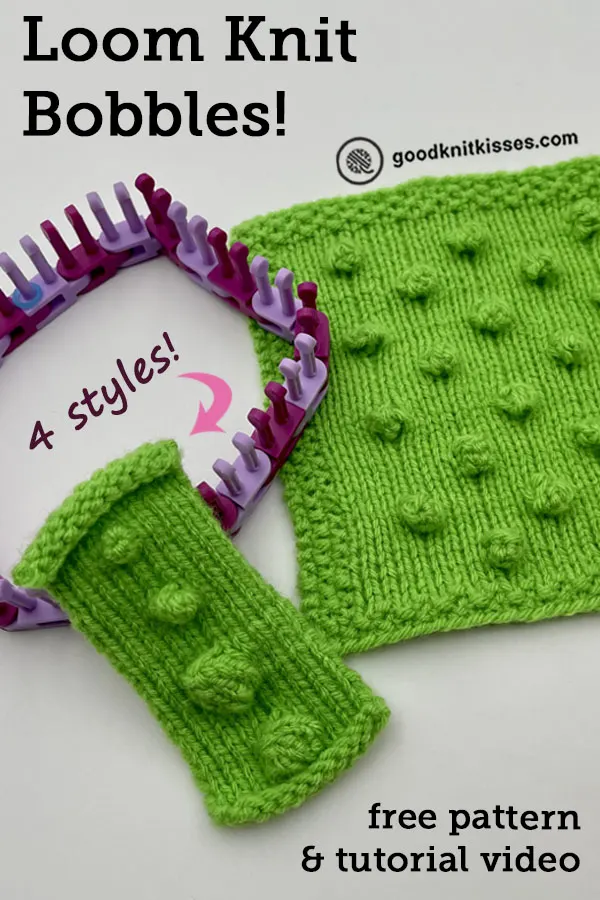
I designed the Bobble Square as a template for you to practice with. This blanket square comes in 2 common sizes and you can choose which bobble method you want to use in the pattern.
As always, I’ve got tutorial videos that show all the techniques. I designed the videos to show how to loom knit the bobbles when working from either the right or left.
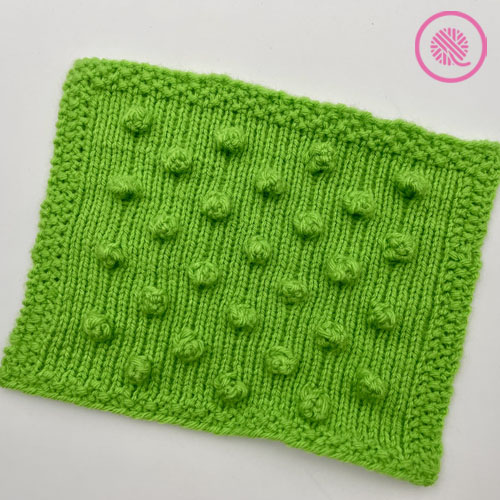

Bobble Square
By Kristen Mangus
A downloadable PDF of this pattern is available in my Etsy store and from Ravelry at the links below:


The loom knit Bobble Square features puffy round bobbles on a field of stockinette with a seed stitch border. Instructions include methods for making 4 sizes of bobbles so you can use the one you prefer or mix and match them. The small quick increase bobble (#4 below) was used in sample shown above.
Pattern includes written instructions for 2 common sizes and links to fully captioned tutorial videos.
MATERIALS
(Materials list may contain affiliate links to products I used to make this project. Using these links costs you nothing, but helps support GKK.)
Yarn
Medium (#4) worsted weight yarn
Red Heart Super Saver in Spring Green used in sample.
Loom
⅜” small gauge (SG) loom with at least 39 (53) pegs.
KB Flexee Loom Skinny used in sample.
Tapestry needle for weaving in ends
ABBREVIATIONS
K = Uwrap knit
Kfpb = Knit into the front and purl into the back of the same stitch
KO = Knit over
MB = Make Bobble
Rep = Repeat
P = Purl
Prev = previous
St(s) = Stitch(es)
For a refresher on loom knitting basics see the blog posts below to get started:
13 Questions for Beginner Loom Knitters
How to Loom Knit Basics (cast on, knit, purl, & bind off)
How to Loom Knit Basic Stitch Patterns (garter st, seed st and ribbing)
How to Loom Knit in the Round
GAUGE
18 sts x 36 rows in 4” in stockinette stitch
SKILL LEVEL Easy
MEASUREMENTS
Option 1: 9” x 7” (23 cm x 18 cm)
Option 2: 12” x 12” (30.5 cm x 30.5 cm)

NOTES
I’ve included two square sizes in this pattern that are commonly used to make blankets. The bobble stitch pattern is a multiple of 8+5 stitches and uses a 12 row repeat.
Kfpb – Knit into the front, purl into the back of same st:
- Hold working yarn above st and pull loop down to true knit. Place loop on prev peg.
- Hold working yarn below st and purl.
Bobble Tips:
- A bobble is made over 1 stitch and typically includes one or more increases (INC), a narrow flat panel and a decrease (DEC) back to 1 stitch.
- INC – when working the increase use the true knit stitch and purl stitch.
- When you work the increase you use pegs on either side of the bobble peg to hold the bobble stitches. The bobble peg will have only 1 st, but the ones used for holding the other bobble sts will have 2. When knitting the flat panel part of the bobble you work only the top stitch on each peg. You will decrease these bobble stitches back down to one stitch before continuing the row.
- Knit the stitch after the bobble tightly.
- Push the bobble to the front of the fabric after you knit a few rows past the bobble row.
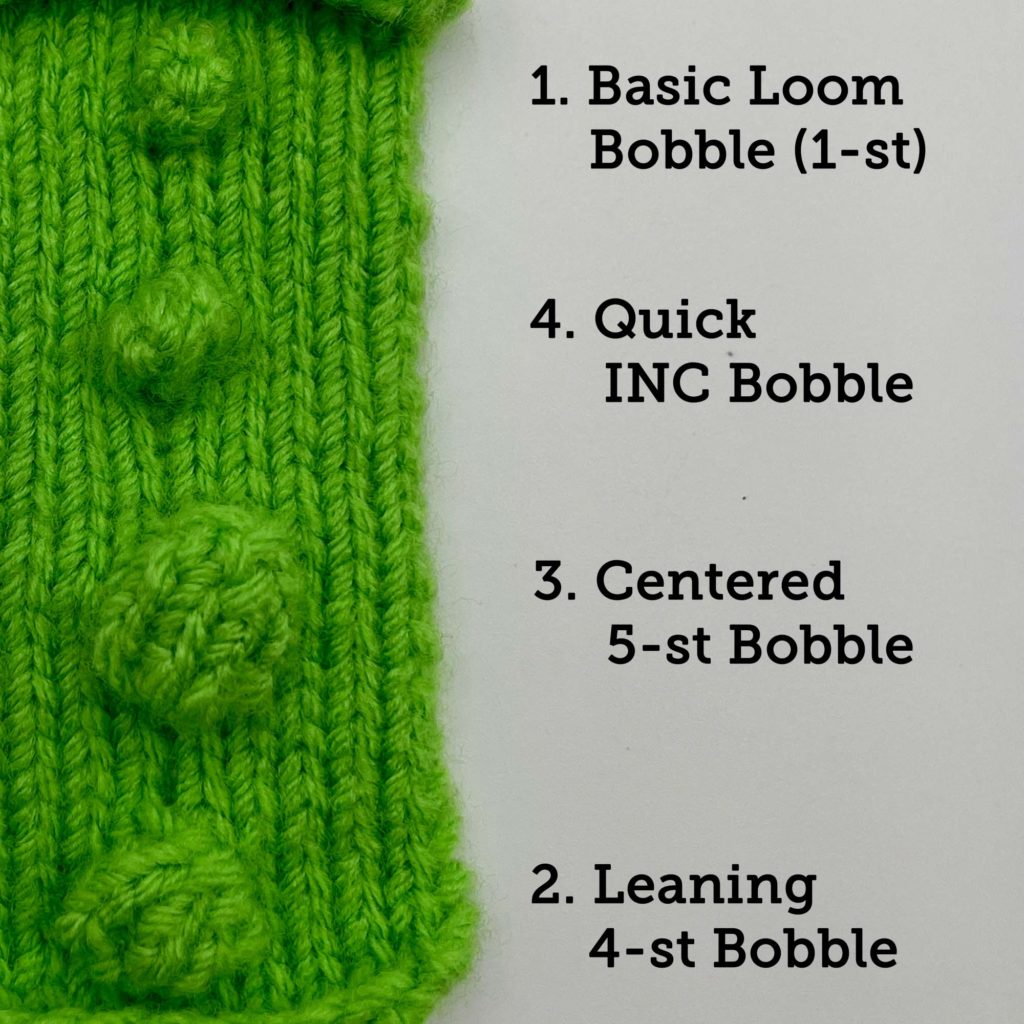
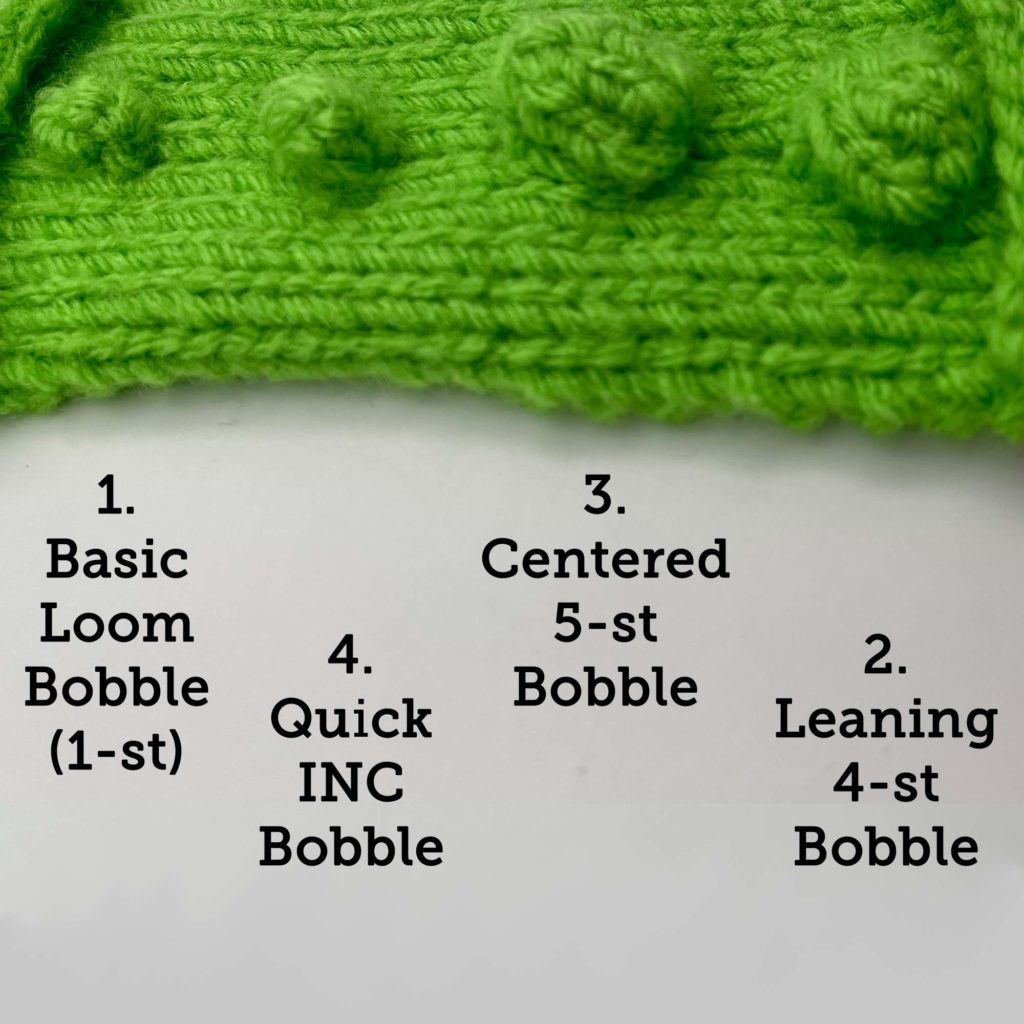
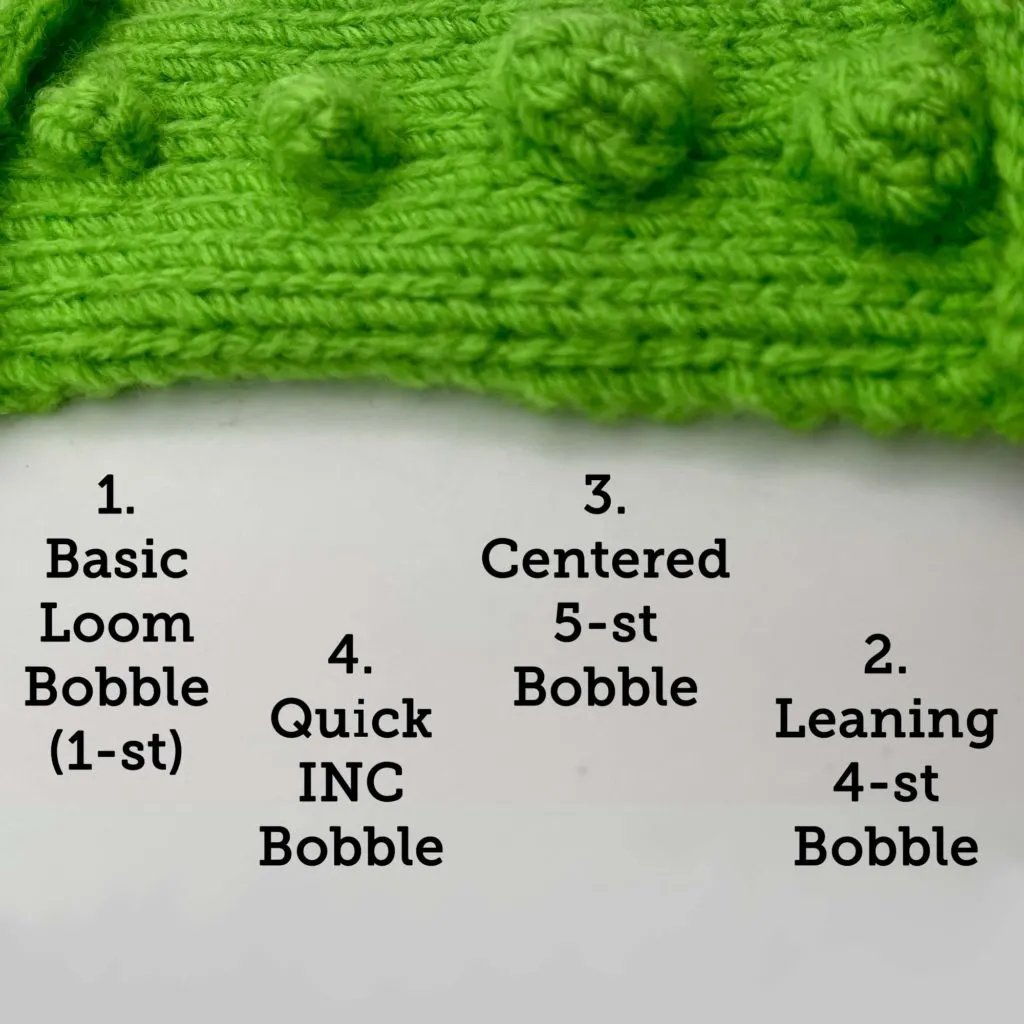
How to Loom Knit Bobbles 4 Ways:
Make Bobble (MB): You can use a variety of techniques to make bobbles and I included 4 options for you in this pattern. (See side by side samples shown below.)
1. Basic Loom Bobble (Small – uses no increases or decreases)
Flat Panel:
- E wrap and knit over peg 3-5 times depending on the bobble size you’d like. (Bobble shown in images below was worked 5x.)
- Pick up back of first st and place on peg.
- Knit over.
2. Leaning 4-st Bobble (Medium)
INC: K, p, k, p into the same st and place sts onto the 2 pegs before the current st, the current peg and the peg after it. (4 sts). Tighten sts before moving on.
Flat Panel:
Knit the 4 bobble sts for 4 rows.
DEC: The working yarn is on the last peg in the direction you are knitting. This is now Peg 4 and the other bobble sts are on Pegs 3, 2 & 1. Move st from Peg 2 to Peg 1, KO and move to prev peg. Move st. from Peg 3 to Peg 2, KO and place st on empty peg. Finally, move st from Peg 4 to Peg 3 and KO.
3. Centered 5-st Bobble (Large)
INC: K, p, k, p, k into the same st and place sts onto the 2 pegs before the current st, the current peg and 2 pegs after it. (5 sts). Tighten sts before moving on.
Flat Panel:
Knit the 5 bobble sts for 5 rows.
DEC: The working yarn is on the end of the row opposite from the direction you are knitting. This is now Peg 1 and the rest of the bobble sts are on Pegs 2-5.
- Move st from Peg 4 to Peg 3 and KO.
- Move st from Peg 2 to Peg 3 and KO.
- Move st from Peg 5 to Peg 3 and KO.
- Move st from Peg 1 to Peg 3 and KO.
4. Quick INC (Increase) Bobble (Small – this bobble was used in the blanket square sample above.)
INC1: K, p, k into same st and place new sts on either side of the current peg and pegs on both sides. (3 sts).
Flat Panel:
- Knit 3. (3 sts)
INC2:
- Kfpb into first bobble st. (Do not work bottom st on this peg.) Move these 2 sts one peg outward toward beg of row to create empty peg.
- Kfpb into next st.
- Move last bobble st 1 peg outward toward end of row. Kfpb into last bobble st. (Do not work bottom st on this peg.)
DEC: The working yarn is on the end of the row in the direction you are knitting. This is now Peg 6 and the rest of the bobble sts are on Pegs 1-5.
- Move st from Peg 4 to Peg 3 and KO.
- Move st from Peg 2 to Peg 3 and KO.
- Move st from Peg 5 to Peg 3 and KO.
- Move st from Peg 1 to Peg 3 and KO.
- Move st from Peg 6 to Peg 3 and KO

INSTRUCTIONS
Option 1 (9” x 7”) Instructions:
Cast on 39 sts.
Row 1 (WS): *K1, p1. Rep from * to last st. K1.
Row 2: *K1, p1. Rep from * to last st. K1.
Row 3: *K1, p1. Rep from* to last st. K1.
Row 4 (RS): K1, p1. Knit to last 2 sts. P1, k1.
Row 5 and all odd rows: K1, p1, k1. Knit to last 3 sts. K1, p1, k1.
Row 6: K1, p1. Knit to last 2 sts. P1, k1.
Row 8: K1, p1. K9. *MB. K7. Rep from * to last 4 sts. K2, p1, k1.
Row 10: K1, p1. Knit to last 2 sts. P1, k1.
Row 12: K1, p1. Knit to last 2 sts. P1, k1.
Row 14: K1, p1. K5. *MB. K7. Rep from * to last 8 sts. MB, k5, p1, k1.
Row 15: Rep Row 5.
Rep Rows 4-15 three times.
Rep Rows 4-7.
Rep Rows 1-3 for top border. Bind off and weave in ends.
Option 1 (12” x 12”) Instructions:
Cast on 53 sts.
Row 1: *K1, p1. Rep from * to last st. K1.
Row 2: *K1, p1. Rep from * to last st. K1.
Row 3: *K1, p1. Rep from* to last st. K1.
Row 4: K1, p1 (twice). Knit to last 4 sts. P1, k1 (twice).
Row 5 and all odd rows: K1, p1 (twice). Knit to last 4 sts. P1, k1 (twice).
Row 6: K1, p1 (twice). Knit to last 4 sts. P1, k1 (twice).
Row 8: K1, p1 (twice). K6. *MB. K7. Rep from * to last 11 sts. MB. K6. P1, k1 (twice).
Row 10: K1, p1 (twice). Knit to last 4 sts. P1, k1 (twice).
Row 12: K1, p1 (twice). Knit to last 4 sts. P1, k1 (twice).
Row 14: K1, p1 (twice). K2. *MB. K7. Rep from * to last 7 sts. MB. K2. P1, k1 (twice).
Row 15: Rep Row 5.
Rep Rows 4-15 seven times.
Rep Rows 4-7.
Rep Rows 1-3 for top border. Bind off and weave in ends.
PIN IT!

How to Loom Knit Bobbles Video Tutorial
Select videos are available to GoodKnit Kisses YouTube members only. To get exclusive access to GKK VIP-only content, free PDF patterns, weekly Zoom meetup and more, sign in to YouTube and join as a VIP Member today! Find out more about GKK Membership HERE!
The following tutorial videos show how to loom knit each of the 4 bobbles described above. While the videos are labeled for right and left handed loom knitters, in this case they apply to the direction you are loom knitting your bobble row. When working right to left, use the right handed video; for working left to right, use the left handed video.
Use the following timestamps to help you navigate the video.
- 03:51 – Basic Loom Knit Bobble
- 06:21 – Leaning 4-st Bobble
- 16:15 – Centered 5-st Bobble
- 22:07 – Quick Increase Bobble
Right handed
Left handed
I hope you enjoy loom knitting bobbles. Check out some of my other loom knit stitch patterns:
Edelweiss Stitch
Sisal and Seagrass
Tumbling Moss Blocks
Dewdrop Stitch
Diamond Lace Stitch (Mock Crochet)
Seafoam Stitch
Trinity/Raspberry Stitch
Triple Rib Stitch
Seed Stitch