
Inside: Learn how to loom knit the linen stitch with detailed instructions, free blanket square pattern and tutorial video.
We’re keeping it smooth with another flat, textured stitch pattern.
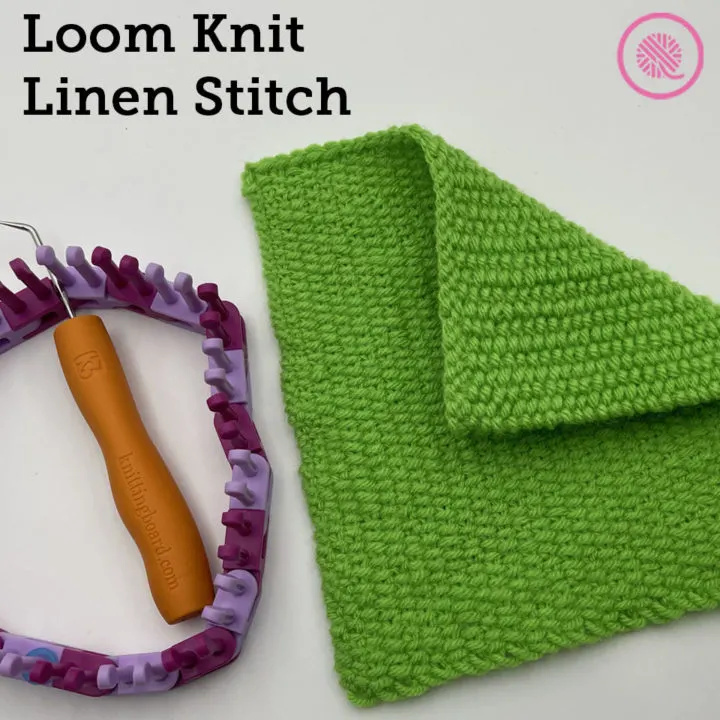
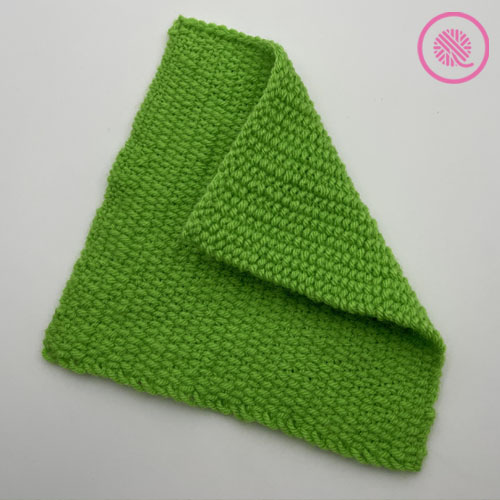
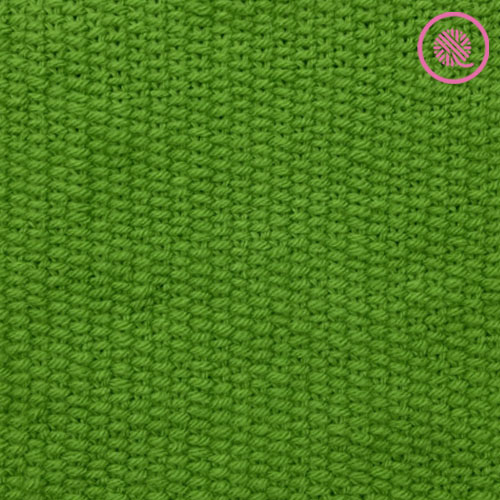
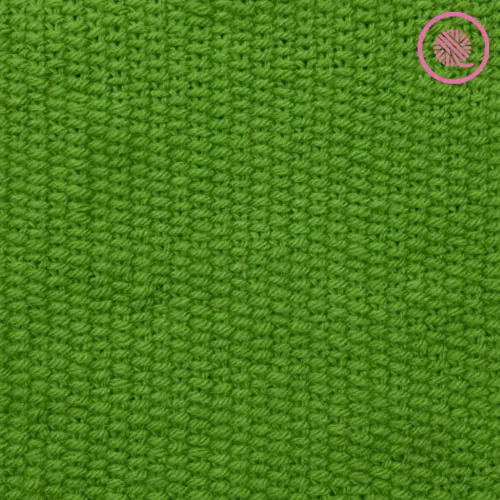
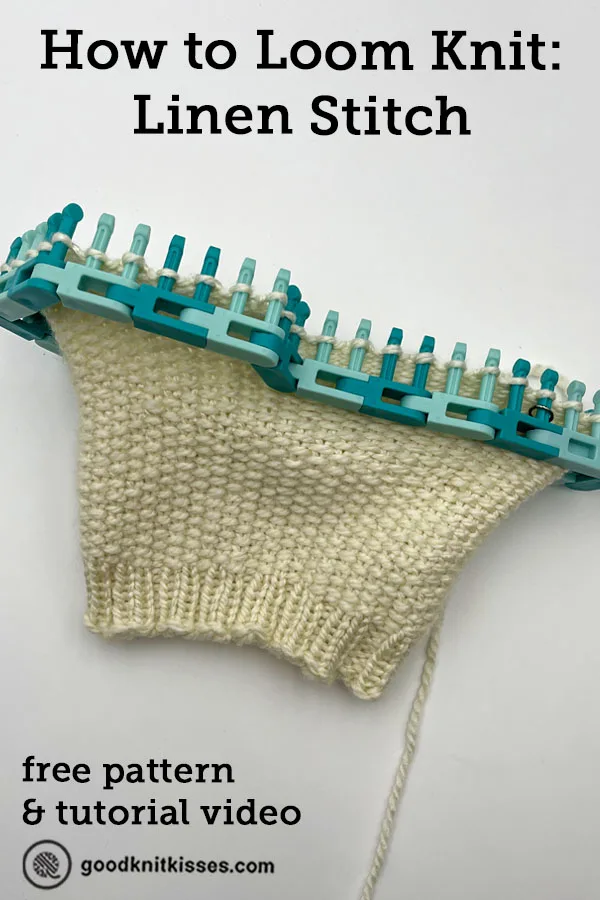
The linen stitch has a smooth texture created by a checkerboard of knit and slipped stitches. It resembles the seed stitch, but doesn’t have any purl stitches making it one of the easiest stitch patterns for a new loom knitter. And since you only work every other stitch it works up quickly and is ideal for big projects.
It resembles a woven stitch. You’ll find that the slipped stitches are very easy to work

While the linen stitch is not fully reversible the back side still makes a smooth fabric. On the front you see a checkerboard of knit stitches and the horizontal bars of the slipped stitches while on the back you see primarily purl bumps.

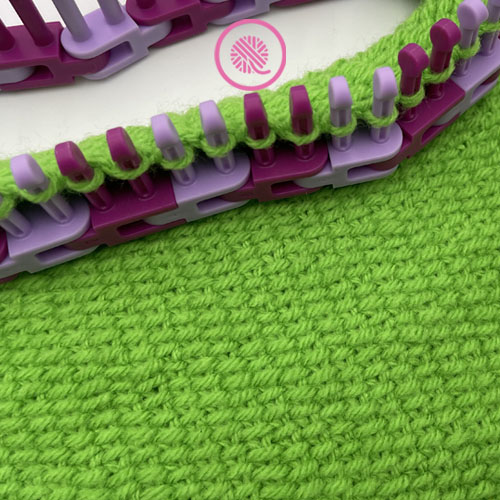
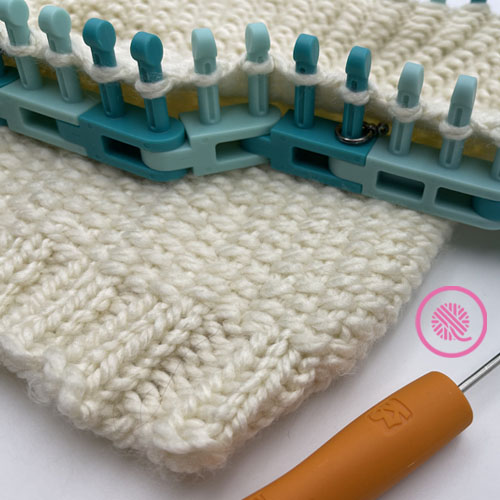
When you loom knit the linen stitch you need to work a specific slip stitch. Typically, when you slip a stitch you just skip the peg and move on. However, we need the working yarn to leave a horizontal bar of yarn on the FRONT of the fabric. That means we need it go between the stitch and the back of the peg.
It sounds tricky, but there are two ways to work this kind of slip stitch. First, you can take the stitch off the peg and hold it to the back while moving the working yarn behind the peg. Then you simply replace the stitch and continue to the next peg. But there’s an easier way.
A few years ago, a fellow loom knitter, Kimberly Carrigan, came up with a fantastic hack to make it much faster. You put the working yarn below the stitch on the peg and pull up a loop as if you’re purling. But instead of making a new stitch you hold that loop to the back and tug the working yarn. The loop disappears over the top of the peg and slides right between the fabric and the peg. You’ll see how easy it is in the videos below!
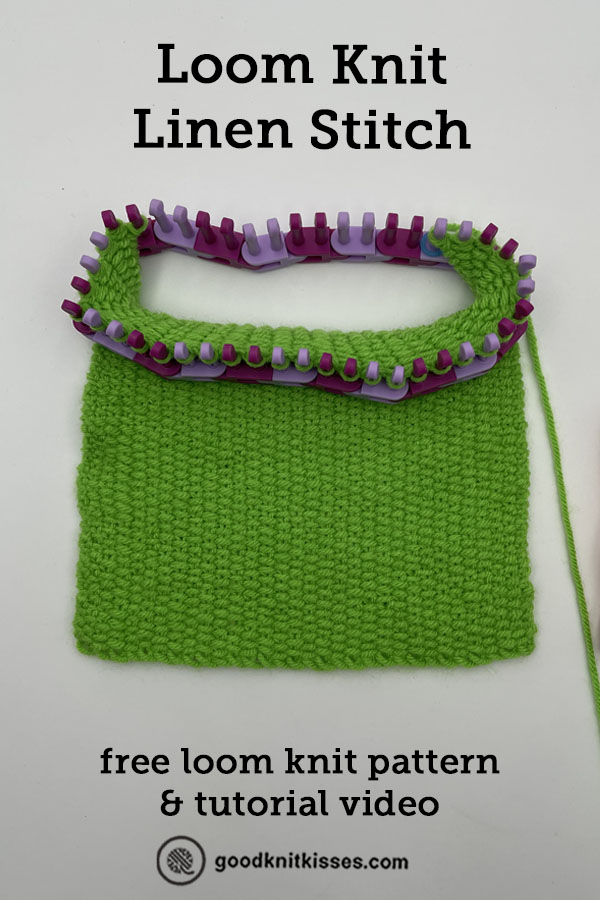
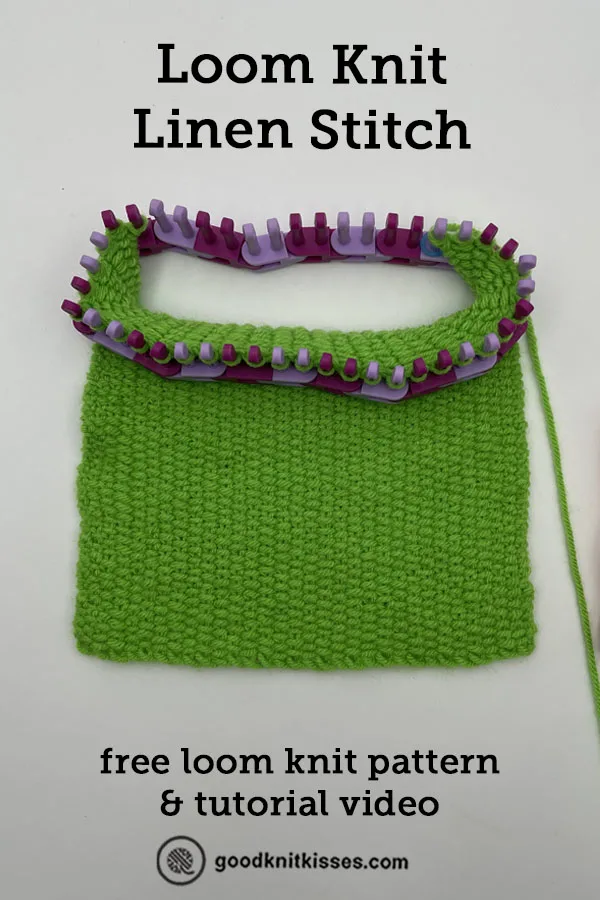
1. Loom Knit the Linen Stitch (Flat Panel)
The linen stitch works in so many patterns! From the smallest coaster or washcloth to big blankets and sweaters it always looks great.
Linen Stitch Details:
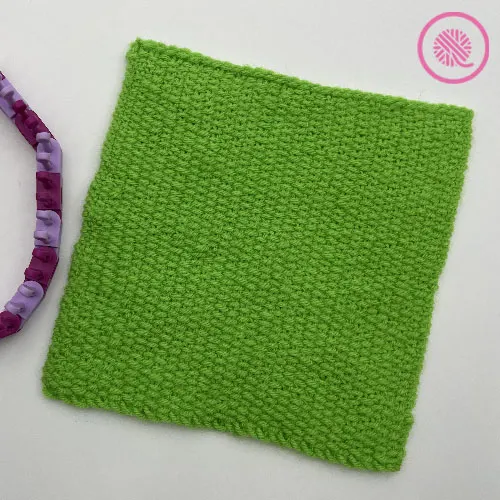
Linen Square
By Kristen Mangus


MATERIALS
(Materials list may contain affiliate links to products I used to make this project. Using these links costs you nothing, but helps support GKK.)
Yarn
Medium (#4) worsted weight yarn
Red Heart Super Saver in Spring Green used in sample.
Loom
⅜” small gauge (SG) loom with at least 30 (52) pegs.
KB Flexee Loom Skinny used in sample.
Tapestry needle for weaving in ends.
ABBREVIATIONS
K = Uwrap knit
Rep = Repeat
Slwyif = Slip stitch with yarn in front
St(s) = Stitch(es)
For a refresher on loom knitting basics see the blog posts below to get started:
13 Questions for Beginner Loom Knitters
How to Loom Knit Basics
How to Loom Knit Basic Stitch Patterns
How to Loom Knit in the Round
GAUGE
17 sts x 51 rows in 4” in linen stitch pattern
SKILL LEVEL Easy
MEASUREMENTS
Option 1: 7” x 9” (18 cm x 23 cm)
Option 2: 12” x 12” (30.5 cm x 30.5 cm)
NOTES
I’ve included square sizes in this pattern that are commonly used to make blankets.
The linen stitch uses a multiple of 2 stitches and a 1 row repeat.
Cast on: I recommend the chain, long tail or true cable cast ons for this stitch pattern.
Slwyif: To slip with the yarn in front, you want the working yarn in front of the fabric but behind the peg. See the video for a quick hack to work this without moving the stitch.
INSTRUCTIONS
Cast on 30 (52) sts.
Row 1: *K1, Slwyif. Rep from * to end of row.
Rep Row 1 until piece measures 9” (12”) or until desired length.
Bind off loosely. Weave in ends and block, if desired.
Loom Knit Linen Stitch (Flat Panel) Video Tutorial
Select videos are available to GoodKnit Kisses YouTube members only. To get exclusive access to GKK VIP-only content, free PDF patterns, weekly Zoom meetup and more, sign in to YouTube and join as a VIP Member today! Find out more about GKK Membership HERE!
Right handed
Left handed
PIN IT!
2. Loom Knit the Linen Stitch In the Round
Working the linen stitch in the round is just as easy as the flat panel, but with one big difference.
Linen Stitch Details:
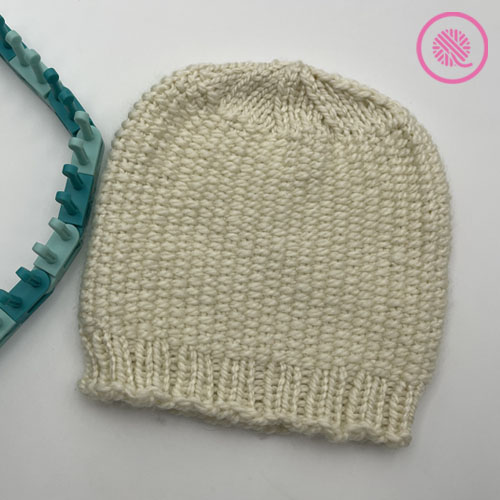
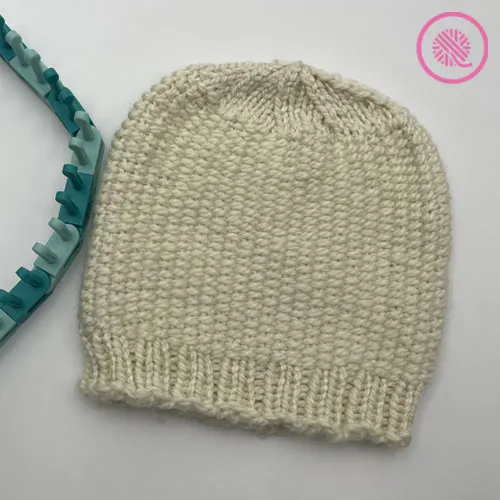
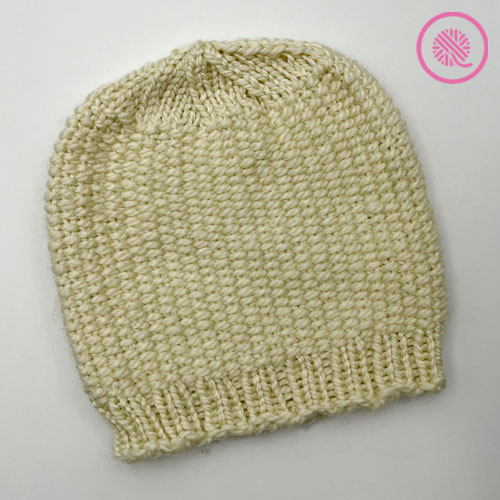
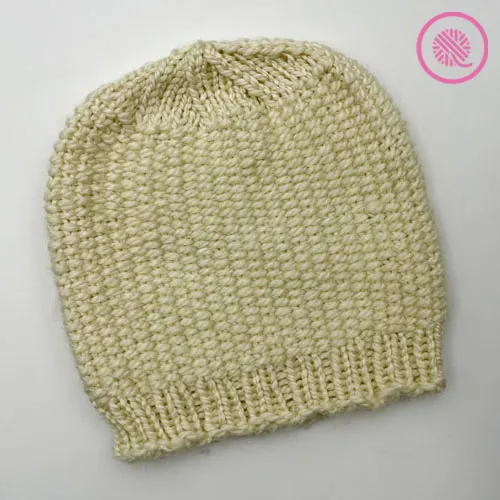
Linen Stitch Hat
By Kristen Mangus
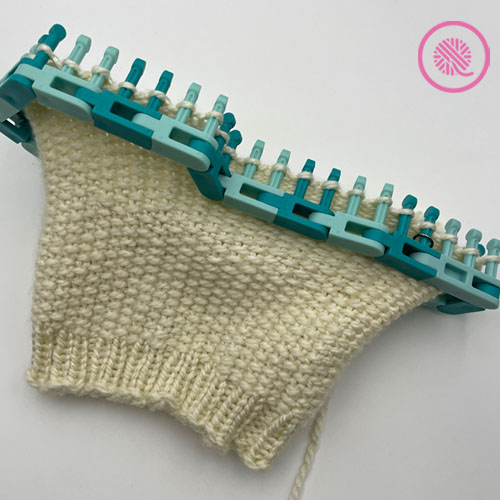
The Linen Stitch Hat features a ribbed brim, linen stitch body and optional decreased crown. It is worked in the round on an odd number of pegs.
Pattern includes written instructions for 3 sizes and links to fully captioned tutorial videos detailing the stitch pattern and decreased crown.
A downloadable PDF of this pattern is available in my Etsy store and from Ravelry at the links below:

MATERIALS
(Materials list may contain affiliate links to products I used to make this project. Using these links costs you nothing, but helps support GKK.)
Yarn
Bulky (#5) weight yarn
Loops & Threads Charisma BIG in color Off White used in sample.
Loom
⅝” large gauge (LG) loom with 33 (49, 57) pegs.
KB Flexee Loom Chunky with additional 3-peg link used in sample.
Tapestry needle for weaving in ends
8 stitch markers (for decreased crown)
ABBREVIATIONS
K = Uwrap knit
Rep = Repeat
Rnd = Round
Slwyif = Slip stitch with yarn in front
St(s) = Stitch(es)
GAUGE
11.2 sts x 30 rows in 4” in linen stitch pattern
SKILL LEVEL Easy
SIZE
Baby (Youth, Adult)
MEASUREMENTS
Circumference 11.8” (17.5”, 20.5”) [30 (44.5, 52) cm] x 6.5” (8.5”, 9”) [16.5 (21.5, 23) cm] in height
NOTES
Slwyif: To slip with the yarn in front, you want the working yarn in front of the fabric but behind the peg. See the video for the quick hack to work this without moving the stitch.
Hat is worked in the round. For right handed knitters work from right to left (clockwise); left handed knitters should work in the opposite direction (counter clockwise).
This pattern can be worked on either a fixed peg loom or an adjustable loom with a slider to decrease the number of pegs in use. Please note the special instructions for non-adjustable (fixed peg) looms.
Flexee Loom setup: Be sure to cast on so that your final 3 stitches will be on the 3-peg link. You will decrease these stitches and replace the 3-peg link before working the crown.
Shaping the top: For shaping the top of the hat Flexee Loom instructions are listed first, followed by instructions for other adjustable and non-adjustable looms.

INSTRUCTIONS
Cast on 33 (49, 57) sts and connect in the round. Place stitch marker on Peg 1 to mark beginning of round.
Hat Brim:
Sizes Baby and Adult:
Rnd 1: *K2, P1. Rep from * to end of Rnd.
Size Youth:
Rnd 1: *K2, P1. Rep from * to last st. P1.
All sizes:
Rep Rnd 1 until piece measures 1 (1.5, 1.5, 2, 2) inches [2.5 (3.75, 3.75, 5, 5) cm] or until desired length.
Hat Body in Linen Stitch:
Rnd 2: *K1, SlwyifP. Rep from * to last st. K1.
Rnd 3: *SlwyifP, K1. Rep from * to last st. Slwyfp.
Rep Rnds 2-3 until piece measures 5.5 (7, 8) inches [14 (18, 20) cm] or until desired length. End after a Rnd 2.
Non Adjustable looms only:
Continue to work the hat in linen stitch pattern for an additional .5” (1”, 1”) [1 (2.5, 2.5) cm] then work the following round:
Rnd 4: Knit until last 2 sts. K2tog.
Proceed to SHAPE TOP (Adjustable and non-adjustable looms).
All adjustable looms continue:
Rnd 4: *SlwyifP, K1. Rep from * until 2 sts rem. K2tog.
SHAPE TOP (Flexee Loom only):
DEC = Move peg 2 to peg 1 and knit together.
Using cable needle, st markers or scrap yarn remove last 2 sts from 3-peg link. Remove 3-peg link and replace with 2-peg link. Place 2 held sts back on loom.
Starting at the beginning of the round place a stitch marker every 4 (6, 7) pegs. As you work the decreases be sure to move the stitch marker as you shift stitches around your loom.
Rnd 1:*DEC. Knit 2 (4, 5) placing each st on empty peg. DEC and move to empty peg. Remove empty loom link. Knit 2, (4, 5). Rep from * around. 24 (40, 48) sts.
Rnd 2 and alt rnds: Knit.
Rnd 3: *DEC. Knit 1 (3, 4) placing each st on empty peg. DEC and move to empty peg. Remove empty loom link. Knit 1 (3, 4). Rep from * around. 16 (32, 40) sts.
Rnd 5: *DEC. Knit 0 (2, 3) placing each st on empty peg. DEC and move to empty peg. Remove empty loom link. Knit 0 (2, 3). Rep from * around. 8 (24, 32) sts. [Baby Size break yarn leaving a long tail and continue with FINISHING below.]
Rnd 7: *DEC. Knit X (1, 2) placing each st on empty peg. DEC and move to empty peg. Remove empty loom link. Knit X (1, 2). Rep from * around. X (16, 24) sts.
Rnd 9: *DEC. Knit X (0, 1) placing each st on empty peg. DEC and move to empty peg. Remove empty loom link. Knit X (0, 1). Rep from * around. X (8, 16) sts. [Youth Size break yarn leaving a long tail and continue with FINISHING below.]
Rnd 11: *DEC. Knit X (X, 0) placing each st on empty peg. DEC and move to empty peg. Remove empty loom link. Knit X (X, 0). Rep from * around. X (X, 8) sts. [Adult Size break yarn leaving a long tail and continue with FINISHING below.]

SHAPE TOP (Adjustable and non-adjustable looms):
Starting at the beginning of the round place a stitch marker every 4 (6, 7) pegs. As you work the decreases be sure to move the stitch marker as you shift stitches around your loom.
Rnd 1: *Knit 2 (4, 5), K2tog. Rep from * around. 24 (40, 48) sts.
Rnd 2 and alt rnds: Knit.
Rnd 3: *Knit 1 (3, 4), K2tog. Rep from * around. 16 (32, 40) sts.
If your loom is NOT adjustable knit one more round and continue to FINISHING below.
If working on an adjustable loom continue:
Rnd 5: *Knit 0 (2, 3), K2tog. Rep from * around. 8 (24, 32) sts. [Baby Size break yarn leaving a long tail and continue with FINISHING below.]
Rnd 7: *Knit X (1, 2), K2tog. Rep from * around. X (16, 24) sts.
Rnd 9: *Knit X (0, 1), K2tog. Rep from * around. X (8, 16) sts. [Youth Size break yarn leaving a long tail and continue with FINISHING below.]
Rnd 11: *Knit X (X, 0), K2tog. Rep from * around. X (X, 8) sts. [Adult Size break yarn leaving a long tail and continue with FINISHING below.]
FINISHING
Thread end through rem sts and draw up tightly. Fasten securely. Weave in tails.
Loom Knit Linen Stitch (Flat Panel) Video Tutorial
Select videos are available to GoodKnit Kisses YouTube members only. To get exclusive access to GKK VIP-only content, free PDF patterns, weekly Zoom meetup and more, sign in to YouTube and join as a VIP Member today! Find out more about GKK Membership HERE!
Right handed
Left handed
Tutorial Videos for the Decreased Crown
The first two videos are specifically for working the crown on the Flexee Loom. You will need to work Rnd 4 (decrease round) and replace the 3-peg link with a 2-peg link before beginning the crown. NOTE: The stitch counts and row instructions used in the video are different than the ones above for the Linen Stitch Hat but the method is the same.
The last video, the Ultimate Loom Knit Decreased Crown, shows how to work the crown on looms other than the Flexee Loom.
PIN IT!

I hope you enjoy loom knitting the linen stitch. Check out some of my other loom knit stitch patterns:
Edelweiss Stitch
Sisal and Seagrass
Tumbling Moss Blocks
Dewdrop Stitch
Diamond Lace Stitch (Mock Crochet)
Seafoam Stitch
Trinity/Raspberry Stitch
Triple Rib Stitch
Seed Stitch
Russell Schroeder
Monday 7th of February 2022
Just learning. Wish me good luck.