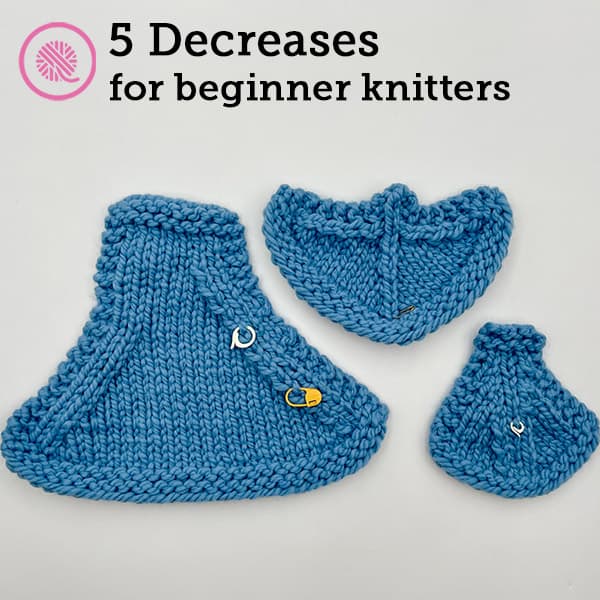

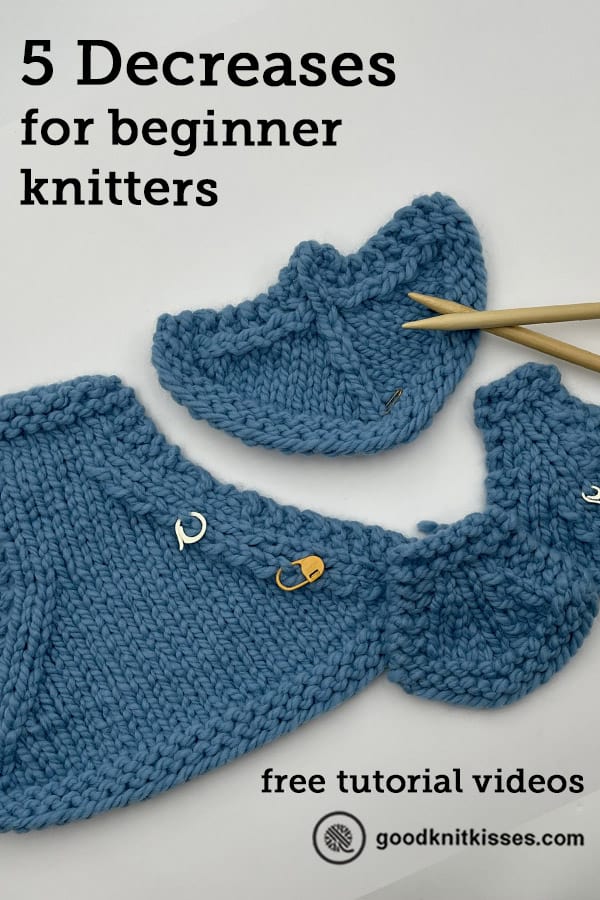
Inside: 5 decreases for beginner knitters including k2tog, ssk, k3tog, sssk and cdd. Includes tutorial video and link to free pattern.
Just like with the increases you learned in Lesson 10, the decreases shape your knitting. Designers use them to fit garments like sweaters, create unique shaped shawls or close up the big holes left by an increase when you knit lace. (As a matter of fact you often see a balanced number of increases and decreases in a row of lace knitting so the overall size stays consistent.)

These 5 decreases for beginner knitters are essential tools to add to your toolbox. So let’s jump into the lesson.
1. Decreasing by 1 Stitch (K2tog & Ssk)

when they are worked near the edge of your knitting.
The k2tog and ssk are the most common decreases for beginner knitters. Most beginner patterns that include decreases will use these two decreases. They are absolutely essential to learn.
It may seem intuitive to just knit two stitches together to decrease down to 1 stitch. But something interesting happens when you do that: the new stitch leans to the right. In order to keep decrease lines on garments symmetrical another not so intuitive decrease is needed. That’s why we also use the Ssk, or slip, slip, knit. This decrease causes the new stitch to lean to the left. As you can see in the sample above this creates a balanced look.
Let’s talk about how to make each of these decreases.
K2tog: Knit 2 together
- Decreases by 1 stitch
- Leans to the right (for right handed knitters)
- Abbreviations: k2tog, K2tog, k2 tog, K2Tog
This is the easy one! Simply put your working needle through 2 stitches as if to knit and pull the working yarn through both. Drop the 2 stitches off the non-working needle. It is just as simple as working a knit stitch.
Ssk: Slip, slip, knit
- Decreases by 1 stitch
- Leans to the left (for right handed knitters)
- Abbreviations: Ssk, ssk, SSK
The ssk takes a little more work.
- Slip: With your working needle slip the first stitch knitwise (that means put the needle into the stitch as if you are going to knit, but slide the stitch onto the working needle without knitting). This twists the stitch around so it will lean to the left.
- Slip: Next, slip the next stitch onto the working needle knitwise.
- Knit: Lastly, Put both stitches back onto the non-working needle by sliding it through the front leg of both stitches. Leave your working needle through the stitches in the back and knit both stitches together through the back loop by yarning over and pulling a new loop though both stitches. Let the 2 old stitches drop off the non-working needle.
Alternate: “Almost” Ssk
This variation on the ssk lies a little flatter than a traditional ssk.
1. Slip the first stitch knitwise and slide back onto working needle. (NOTE: This version eliminates the second slip altogether!)
2. Knit both stitches together through the back loop as you do for a traditional ssk.
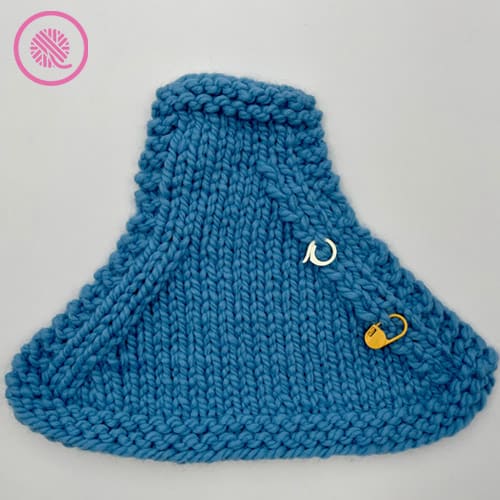
Now that you know the mechanics of working both stitches let’s take a look at how they are used. The sample above shows what these decreases look like when used on the edges of your knitting. But what if you use them in the middle?
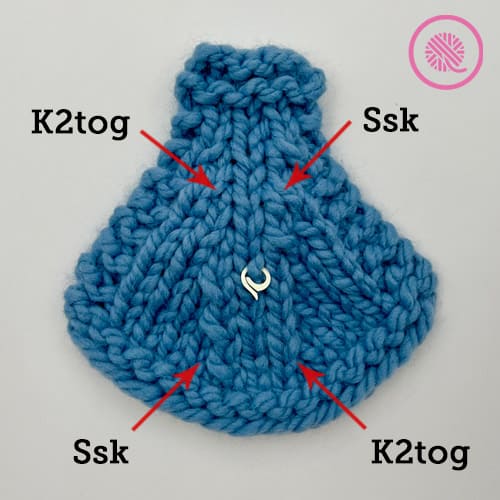
The sample below shows what happens when you use right and left leaning decreases next to a center column of knit stitches. The first half (below the white stitch marker) uses a k2tog on the right and an ssk on the left. Notice that the center column of stitches look wider. That’s because the decreases are leaning away from the middle column of stitches and create a visible ridge. The second half of the sample shows the ssk on the right and the k2tog on the left. The decreases lean toward the center column and create a smoother appearance.

I wanted to show you how the look of your knitting can change depending on where you use an ssk and a k2tog. As a beginner you’ll see them used in a variety of ways. Depending on where the designer uses them it can change the look of the finished project and I don’t want to be surprised and say, “That doesn’t look like the k2tog I know!”
2. Decrease by 2 Stitches (K3tog, Sssk, Cdd)
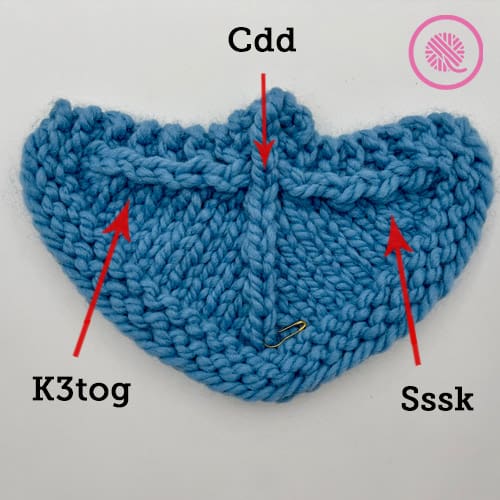
Decreasing from 3 stitches down to 1 can quickly shrink your row. This is especially useful in shawls when you want that beautiful crescent shape without too much length. There are 3 main stitches used to decrease by 2 stitches. The k3tog, sssk and the cdd.
You can probably figure out what k3tog and sssk mean. But cdd is probably a new one. It means the central double decrease. As you can see in the sample below the cdd leaves you with a straight column of knit stitches with the rows on either side leaning in toward it. It’s a beautiful design element when used in a pattern!
Let’s learn how to make these decreases for beginner knitters!

K3tog: Knit 3 together
- Decreases by 2 stitches
- Leans to the right (for right handed knitters)
- Abbreviations: K3tog, k3tog, K3Tog, k3 tog
Again, this is the easy one! Simply put your working needle through 3 stitches as if to knit and pull the working yarn through both. Drop the 3 stitches off the non-working needle. It is just as simple as working a knit stitch.
NOTE: It can be a little tight trying to work all 3 stitches together so try to work with the tips of your needles. You may need to hold the 3 stitches with your finger at the tip of your needle so they don’t slide off before you knit them.
Sssk: Slip, slip, slip knit
- Decreases by 2 stitches
- Leans to the left (for right handed knitters)
- Abbreviations: Sssk, sssk, SSSK
- Slip: With your working needle slip the first stitch knitwise
- Slip: Next, slip the second stitch onto the working needle knitwise.
- Slip: Slip the third stitch onto the working needle knitwise.
- Knit: Lastly, put all 3 stitches back onto the non-working needle by sliding it through the front leg of all stitches. Leave your working needle through the stitches in the back and knit both stitches together through the back loop by yarning over and pulling a new loop though both stitches. Let the 3 old stitches drop off the non-working needle.
Cdd: Center double decrease
- Decreases by 2 stitches
- Balanced: one stitch on either side leans inward toward the middle stitch.
- Can also be referred to as the central double decrease or centered double decrease
- Abbreviations: cdd, Cdd, CDD, S2kpo, S2kp
- Slip 2: Slip the first 2 stitches on your non-working needle knitwise. (Slip your working needle into the second stitch as if to knit and slide both stitches onto your working needle.)
- Knit: Then knit the next stitch on your non-working needle.
- Pass slipped stitches over (psso): Finally, pick up the first two stitches with the tip of your non-working needle and lift them over the stitch you knit and drop them off the working needle.
PSSO: Pass slipped stitch(es) over
Knitters use this technique in combination with other stitches. Sometimes you will see it abbreviated as psso, po or just p when added to the and of long abbreviation.
For example, the cdd can be abbreviated S2kpo. This abbreviation describes the process of S2: slip 2 stitches, K: knit 1, po: pass slipped stitches over.
Practice your decreases using Grandma’s Favorite Dishcloth pattern! This free pattern uses both increases and decreases as you knit from corner to corner.
PIN IT!

Lesson 11: Decreases for Beginner Knitters Video Tutorial
If any of the videos below do not show they may be restricted to GoodKnit Kisses YouTube members only. Find out more about GKK Membership HERE!
NOTE: This tutorial video is available for both right and left handed knitters. I tried to eliminate the use of the verbal directions right and left in the instructions, but it’s not always possible with these decreases. Since there are more right handed people in the world you will hear the decreases listed as right and left leaning. I included that information above. If you are left handed, know that if you follow the method described above and shown in the Left Handed video below your stitches will come out correctly.
Use the following timestamps in the video to help guide to the exact part of the lesson you need.
00:00:00 Welcome
00:01:41 Overview – What’s covered in this video
00:02:14 Note about Right vs Left-handed
00:03:26 Sample Setup
00:03:48 K2tog – Knit 2 together (Decrease by 1)
00:08:20 SSK – Slip Slip Knit (Dec by 1)
00:12:33 General notes Decrease 3 stitches to 1 (Dec by 2)
00:12:54 SSSK – Slip Slip Slip Knit (Dec by 2)
00:14:34 K3tog – Knit 3 together (Dec by 2)
00:16:24 CDD – Center Double Dec (Dec by 2) Aka S2KPO
00:19:04 PSSO – Pass Slipped Stitch Over – aka SKPO, Sl1k1Psso, and SKP
00:21:14 ‘Almost SSK’ – alternative to SSK
00:22:03 Reading/understanding your knitting
00:26:40 Wrap Up
Right handed
Left handed
Be sure to follow all the How to Knit for Complete Beginners Lessons.
- How to Knit – Garter Stitch for Complete Beginners includes Basic Garter Scarf pattern
- How to Knit – Purl stitch for Stockinette
- How to Knit – Stockinette with Garter Border includes Basic Bordered Dishcloth pattern
- How to Knit – Ribbing 1×1 and 2×2 includes Easy Ribbed Headband pattern
- How to Knit – Seed Stitch for Beginners includes Seed Stitch Washcloth pattern
- How to Knit – Moss Stitch for Beginners includes Moss Stitch Washcloth pattern
- How to Knit – Basketweave Stitch for Beginners includes Basketweave Cowl pattern
- How to Knit – Knitting in the Round includes Moss Cowl pattern.
- How to Knit – 5 Cast Ons for Beginners
- How to Knit – 4 Increases includes Grandma’s Favorite Dishcloth pattern
- How to Knit – 5 Decreases includes Grandma’s Favorite Dishcloth pattern
- How to Knit – Slip Stitches
Trish
Saturday 24th of April 2021
Wow! I had no idea that there were so many ways to decrease when knitting. I saw a reference to SSK in a pattern a few years ago but no explanation for that abbreviation. Not helpful so I just went on to find something else to work on. Thanks for your explanation and for this whole tutorial. You make the process of knitting fun.